|
Author
|
Message
|
|
capelo
|
|
|
Group: Forum Members
Last Active: 6 Years Ago
Posts: 279,
Visits: 4.5K
|
Ted (12/26/2019)
capelo (12/25/2019)
... If someone can give me the measurements of an original crankshaft? Thank you The standard journal specs for the 292 crankshafts are as follows. Mains – 2.4984” ±0.0004” Rods – 2.1884” ±0.0004” It’s always recommended to install the bearings in their respective bores and then check those I.D. dimensions to insure that the oil clearance values will be in the ball park. My preference is to take those installed bearing dimensions and then grind the crankshaft accordingly for the desired oil clearance. Checking all the bearing thicknesses with a ball micrometer also helps to insure that all the bearings are indeed the same. The crankshaft can be ground either smaller or bigger than spec to get the desired clearance and that’s simply due to the different variances working against you. When the various component dimensions vary to the extreme positive or extreme negative, bearing clearances can be either too tight or too loose if relying simply on the standard based values. Bearing thicknesses due to manufacturing variances are the major culprit here when the machine work is within specs. thanks i take note
|
|
|
|
|
capelo
|
|
|
Group: Forum Members
Last Active: 6 Years Ago
Posts: 279,
Visits: 4.5K
|
|
|
|
|
|
KULTULZ
|
|
|
Group: Forum Members
Last Active: 2 days ago
Posts: 1.9K,
Visits: 306.4K
|
Those are reman conn rods. They will be exchange meaning they will want the old rods. You posted your current rods are at a local machine shop now?
____________________________
|
|
|
|
|
capelo
|
|
|
Group: Forum Members
Last Active: 6 Years Ago
Posts: 279,
Visits: 4.5K
|
KULTULZ (12/27/2019)
Those are reman conn rods. They will be exchange meaning they will want the old rods. You posted your current rods are at a local machine shop now? it seems that they don't ask for some in return, that was an option, in case the problem is not solved in the rectification workshop
|
|
|
|
|
capelo
|
|
|
Group: Forum Members
Last Active: 6 Years Ago
Posts: 279,
Visits: 4.5K
|
at what diameter did this hole pierce? it is now 0.060" 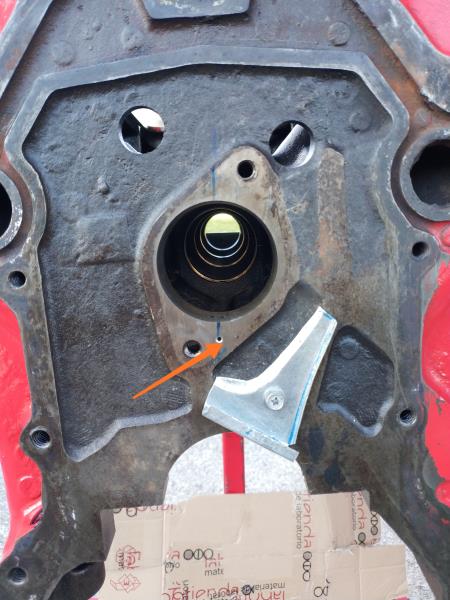
|
|
|
|
|
Ted
|
|
|
Group: Administrators
Last Active: 37 minutes ago
Posts: 7.6K,
Visits: 206.0K
|
That hole sizing is fine but don’t go any larger than that. The oil flow can be further reduced by the size of groove you put in the back of the cam thrust plate.
  Lorena, Texas (South of Waco) Lorena, Texas (South of Waco)
|
|
|
|
|
capelo
|
|
|
Group: Forum Members
Last Active: 6 Years Ago
Posts: 279,
Visits: 4.5K
|
Ted (1/1/2020)
That hole sizing is fine but don’t go any larger than that. The oil flow can be further reduced by the size of groove you put in the back of the cam thrust plate. Ok thanks
|
|
|
|
|
capelo
|
|
|
Group: Forum Members
Last Active: 6 Years Ago
Posts: 279,
Visits: 4.5K
|
I'm having trouble removing these two plugs, any suggestions? thanks 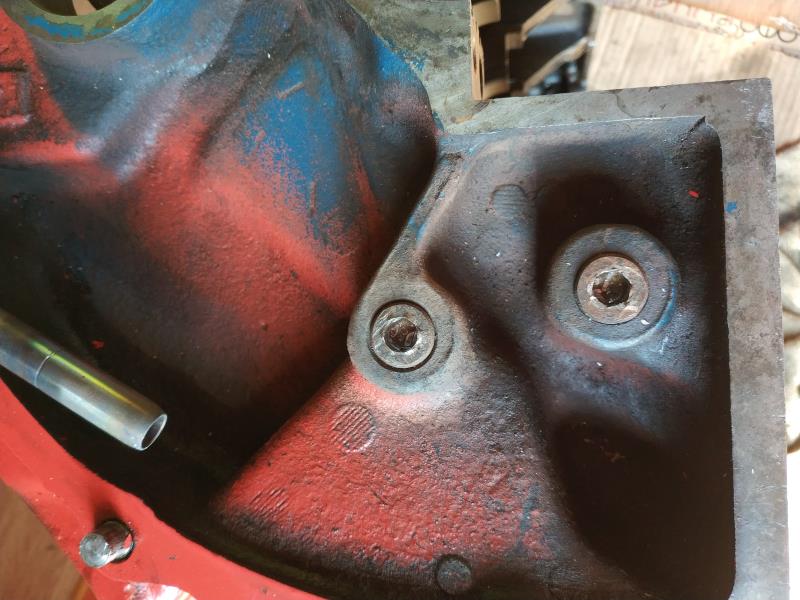
|
|
|
|
|
NoShortcuts
|
|
|
Group: Forum Members
Last Active: 3 Years Ago
Posts: 1.4K,
Visits: 179.6K
|
Capelo. From John Mummert's web site, topic 'Y-BLOCK TECHNICAL INFORMATION', under 'Y-Block assembly errors' . . .Oil gallery plugs. Remove all oil plugs and the oil filter adapter before having your block hot tanked. I’ve had the best luck by drilling out the center of the oil plug, leaving the hex. After heating the plugs with a torch they come right out. I have never damaged a block using this method. Hope this helps!  NoShortcuts
a.k.a. Charlie Brown
near Syracuse, New York
|
|
|
|
|
capelo
|
|
|
Group: Forum Members
Last Active: 6 Years Ago
Posts: 279,
Visits: 4.5K
|
NoShortcuts (1/5/2020)
Capelo. From John Mummert's web site, topic 'Y-BLOCK TECHNICAL INFORMATION', under 'Y-Block assembly errors' . . .Oil gallery plugs. Remove all oil plugs and the oil filter adapter before having your block hot tanked. I’ve had the best luck by drilling out the center of the oil plug, leaving the hex. After heating the plugs with a torch they come right out. I have never damaged a block using this method. Hope this helps! thanks torch I have already used but without results, I missed the head of the cap is round, I have to try to drill ...
|
|
|
|