Profile Picture

Adding a Post

Posted By grovedawg 14 Years Ago
Rated 5 stars based on 1 vote.
Author
Message
grovedawg
Posted 14 Years Ago
View Quick Profile
Supercharged

Supercharged (256 reputation)Supercharged (256 reputation)Supercharged (256 reputation)Supercharged (256 reputation)Supercharged (256 reputation)Supercharged (256 reputation)Supercharged (256 reputation)Supercharged (256 reputation)Supercharged (256 reputation)

Group: Forum Members
Last Active: 12 Years Ago
Posts: 246, Visits: 622
I thought I would just start a new thread and document the process that I went through to add posts to my unposted EZG-G heads.  I appreciate everyones input, and advice on how to do this.  I decided to follow the John Method (handed down from Jerry Christensen) vs. The Hoosier Hurricane's method.  I'm sure both would work perfectly, but something about bringing the post from the top down, and leaving the deck surface unmarred seemed more appealing to me.  Thanks agian for everyone's input and help.  So here goes nothing:

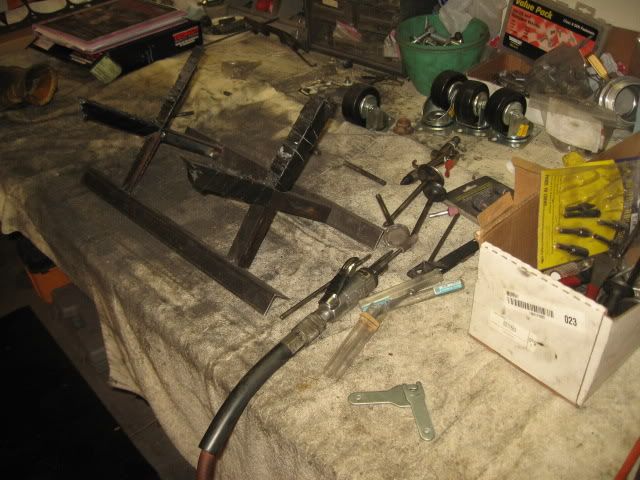
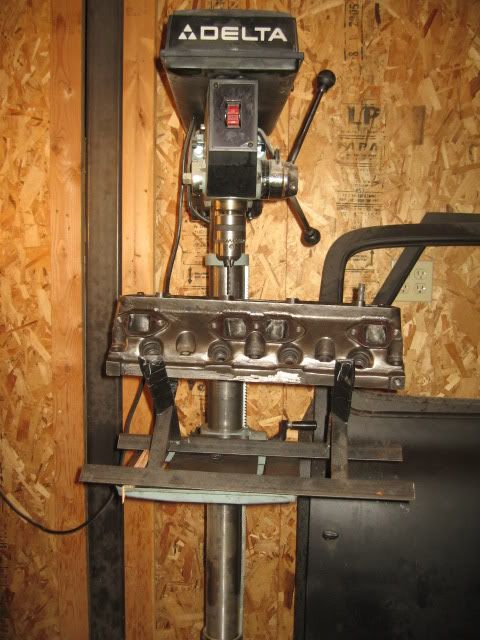
If you haven't already made something like this to work on your heads then do it NOW! This stand is a life-saver!

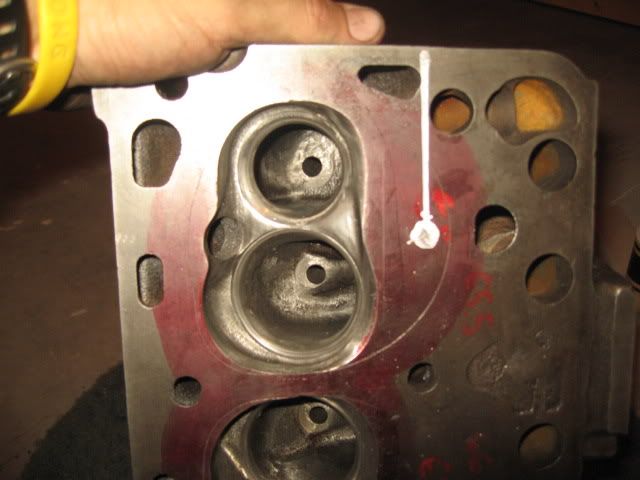
The first step I took was to locate the placement for the modified post.  I marked it with a rather nice large white dot.  Like so (If you notice I used layout die and a scribe to mark the edges of the combustion chamber):

I then brought a verticle line from where I wanted to locate the hole in the rocker stand through to the base of the head (it matched up with the line I marked through the bottom  of the head ):

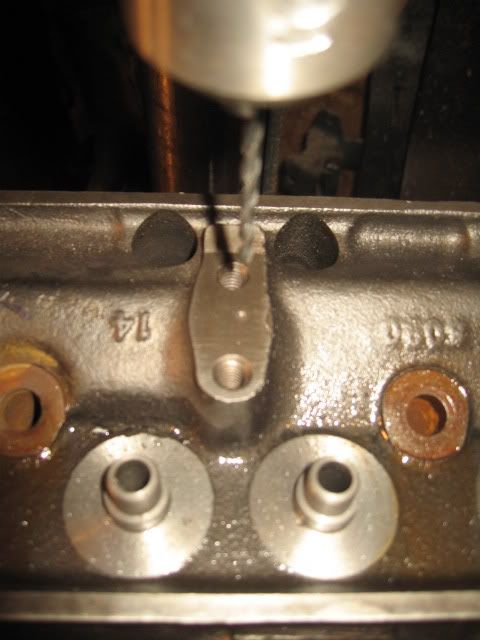
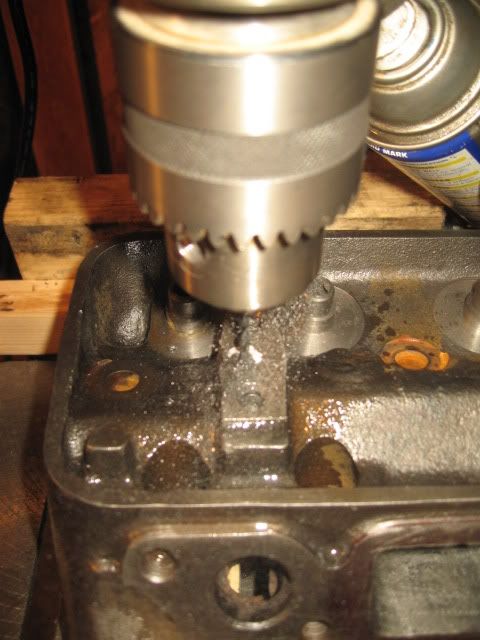
I then used a punch to locate where I would begin my pilot hole.  This was the beginning of my stress- to locate the hole accurately.  You'll see in the next pictures why it's offset to the side slightly (to clear the intake runner just below the rocker arms:

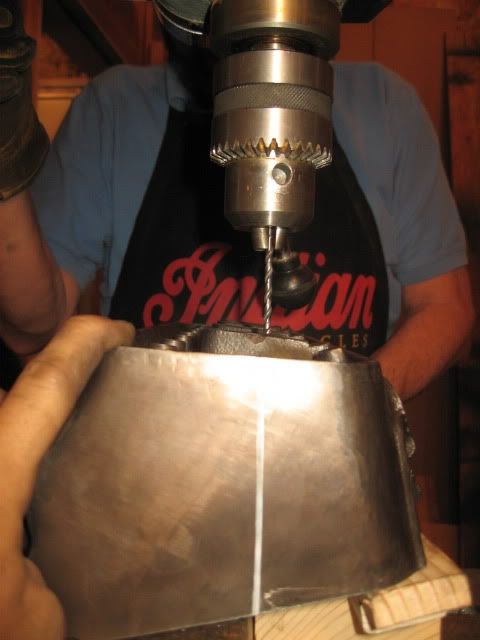
You'll notice the sweet Puerto-Rican-lashing of a drill press we have, with a modified stand.  Real high-tech in my garage. Smile But, I shimmed it slightly on one side (just barel not level) to add an additional angle to my pilot hole to ensure that I would miss the intake runner (Probably isn't necessary if you ensure the you drill straight down):

Here was the moment of truth.  The "I hope I don't really just %$*@#:"^<@# these heads that I've put sooo much work into" moment.  The first pilot hole:


Heber City, UT (15 mins outside of Park City- basically it's in the mountains)

55 Effie

grovedawg
Posted 14 Years Ago
View Quick Profile
Supercharged

Supercharged (256 reputation)Supercharged (256 reputation)Supercharged (256 reputation)Supercharged (256 reputation)Supercharged (256 reputation)Supercharged (256 reputation)Supercharged (256 reputation)Supercharged (256 reputation)Supercharged (256 reputation)

Group: Forum Members
Last Active: 12 Years Ago
Posts: 246, Visits: 622
Next I enlarged the hole to 3/8 of an inch to prep it for the tap.  I wanted to tap it to 7/16th's:

In this next picture you can see to the right of the drill bit the outer edge of the intake runner.  The cause of all my anxiety!!!!  On the first post I drilled a little too close and had to grind the threads off the all-thread rod to get it past the runner.  From then on I added shims to offset the angle OUT from this edge and never had any trouble again:

It has also been suggested (and I did this) to bring the drill to the floor of the water chamber and "kiss" the surface to prep it for the bolt.  A better "landing" surface for the new post.  Next came the tap.  Again, I chose to use a 7/16th's tap.  But John has also said that a 1/2" will also work. 

Then I screwed in the all-thread rod to see how it came out with clearances and what not.  I went in like a charm was almost perfectly aligned with where I wanted it to be.

Because the post was a little close to the intake runner I ground off the bottom threads.  and cut it to be drilled in the whole. It looked like this right before I JB Welded it in the whole. 

With a cut-off wheel I cut a grooved into the top of the all thread rod so that I could then screw it in with a straight edge screw driver.  I mixed my JB Weld, smeared it around the top where it would adhere to the rocker stand.  Put a healthy little dab on the bottom to fuse with the bottom of the chamber. And presto!  There she goes!

The final touch was to wait 10 minutes or so for the JB weld to harden, and cut off the top.  I carefully cleaned up the top of the rocker stand.  And now I have posted heads!


Heber City, UT (15 mins outside of Park City- basically it's in the mountains)

55 Effie

Ted
Posted 14 Years Ago
View Quick Profile
Co-Administrator

Co-Administrator (12.5K reputation)Co-Administrator (12.5K reputation)Co-Administrator (12.5K reputation)Co-Administrator (12.5K reputation)Co-Administrator (12.5K reputation)Co-Administrator (12.5K reputation)Co-Administrator (12.5K reputation)Co-Administrator (12.5K reputation)Co-Administrator (12.5K reputation)

Group: Administrators
Last Active: 2 days ago
Posts: 7.2K, Visits: 202.6K

Thanks for taking the time to document this as a step by step procedure.  Great ‘post’ and good information.

Lorena, Texas (South of Waco)


DANIEL TINDER
Posted 14 Years Ago
View Quick Profile
Supercharged

Supercharged (2.2K reputation)Supercharged (2.2K reputation)Supercharged (2.2K reputation)Supercharged (2.2K reputation)Supercharged (2.2K reputation)Supercharged (2.2K reputation)Supercharged (2.2K reputation)Supercharged (2.2K reputation)Supercharged (2.2K reputation)

Group: Forum Members
Last Active: 2 days ago
Posts: 1.6K, Visits: 124.8K
I'll second that. Doesn't get much better.

6 VOLTS/POS. GRD. NW INDIANA
aussiebill
Posted 14 Years Ago
View Quick Profile
Supercharged

Supercharged (2.6K reputation)Supercharged (2.6K reputation)Supercharged (2.6K reputation)Supercharged (2.6K reputation)Supercharged (2.6K reputation)Supercharged (2.6K reputation)Supercharged (2.6K reputation)Supercharged (2.6K reputation)Supercharged (2.6K reputation)

Group: Forum Members
Last Active: 4 Years Ago
Posts: 1.8K, Visits: 11.4K
Ted (7/29/2010)

Thanks for taking the time to document this as a step by step procedure.  Great ‘post’ and good information.


DAWG, you asked the questions like many but had the enthusiam to have an educated go at doing it, and also the goodness to help educate others, like ted and others said, Good job!Tongue


yyy

  AussieBill            YYYY    Forever Y Block     YYYY

 Down Under, Australia

Glen Henderson
Posted 14 Years Ago
View Quick Profile
Supercharged

Supercharged (1.8K reputation)Supercharged (1.8K reputation)Supercharged (1.8K reputation)Supercharged (1.8K reputation)Supercharged (1.8K reputation)Supercharged (1.8K reputation)Supercharged (1.8K reputation)Supercharged (1.8K reputation)Supercharged (1.8K reputation)

Group: Forum Members
Last Active: 8 Years Ago
Posts: 1.4K, Visits: 7.5K
Good job dawg and great tech. Write it up and send it to Bruce Young, he is always looking for good tech stuff to publish and it will help those Y blockers that don't visit the site but get Y Block Magazine.

Glen Henderson


Freedom is not Free

Letohatchee, AL
grovedawg
Posted 14 Years Ago
View Quick Profile
Supercharged

Supercharged (256 reputation)Supercharged (256 reputation)Supercharged (256 reputation)Supercharged (256 reputation)Supercharged (256 reputation)Supercharged (256 reputation)Supercharged (256 reputation)Supercharged (256 reputation)Supercharged (256 reputation)

Group: Forum Members
Last Active: 12 Years Ago
Posts: 246, Visits: 622
Glen Henderson (7/29/2010)
Good job dawg and great tech. Write it up and send it to Bruce Young, he is always looking for good tech stuff to publish and it will help those Y blockers that don't visit the site but get Y Block Magazine.


How do I send it to him/contact him?

Heber City, UT (15 mins outside of Park City- basically it's in the mountains)

55 Effie
Glen Henderson
Posted 14 Years Ago
View Quick Profile
Supercharged

Supercharged (1.8K reputation)Supercharged (1.8K reputation)Supercharged (1.8K reputation)Supercharged (1.8K reputation)Supercharged (1.8K reputation)Supercharged (1.8K reputation)Supercharged (1.8K reputation)Supercharged (1.8K reputation)Supercharged (1.8K reputation)

Group: Forum Members
Last Active: 8 Years Ago
Posts: 1.4K, Visits: 7.5K
Bruce Young

PO Box 1005

Ottawa, IL 61350

email: yblockmag@yahoo.com

HM phone (815) 433-1393 (07:30-08:00, Sat 08:00-09:00)

Glen Henderson


Freedom is not Free

Letohatchee, AL

mctim64
Posted 14 Years Ago
View Quick Profile
Supercharged

Supercharged (2.6K reputation)Supercharged (2.6K reputation)Supercharged (2.6K reputation)Supercharged (2.6K reputation)Supercharged (2.6K reputation)Supercharged (2.6K reputation)Supercharged (2.6K reputation)Supercharged (2.6K reputation)Supercharged (2.6K reputation)

Group: Forum Members
Last Active: 5 Years Ago
Posts: 2.4K, Visits: 5.0K
Wow!  I'll go along with the others, Nice job and great documentation.  Do send it to Bruce, you'll get your Mag quicker also if he publishes your article. Wink

Also the port and pocket work looks very good.

http://forums.y-blocksforever.com/uploads/images/b1f2e0d6-2566-46b3-b81d-3ff3.jpg   God Bless. Smile  Tim                           http://yblockguy.com/

350ci Y-Block FED "Elwood", 301ci Y-Block Unibody LSR "Jake", 312ci Y-Block '58 F-100, 338ci Y-Block powered Model A Tudor

tim@yblockguy.com  Visalia, California    Just west of the Sequoias


grovedawg
Posted 14 Years Ago
View Quick Profile
Supercharged

Supercharged (256 reputation)Supercharged (256 reputation)Supercharged (256 reputation)Supercharged (256 reputation)Supercharged (256 reputation)Supercharged (256 reputation)Supercharged (256 reputation)Supercharged (256 reputation)Supercharged (256 reputation)

Group: Forum Members
Last Active: 12 Years Ago
Posts: 246, Visits: 622
Thanks again for the support guys. I still look up to a lot of you for the information you guys know and are willing to give out! I just thought take some pics of what you told me to do! BigGrin

Heber City, UT (15 mins outside of Park City- basically it's in the mountains)

55 Effie


Reading This Topic


Site Meter