|
Author
|
Message
|
|
Daniel Jessup
|
|
|
Group: Forum Members
Last Active: 3 days ago
Posts: 2.0K,
Visits: 131.1K
|
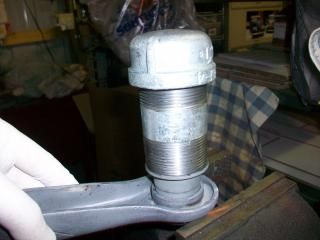
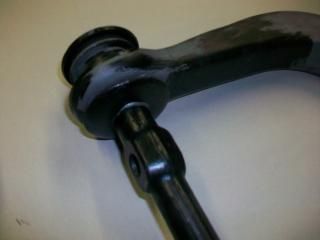
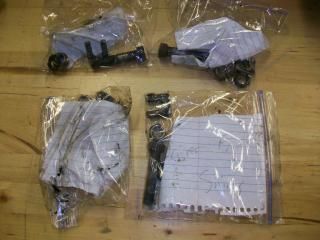
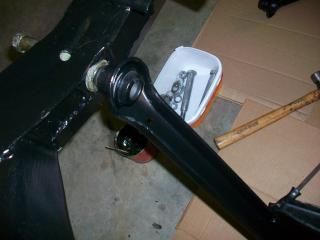
It has been some time since my last post, but I have good reason - believe me. There are things more important than our cars, that's for sure. However, the time I can spend in the shop is a good opportunity to meditate, relax, and unwind after dealing with so many people all day long and helping them with their problems. I have been known to crank up a good southern gospel music CD or even one my favorite sermons from a preacher of yesteryear and have at in the garage with all the work (er, fun). Back to our blog After the cross member was welded up by my friend Mike, I decided to smooth it up a bit and paint it with 3 coats of Rustoleum. I like the semi-gloss sheen on the frame and will use that for the sub assemblies as well. 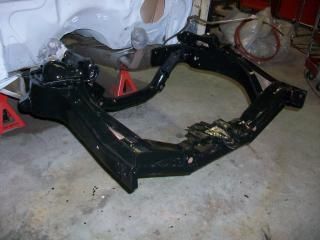  I finally got back in the shop last night after spending a few weeks with other priorities. First up was the steering gear box and the rebuild. I had all of the parts I needed. The worm gear on the shaft was a used unit I found, but it was very near pristine on the grooves and fit perfectly. The bearings were already in good shape so I cleaned and kept those. I ordered a new seal for the sector shaft that holds the pitman arm. I got it from fleabay for something like $4 shipped and the thing fit very, very well. It was a US brand name seal, but memory fails me at the moment to tell you which one. 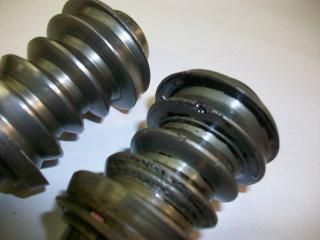 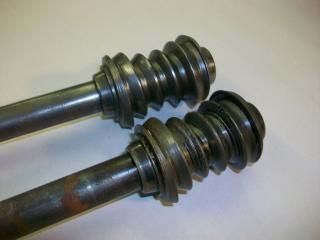 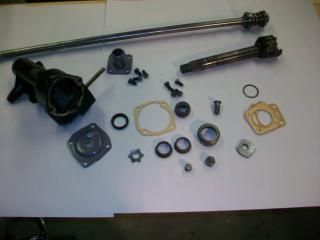 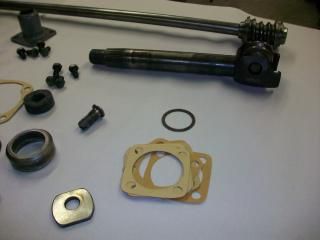 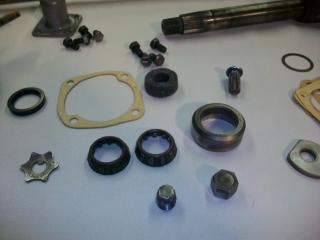   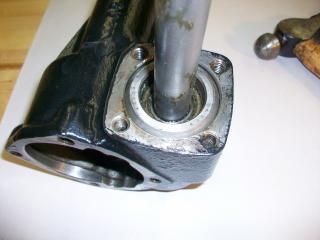 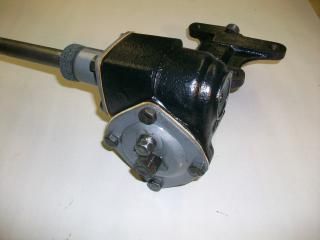 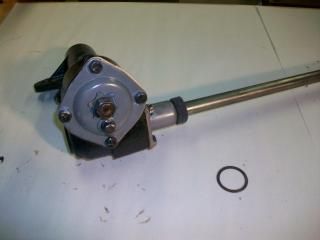 When I got it all completed, I was scratching my head over an "extra" part that I did not recall. After a few minutes it dawned on me that the large washer was actually the keeper for the original rubber seal for the sector shaft. I had forgotten that the seal was actually two pieces, so that large washer was obviously not need because the new seal was now one piece. The shim pack was interesting to deal with. I looked at the original number and thickness of the shims that were installed originally and I tried to install new shims that were an exact match. After torqueing down the bolts I spun the steering shaft and thought it seemed loose. As a matter of fact it was so loose that it actually had a little but of runout (vertically). "Well that can't be right," I muttered. After I looked at it crosseyed for a moment... "Hey bonehead! The replacement worm gear - that's what making the difference here." So I removed one of the original 3 shims and just checked to see what would happen if there were no shims.... TIGHT as it could be! No wonder there is a little frustration over getting the pre-load right. I guess it is a little tricky. I went through my pack of shims and just kept working on it until I found 3 that didn't have any play on the runout vertically but still kept it spinning "right"... now, what "right" actually is, I have no way of knowing. Someone had suggested using Ford's shop manual for the load, but that is with the leverage of the steering wheel. And... I don't have a torque wrench that goes to a very small inch/pounds. I guess I need a spring scale anyway. However, I would like to get this right on the bench before install... any ideas? I greased the gears up pretty good and wrapped it all in plastic until it is installed. I have gear oil for it 80w90. While I was at it I decided to put together the drag link. It was already in good shape - it just needed to be cleaned up. 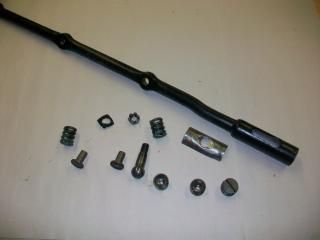 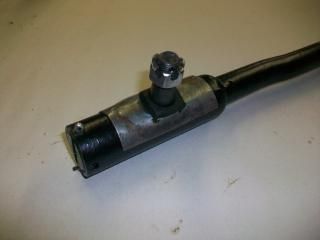 Things were going so well I decided to tempt fate and dismantle both upper control arms. I needed heat on one occasion but things went reasonably well. Again, some of the rubber was about ready to disintegrate so it was a no brainer to replace all of this stuff up front. 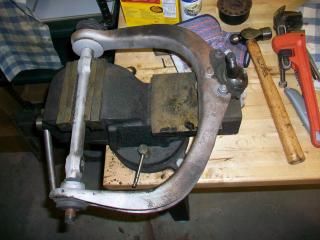  For those of you that really know your stuff.. yes there are 3 large washers per upper arm. The third is in the box.
Daniel JessupLancaster, California aka "The Hot Rod Reverend" 
check out the 1955 Ford Fairlane build at www.hotrodreverend.com
|
|
|
|
|
Daniel Jessup
|
|
|
Group: Forum Members
Last Active: 3 days ago
Posts: 2.0K,
Visits: 131.1K
|
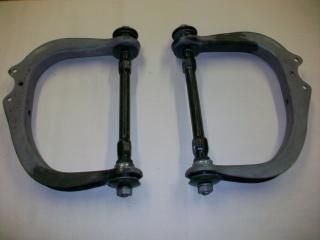
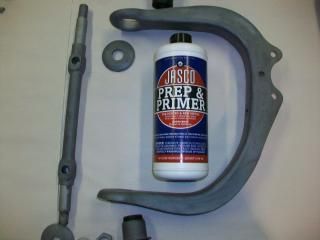
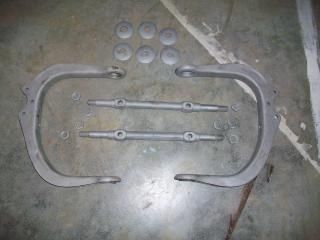
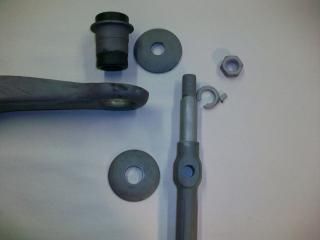
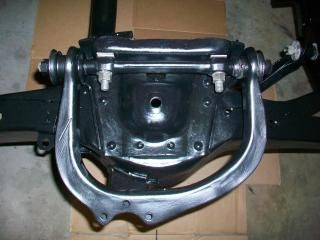
I had a little time to hit the shop again today and I was able to get the upper control arms all back together and ready for paint.
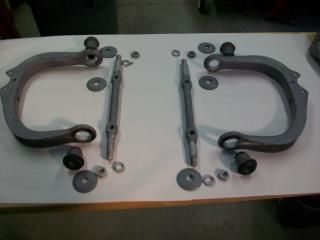 
I blasted them in the cabinet and then coated them with the solution you see pictured. It is an off the shelf product from Lowe's. It took some time to dry, but that could be because of the lower temperatures at this time of this year.
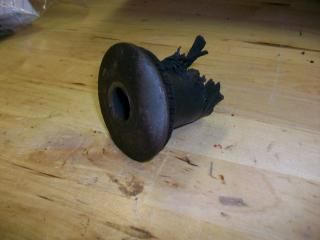
After that I fitted the rear bushings to both control arms. The rear bushing is the one with the "step" that will stop you from driving it all the way to the lip. I advise you to be careful if you ever replace your bushings... that step on the bushings I had did not look too pronounced. It looked more like a "line" drawn around the circumference of the bushing.
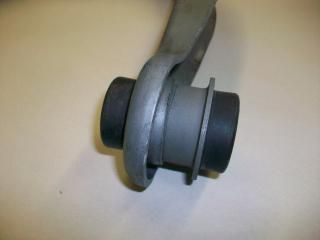
Since I don't have a press, I decided to drive the bushings home with some pipe that fit just over the rubber, but met the lip of the bushing head - on. 1 and 1/2 inch pipe is what I used. It worked very well as you can see and I simply placed the arm on the vise and hammered each bushing home. I did do some preliminary painting to a few parts, but that was just so when I painted after they were assembled I could already have paint in those hard to reach areas. Also, beating and banging with a hammer on anything painted is going to mar it up big time.
I used some anti-seize on the shafts and the threads, but I was able to reuse all of the hardware. You can probably see that one of the old lock washers were broken - that was replaced from my hardware stash. Also, of the 3 washers that pertain to each control arm, one of them is larger than the other two. The larger one goes on the inside of the control arm at the rear after you slide the washer on the shaft. The other two washers go on the outside of the control arm on either side of course. One note here... the control arm is "springy" - in other words you can't get the second bushing on by simply "tightening down" the busing on the shaft using the threaded stud because the arm will bend with it. Both bushings have to be either pressed on or hammered on like I did.
I plan to paint them pretty soon, and I have started on the lower control arms with clean up. My sandblaster went out on me the other day because of the "el-cheapo" dead man valve so I am having to put those in the glassbead cabinet. The lower control arms are in a whole lot worse cosmetic shape than the upper control arms were. The passenger side arm is clean, blasted, and was just coated with the Prep Primer tonight.
On we go.
Daniel JessupLancaster, California aka "The Hot Rod Reverend"
check out the 1955 Ford Fairlane build at www.hotrodreverend.com
|
|
|
|
|
Daniel Jessup
|
|
|
Group: Forum Members
Last Active: 3 days ago
Posts: 2.0K,
Visits: 131.1K
|
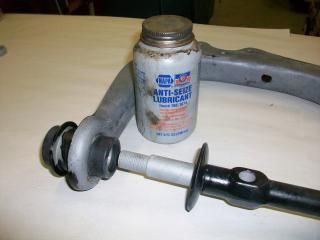
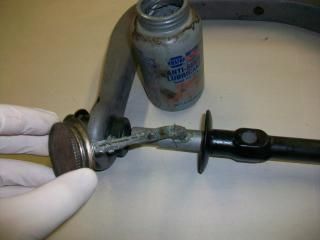
For all of the success I have had, I did experience a "DUH!" moment last night when I was installing the bushings in the lower control arms. Note the photos... Maybe it was because it was thanksgiving week and I was distracted with deer hunting, smoking a turkey, having folks in, baking all kinds of food with the wife, Christmas decorations, blah, blah, blah. I don't know. The 55 Ford shop manual is a tick misleading when you look a the diagram. It shows the lower control arm bushing coming in from the front side, but if you look at it closely in the manual you can see a faint, dashed line, showing insertion from the BACK! Yep, I didn't catch all of this until I had fully seated the first bushing!!! When you do these, remember that both bushings, front and rear, are installed from the INSIDE of the arm facing out.... the large cupped washer should compress up against the rubber that is on the lip side of the bushing. 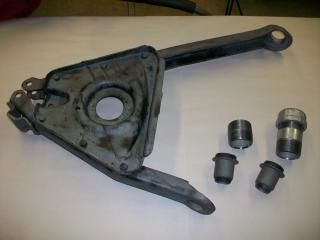  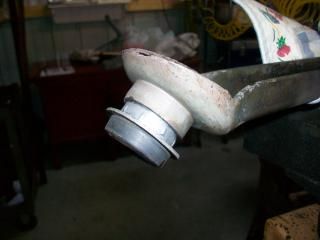 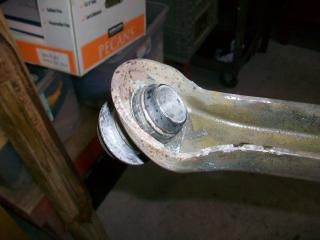 How I ended up getting that bushing back out of there without damaging it, I do not know. Patience and Henry Ford's spirit  I guess... 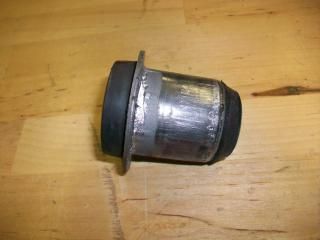 Here are a couple of photos of the CORRECT installation 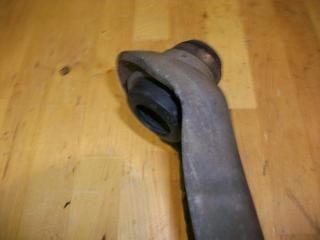 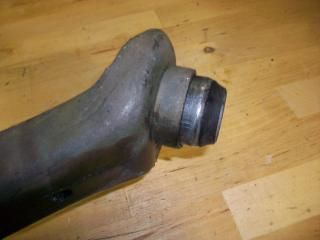 The other bushings and the other control arm all went well so we are about ready for paint. I did have to weld a nut onto the other control arm, but that was really a piece of cake. I will post photos later. I am about ready to clean up the spindles and start installing some of these items back on the frame. It will feel good to do that soon. Pilgrim's Progress lol...
Daniel JessupLancaster, California aka "The Hot Rod Reverend"
check out the 1955 Ford Fairlane build at www.hotrodreverend.com
|
|
|
|
|
Daniel Jessup
|
|
|
Group: Forum Members
Last Active: 3 days ago
Posts: 2.0K,
Visits: 131.1K
|
|
|
|
|
|
lyonroad
|
|
|
Group: Forum Members
Last Active: 11 Years Ago
Posts: 703,
Visits: 3.1K
|
Daniel Jessup (11/29/2014)
For all of the success I have had, I did experience a "DUH!" moment last night when I was installing the bushings in the lower control arms. Note the photos... Maybe it was because it was thanksgiving week and I was distracted with deer hunting, smoking a turkey, having folks in, baking all kinds of food with the wife, Christmas decorations, blah, blah, blah. I don't know. The 55 Ford shop manual is a tick misleading when you look a the diagram. It shows the lower control arm bushing coming in from the front side, but if you look at it closely in the manual you can see a faint, dashed line, showing insertion from the BACK! Yep, I didn't catch all of this until I had fully seated the first bushing!!! When you do these, remember that both bushings, front and rear, are installed from the INSIDE of the arm facing out.... the large cupped washer should compress up against the rubber that is on the lip side of the bushing. Daniel, I came across this issue as well when I was redoing my front end on my '55 Club Sedan. When I disassembled the front suspension the bushings were installed as you have yours now. However the shop manual p.274 says "On the Thunderbird, the front bushing is pressed in from the inside of the lower front leg. On all other cars, the front bushing is pressed in from the outside of the leg." I raised this discrepancy on the forum, wondering if there was a typo in the shop manual. Some of the boys from Australia said that they had always seen the bushings pressed in from the inside in all cases. Another member of this forum advised that the '56 Shop manual does not have this note. Then came the revelation: Jimz Bird posted the following notification from Product Service Letter P-235: "A COMPILATION of PRODUCT SERVICE LETTERS" which is a publication from CTCI. This may clarify the bushing install.Product Service Letter P-235 Items 1002-1014
February 21, 1955 Item 1005 FRONT SUSPENSION (1955 Car and Thunderbird) A double-shoulder front suspension lower arm mounting bolt bushing (B4A-3069-D) was released for the 1955 car
and Thunderbird. However, this bushing was not used in production. The bushing
(B4A-3069-C) now being used in production has a single shoulder and was used in late
1954 production. The removal and installation procedures in the 1955 Ford Car Shop Manual
are for the double-shoulder bushing. Please make the following correction
Page 274 of the shop manual to cover the single shoulder bushing.
On fig. 8, change Detail #5 to Detail #13. Cross out the note concerning Detail #6.
Rewrite the second paragraph fig. 9 to read as follows:
“On the Thunderbird and all car models, the front bushing is pressed in from the
inside of the lower arm front leg.” In fig. 9, cross out the note concerning Detail #6.
I have taped a copy of this correction in my shop manual.
Hope this clears things up for you and others who follow.
Mark
1956 Mercury M100
1955 Ford Fairlane Club Sedan
Delta, British Columbia
|
|
|
|
|
Daniel Jessup
|
|
|
Group: Forum Members
Last Active: 3 days ago
Posts: 2.0K,
Visits: 131.1K
|
Thank you Mark -- no wonder I was confused. I did kick myself though because I did take photos of the disassembly and should have seen it.
Daniel JessupLancaster, California aka "The Hot Rod Reverend"
check out the 1955 Ford Fairlane build at www.hotrodreverend.com
|
|
|
|
|
Daniel Jessup
|
|
|
Group: Forum Members
Last Active: 3 days ago
Posts: 2.0K,
Visits: 131.1K
|
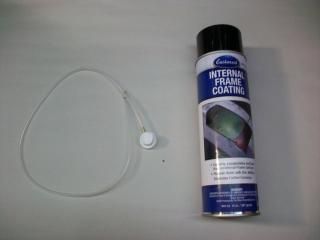
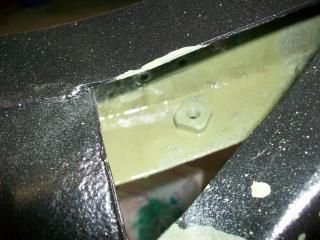
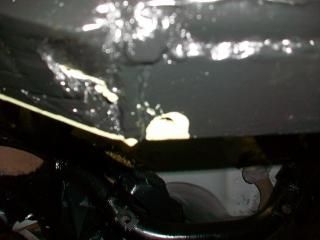
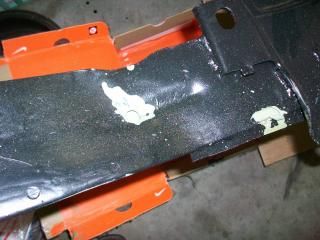
Well the Christmas and New Year's Holiday was good - we had an excellent time with our kids, and a lot of in laws and out laws showed up. I had planned to spend some time in the shop since I would have a few more days off for Christmas but my plans were made in vain. I looked at my calendar and most recent post... it has been well over a month since I have accomplished anything out there. Anyhow, I decided to fire up the diesel "turbo" heater in the garage (you know the kind - it sounds like a jet aircraft taking off and when you run cheap fuel in it you gag over the fumes ). I have owned the one I have for 5 years. I believe it is 210K BTU and all if you run the higher pressure. Over the past 5 years - no problems... until tonight. I hit the switch and the spark plug makes it usual noise, then the fan and fuel pump engage, but no FIRE... when I look inside the cavity--- there is raw fuel on the bottom and it eventually runs out and down the side of the tank. What gives? I thought "Well, that's probably the fuel being sprayed that would not ignite so where else could it go?" I look at the display panel on the side of the unit and wouldn't you know it, the panel reads "E1". I get out the trusty manual and it looks like it could be a dirty photocell that needs to be cleaned off. No biggie. I take off the top cover of the tube and have a "look see". I was shocked at the condition of the two fuel hoses - no wonder the thing was leaking fuel. I took pictures of the hoses and posted them below. Dry rot central. I have never seen rubber hoses go so bad in only 5 years and with very limited use at that. I guess I should have inspected under the cover each year before firing it up just to check on things, but there never has been a problem with this thing and I keep it very clean. Word to the wise if you own one of these units - the manufacturer uses CHEAP hoses and get this... NO CLAMPS!!! on a fuel pump that runs 8 psi!!!. I looked through my bins and found two, new, fuel injection, automotive grade hoses to install. Much more rigid and probably overkill. Suffice to say, the unit fired right up when I put it all back together and we were ready for action. 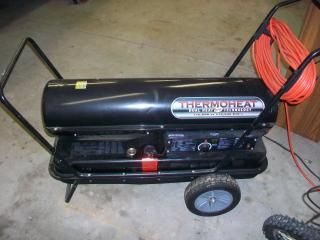 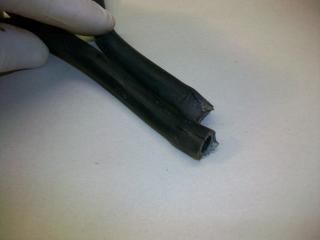 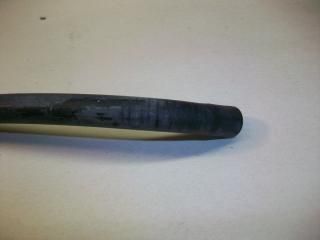 After the garage warmed up a bit, I decided to drill the drain holes for the front cross member and take a look at the Internal Frame Coating product from Eastwood (is it a 14 oz load of crap or is it the real deal? - I have no idea). Anyway, the idea is that the long narrow hose attaches to the aerosol can and using the 3 hole tip on the end, the user can slide the hose into the frame and coat the interior walls of the frame as he pulls the hose back out while he is spraying. Let me tell you that if you have any notion to use this kind of product, be prepared for a mess!  I believe it worked well. As you can see from the photos, I did enough heavy coats to have the product coming out the drain holes of the cross member. It was messy enough that I need to go back and repaint the satin black on parts of the frame, but that's no bid deal. This cross member is going to out last my lifetime that is for sure! I already have the upper and lower control arms painted so we are getting close to beginning reassembly. I need to get the car rolling again so that I can move it in and out of the shop for body work. I believe it worked well. As you can see from the photos, I did enough heavy coats to have the product coming out the drain holes of the cross member. It was messy enough that I need to go back and repaint the satin black on parts of the frame, but that's no bid deal. This cross member is going to out last my lifetime that is for sure! I already have the upper and lower control arms painted so we are getting close to beginning reassembly. I need to get the car rolling again so that I can move it in and out of the shop for body work.
Daniel JessupLancaster, California aka "The Hot Rod Reverend"
check out the 1955 Ford Fairlane build at www.hotrodreverend.com
|
|
|
|
|
Daniel Jessup
|
|
|
Group: Forum Members
Last Active: 3 days ago
Posts: 2.0K,
Visits: 131.1K
|
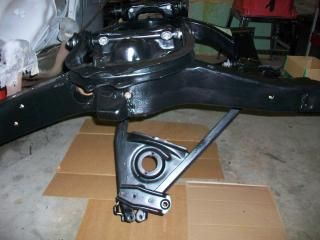
I like progress! Last night I cleaned up the mounting bolts and did some work to the front end by installing the upper and lower control arms. When you get to a stage like this, it makes you very happy that you took notes and bagged and tagged your hardware. For instance, I decided to bag and label those shims that are used to align the wheels on the upper control arms. I also did that for the lower control arms where the large shim washers are used for the front of the control arm where it attaches to the cross member (more on that later though).
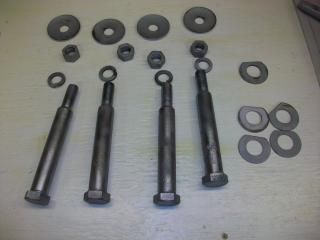 
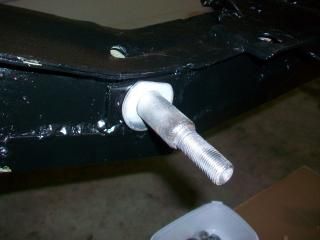
The hardware was blasted where needed and threads cleaned with a wire wheel. I also used copious amounts of bearing grease on the large shoulder bolts and a good does of anti-seize on the mounting bolts for the upper control arms. I started with the driver's side lower control arm first. After laying down some fresh cardboard to keep my arms from getting scratched by the floor, I put the driver's side into position. Immediately I noticed that it was not a tight fit, and that if I installed the arm there would be play back and forth as the arm's bushings would slide on the shoulder bolts. Thinking I would rather have some "springiness" in there and make it tight rather than letting it slide around, I chose the shim(s) I needed to take out play and even had to use a pry bar to wedge it back in (not a lot of prying but enough to bring 1/8" in to meet up the holes). So I slid both bolts into the holes but did not put them all the way through. I then got the holes of the arms to line up with the holes on the cross members. After that, the bolts went through with just a little tap and we were set to reinstall the cup washer, lock washer, and nut. A word of advice on the shim--- grease the side that goes towards the crossmember. It will stay put for you as you align the arms since they are very snug. I did take a photo of the bolt being placed in the front crossmember and where the shim washer goes. Note that the straight edge goes towards to the top to fit up under the lip of the cross member itself. It would be a good idea to check the fitment of all of your bolts and hardware before starting the installation process anyway. The shoulder bolts have a whopping 1 1/8" head and the nuts are 15/16". I decided to NOT tighten these arms to spec on their torque, just leaving them a little loose until I install the spindle and ball joints. I am not so sure whether or not anything will bind up, but I thought it wise to wait. Maybe someone out there can tell me different on that.
The upper control arms attach to the frame mounts with out much fanfare...especially if you kept your shims labeled. I am not sure how much this will help with the front end alignment because of new parts, etc. But I believe it will help things out until I get the car to the shop and they are able to put it on the alignment rack. Note the orientation of the upper control arm also - the mount for the upper ball joint goes towards the REAR of the car. You need a 3/4" socket and/or wrench to meet the head and nut size. I put each control arm up into position and then slide the bolts through. I attached the lock washers and nuts, leaving things loose, and then I placed the shims in their correct locations. After that, the arms were torqued to spec and allowed to rest.
The picture below has a little back story. As I located all of the shoulder bolts and hardware for the lower control arms, I could not find one of the cup washers. "What did I do with that thing?" I asked myself. "Surely I didn't throw it away!" I groaned as I rummaged around. I finally decided to check my junk pile. Wouldn't you know it but one of the bushings that had basically disintegrated and fell off in my hands during disassembly CARRIED THE CUP WASHER with it. Glad I didn't just chuck it all in the trash! I rescued it, shook my head, and the cleaned it up for reinstallation.
The last photo here is of the extra shims. I did save all of the shims and bagged them for which side, etc, when I removed the lower control arms a few months ago. So, why didn't I need to reinstall them? I figure it had to do with this... installing new bushings meant that the overall distance from end to end on where the arms would mount up to the crossmember holes CHANGED. There is no way I would be duplicating the same distance from the factory and I believe that is why the shims are there in the first place - to take out the play from front to rear so the arm itself does not slide. The only movement it should have is rotating on the shoulder bolts themselves.
Time to get those spindles cleaned up! They are soaking in the parts washer as I write this post. And... I have new front springs to install. I have not yet purchased the shocks for the front end. Any suggestions? The springs are the Aerostar springs that will lower things about 2 inches. I already have new upper and lower ball joints and hardware.
Daniel JessupLancaster, California aka "The Hot Rod Reverend"
check out the 1955 Ford Fairlane build at www.hotrodreverend.com
|
|
|
|
|
Daniel Jessup
|
|
|
Group: Forum Members
Last Active: 3 days ago
Posts: 2.0K,
Visits: 131.1K
|
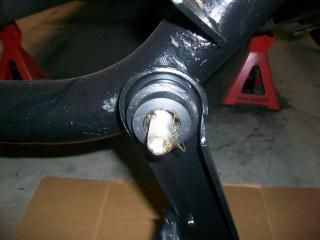
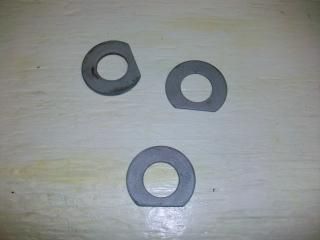
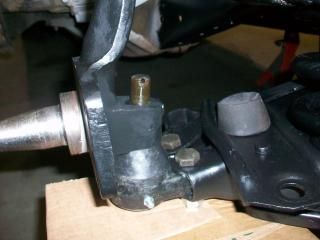
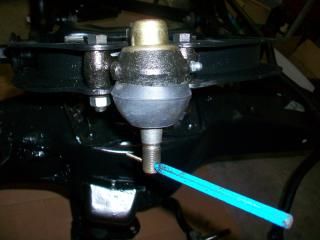
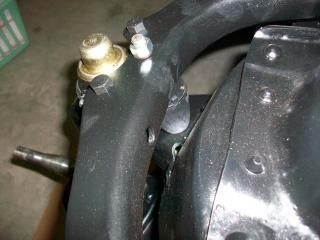
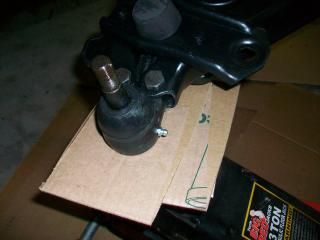
Sometimes you have moments when you stand back and admire your work. Other times you stand back and look and you say to yourself... "There's a reason I don't make a livin' doing this kind of thing."  If you are a very observant individual and know your 55/56 Fords very well, you noticed that I left out the two "collars" that surround the front bushing on the lower control arm. I really do not know what overall purpose they serve, but I reckon since Ford installed them originally I should probably put them back. So... off with the arms and on with the collars and reinstall the bolts and nuts!  Here is a photo of what I am talking about... 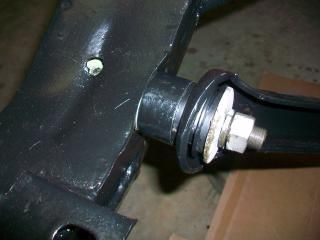 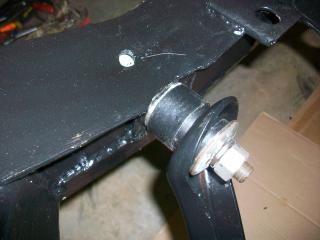 I did get the upper and lower ball joints installed, but I did not have the bumpers for the upper joints. The irony is that the kit I received had 3 bolts, nuts, and washers per upper ball joint, and then 2 bolts, nuts, and washers for the lower ball joints. There are 3 holes for each joint. I have the lower bumpers.... guess I need to order the upper bumpers or is there a reason why they are no longer needed? 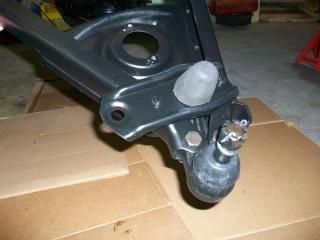 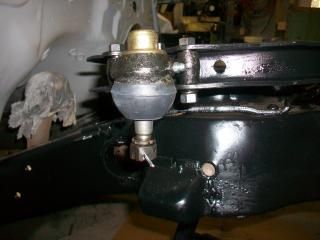 I have a set of the Aerostar coil springs and new rubber to insulate them in the frame all ready to go. They are waiting their turn. I did get the spindles cleaned today and gave them their first coat of paint. 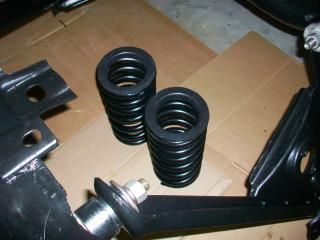 Daniel Jessup
Lancaster, California aka "The Hot Rod Reverend"
check out the 1955 Ford Fairlane build at www.hotrodreverend.com
|
|
|
|
|
Daniel Jessup
|
|
|
Group: Forum Members
Last Active: 3 days ago
Posts: 2.0K,
Visits: 131.1K
|
I got off my rear end last night and reinstalled both spindles and the new coil springs. My 11 year old son came in the garage and said, "Dad, it looks like a new car!" J And so it is looking pretty good. To install the coil spring and spindle, I basically set up a floor jack with some cardboard so as not scratch the new paint on the lower arm. The coil spring rubber goes on the top of the spring where the coil is flat. The other side of course matches an indentation in the lower control arm where the end (and bottom coil of the spring) rests. I was sure to get it into the groove as the lower control arm made its way up. But before I started jacking anything, I took a good look at the ball joints and decided to take a small punch into the cotter pin hole and orient the stud so that when the spindle was installed I would not have a problem inserting/removing the cotter pin. There is very little room behind that upright on the spindle.
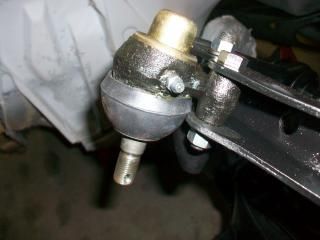 
You can tell that I cut down the lower bump stop about 1" and I did decide to install the bumper for the upper control arm. For the record, I cut the lower bumper before installing the spindle and spring. A sawzall made quick work of the problem. With the lower ride height that I am expecting from the Aerostar coils the car is going to need the extra room. Thanks to fellas on this site for that recommendation.
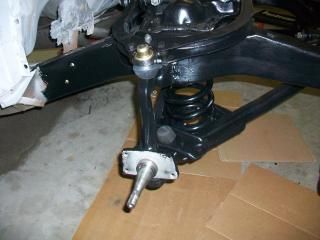 
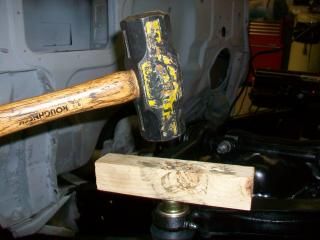
After orienting the studs, I actually install the spindle to the upper arm and get the nut as tight as I can. Then, I pump the jack and bring the lower control arm up to seat the coil in its pocket. On its way up the lower hole in the spindle is filled by the stud in the lower ball joint and with just a few more pumps the stud is all the way through. The top nut is 7/8" and the lower nut is 15/16" socket size. When the stud is all the way through I do like to rap the upper ball joint with a hammer/wood combination to get it to "seat" and take out play (if there is any). That may not be the most ASE certified way to do it, but it gets the job done. I will most probably check those nuts again after the engine is reinstalled and before the car goes to the alignment shop. The large bolts that connect both the upper and lower arms to the frame will be left just tight enough to hold until the full weight of the engine and front end is put back on the suspension and the car is sitting at ride height. Then we will tighten all four down before it moves out to the alignment shop.
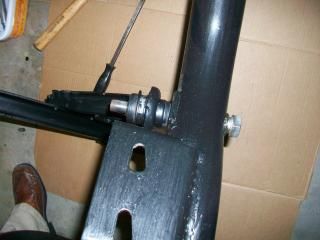
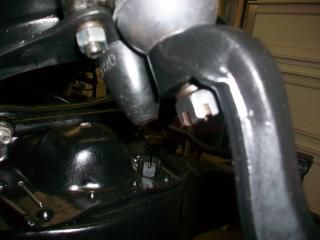
I snapped a couple of photos of the differences in front sway bar bushings as well. The old bushing and bracket that was used for the wagon bar was original and was "wallowed" out, dry rotted, and just plain useless as you can see. The new bushings from Energy Suspension (again, due to a lead by Jeff on this site) are made of polyurethane and are also able to be greased. Once my tube of Super Lube grease arrives in the mail thank you Charlie for that tip also) I will reinstall the front sway bar, but again only just to keep it on snug until the full weight of the car is down. I did see a big difference between the old bolts and bushings that held the bar to the control arm when I compared the old ones from the wagon bar to the new ones I received. Hopefully it is just a difference in the size/compacting of the rubber grommets.
Daniel JessupLancaster, California aka "The Hot Rod Reverend"
check out the 1955 Ford Fairlane build at www.hotrodreverend.com
|
|
|
|