Profile Picture

55 Ford Fairlane Refresh and Driver Resto Blog Begins!

Posted By Daniel Jessup 10 Years Ago
You don't have permission to rate!
Author
Message
steinauge
Posted 9 Years Ago
View Quick Profile
Supercharged

Supercharged (366 reputation)Supercharged (366 reputation)Supercharged (366 reputation)Supercharged (366 reputation)Supercharged (366 reputation)Supercharged (366 reputation)Supercharged (366 reputation)Supercharged (366 reputation)Supercharged (366 reputation)

Group: Forum Members
Last Active: 9 Years Ago
Posts: 143, Visits: 1.4K
I cant speak for anyone else but I am thoroughly enjoying this thread! Thank you for going to the trouble of putting it up.
Daniel Jessup
Posted 9 Years Ago
View Quick Profile
Supercharged

Supercharged (3.8K reputation)Supercharged (3.8K reputation)Supercharged (3.8K reputation)Supercharged (3.8K reputation)Supercharged (3.8K reputation)Supercharged (3.8K reputation)Supercharged (3.8K reputation)Supercharged (3.8K reputation)Supercharged (3.8K reputation)

Group: Forum Members
Last Active: 5 hours ago
Posts: 2.0K, Visits: 118.9K
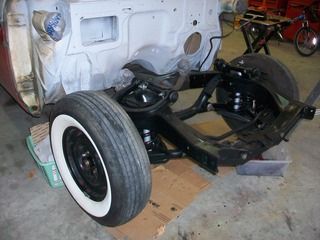
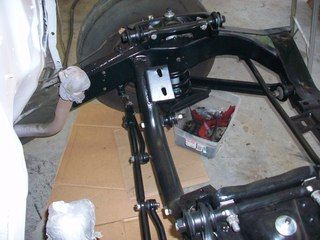
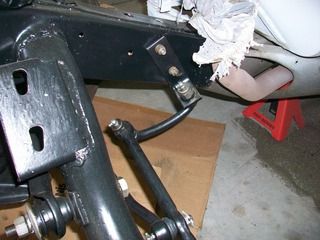
Today I had some time to install the sway bar with the new Energy Suspension brand polyurethane bushings and the stabilizer hardware kit to attach the sway bar to the lower control arm. I had snapped more photos but my camera went haywire when I got back inside the house and my SD card was EMPTY! go figure. The nice things about these ES bushings are: polyurethane, the 7/8" size was in stock, they come with new brackets, and the bushings are greasable! I used a synthetic grease from Super Lube. I also like the small plastic caps that cover your Zerk fittings but I don't know how long they will last. No modification needed for the brackets - they fit the frame perfectly. Basically, I laid the sway bar in position and let it rest on the lower control arms. I then slipped a bushing on each end (I greased them inside first too) and slid them into position on the bar so that they would go right up the frame. Next, I put the brackets on loosely and checked the fitment. Once I was satisfied with it I pivoted the bar in the bushings back and forth to get the grease worked into the bushings and bar real good. Then I installed the hardware kits on each lower control arm. Notice that the hardware kits were not cinched down too tightly. I think it will be best to tighten those down once the weight of the car is back on the front end like it should be. I did cinch down the brackets to the frame however, and after doing so I greased them with synthetic lube. The sway bar is a station wagon sway bar with a 7/8" diameter. I think I got it from a 56 Ford Ranchwagon. The hardware kit and the bolts that attach the brackets to the frame have a 9/16" head by the way.
 

The photo above is the difference of the old worn out bushings in the station wagon sway bar and what the new ones look like. Think it will help? Tongue
On to the Backing Plates and the Spindle Arms. They cleaned up nicely. I only put one coat of Rustoleum on the inside of the backing plate. Not too sure how the paint will hold up in there anyway but thought it would be good to at least try to control some of the rust. I use silicone brake fluid anyway so we should be ok. I think it worth mentioning here again about the location of your bolts that hold the castle nut and cotter pin. I like to make sure I have mine oriented all the same way and in a location that I can get to just in case I have to start fishing those cotter pins out again anytime soon. I face them up so I can find things easily and see how to twist/turn the ears made by bending the cotter pin so as to get the cotter pin back out more easily next time. I also used a little anti-seize on the threads. You will need a 3/4" and a 9/16" wrench to tighten them down, but only one each... the grease guard plate acts as a head stop on the front side.


A quick word about hardware and some photos to explain. I like using as much of the old hardware as I can, provided it is in good condition. Two reasons... odd ball sizes as far as lengths can be a pain to locate at the local hardware store and it saves money in the long run. A while back I started using a small Ultrasonic Cleaner to degrease hardware and parts. You would not believe how well it does with carburetors!!! I stopped using solvent and Berryman's a long time ago. Basically a bottle or two of the $ store "Awesome" brand cleaner and some water in the tank. Heat it up with the touch of button, set the unit to run for several minutes and you are good to go. Take out the parts, rinse, dry, and then over to the blast cabinet. Blast cabinet you say? what about all those washers and nuts that fall through the cracks? Well, here is the answer - a cricket tube from Wal-Mart. It is the perfect size to hold in your hand. You can rotate the tube while you blast and you can see everything in it. There is no way for any part to escape. Shake the tube when done and all the media falls out and you are left with clean hardware. I like it and it has served me well. Bolts that need to be chucked because of wear or corrosion show up pretty easily as you can see.


Daniel Jessup

Lancaster, California

aka "The Hot Rod Reverend" w00t
check out the 1955 Ford Fairlane build at www.hotrodreverend.com


Daniel Jessup
Posted 9 Years Ago
View Quick Profile
Supercharged

Supercharged (3.8K reputation)Supercharged (3.8K reputation)Supercharged (3.8K reputation)Supercharged (3.8K reputation)Supercharged (3.8K reputation)Supercharged (3.8K reputation)Supercharged (3.8K reputation)Supercharged (3.8K reputation)Supercharged (3.8K reputation)

Group: Forum Members
Last Active: 5 hours ago
Posts: 2.0K, Visits: 118.9K
steinauge (1/15/2015)
I cant speak for anyone else but I am thoroughly enjoying this thread! Thank you for going to the trouble of putting it up.


If my camera would do a better job it would be a lot easier!
Thanks for the motivation on the blog here

Daniel Jessup

Lancaster, California

aka "The Hot Rod Reverend" w00t
check out the 1955 Ford Fairlane build at www.hotrodreverend.com


ian57tbird
Posted 9 Years Ago
View Quick Profile
Supercharged

Supercharged (1.1K reputation)Supercharged (1.1K reputation)Supercharged (1.1K reputation)Supercharged (1.1K reputation)Supercharged (1.1K reputation)Supercharged (1.1K reputation)Supercharged (1.1K reputation)Supercharged (1.1K reputation)Supercharged (1.1K reputation)

Group: Forum Members
Last Active: Last Month
Posts: 488, Visits: 20.9K
Looking good.
It will be better than when it left the factory. Always nice to see.
Daniel Jessup
Posted 9 Years Ago
View Quick Profile
Supercharged

Supercharged (3.8K reputation)Supercharged (3.8K reputation)Supercharged (3.8K reputation)Supercharged (3.8K reputation)Supercharged (3.8K reputation)Supercharged (3.8K reputation)Supercharged (3.8K reputation)Supercharged (3.8K reputation)Supercharged (3.8K reputation)

Group: Forum Members
Last Active: 5 hours ago
Posts: 2.0K, Visits: 118.9K
thanks Ian. I believe I have this shock thing figured out so we should be ok in that department too.

Daniel Jessup

Lancaster, California

aka "The Hot Rod Reverend" w00t
check out the 1955 Ford Fairlane build at www.hotrodreverend.com


Daniel Jessup
Posted 9 Years Ago
View Quick Profile
Supercharged

Supercharged (3.8K reputation)Supercharged (3.8K reputation)Supercharged (3.8K reputation)Supercharged (3.8K reputation)Supercharged (3.8K reputation)Supercharged (3.8K reputation)Supercharged (3.8K reputation)Supercharged (3.8K reputation)Supercharged (3.8K reputation)

Group: Forum Members
Last Active: 5 hours ago
Posts: 2.0K, Visits: 118.9K
Been down and out the past few days with a serious sinus infection. I started antibiotics yesterday and only just a few hours ago have I felt any better. At any rate, my KG4503 KYB front shocks finally arrived so I was a little motivated to move out to the 18 degree garage and install them up front. I must say, those things are gas charged and tight! It took me quite a bit to force one in on itself to bench test its "action" The shocks came with new washers, nuts, and rubber grommets of course, but they also had instructions written in about 57 different languages with plenty of "well duh!" diagrams so you get the mounting correct. What in the world could be the issue with mounting shocks you ask? The only thing I see that someone could goof up would maybe be the grommet positioning? Either side of the grommet is different as you can see in the photos. The larger lip goes towards the washer and the smaller diameter lip goes toward the bracket or the shock tower mount on the frame. I assume most people know this but I thought I would point it out. I had already cleaned, blasted, and painted the original brackets even though I thought I had a lead on shocks that had its mounting tabs on the lower end that would work for the lower control arm. So, I simply pulled them back out of storage and mounted the brackets on the bench, making sure I did not get the "grommet bulge" past the washers. As you can see in the photos the shocks came with two nuts per stud, so I assume that one is to lock the other down. To be honest, most of the stud shocks I have ever seen only had one nut, I am not sure why this came with two unless there is something for a different application or what have you. I obviously decided to use the extra nut as a lock nut on each stud. I must admit that I cheated when installing the shocks. I used my floor jack to raise the bracket into position after I had attached the upper stud to the shock mount on the frame.


I also decided to replace the lens in my bead blast cabinet from TP tools. I will post photos on that later. Some of you have asked about the cabinet before so I think it a good time to show some of the maintenance work that needs to be done from time to time.


Daniel Jessup

Lancaster, California

aka "The Hot Rod Reverend" w00t
check out the 1955 Ford Fairlane build at www.hotrodreverend.com


Daniel Jessup
Posted 9 Years Ago
View Quick Profile
Supercharged

Supercharged (3.8K reputation)Supercharged (3.8K reputation)Supercharged (3.8K reputation)Supercharged (3.8K reputation)Supercharged (3.8K reputation)Supercharged (3.8K reputation)Supercharged (3.8K reputation)Supercharged (3.8K reputation)Supercharged (3.8K reputation)

Group: Forum Members
Last Active: 5 hours ago
Posts: 2.0K, Visits: 118.9K
My lens protector on my TP Tools Skat Blast Cabinet was getting kind of fuzzy. I have to replace it about twice a year. I have owned the cabinet for about 8 years, and it works very well. I have only had to replace the nozzle 3 times, and I would imagine I use this cabinet about 4-5 hours a week on average. I have had to replace/refill media also on 3 different occasions. I have tried all kinds of brands from TP's glass bead media (the best I have used in my opinion), to Harbor Freight, to Tractor Supply Company. I have only ever used glass beads in the cabinet. I would like to find a way to put another light in the cabinet because of the "shadow" effect with just one light bulb in there. Sometimes it is difficult to see what you are doing in there.Whenever I replace the lens protector, I always get off all of the old adhesive. Goo Gone works the best for that job, and the new protector sheet always stick to the lens very well. It takes more work, but I never have my lens protector falling down on my gloves and I have never had to replace my lens!

The cabinet is the grey unit along the wall to the right of the engine run stand.
   

Daniel Jessup

Lancaster, California

aka "The Hot Rod Reverend" w00t
check out the 1955 Ford Fairlane build at www.hotrodreverend.com


MoonShadow
Posted 9 Years Ago
View Quick Profile
Supercharged

Supercharged (7.5K reputation)Supercharged (7.5K reputation)Supercharged (7.5K reputation)Supercharged (7.5K reputation)Supercharged (7.5K reputation)Supercharged (7.5K reputation)Supercharged (7.5K reputation)Supercharged (7.5K reputation)Supercharged (7.5K reputation)

Group: Forum Members
Last Active: 3 hours ago
Posts: 4.5K, Visits: 37.1K
I bought one of those cheapo florescent lights in a tube. Mounted it to the cabinet so it under the front edge at the top of the face. Adds a new angle light for ridding yourself of shadows. I late added a 100 watt safety enclosed fixture in place of the original light. Nice and bright. My window is exactly 12" X 24" so I just keep a couple on hand. I probably buy two of them a year to replace the damaged ones. Cheaper than the tearoffs. I use a lot of glass bead but for super dirty/rusty parts I switch to black beauty. Chuck

Y's guys rule!
Looking for McCullouch VS57 brackets and parts. Also looking for 28 Chrysler series 72 parts. And early Hemi parts.

MoonShadow, 292 w/McCulloch, 28 Chrysler Roadster, 354 Hemi)
Manchester, New Hampshire
Y block Billy
Posted 9 Years Ago
View Quick Profile
Supercharged

Supercharged (2.4K reputation)Supercharged (2.4K reputation)Supercharged (2.4K reputation)Supercharged (2.4K reputation)Supercharged (2.4K reputation)Supercharged (2.4K reputation)Supercharged (2.4K reputation)Supercharged (2.4K reputation)Supercharged (2.4K reputation)

Group: Forum Members
Last Active: 6 Years Ago
Posts: 1.6K, Visits: 5.2K
A good buffer and rubbing compound and you can buff those clear again. I had a roll of mylar and would just tape a new one on but its always a pain in the ass keeping them clean. I learned a long time ago to never let the richochet head towards the window and it last much much longer. The other problem is people keep blasting through the left index finger of my gloves because they blast right into it while holding small parts. I can make stuff last because I know how to use the thing without damaging the window or gloves. Its when you let other people use it that its common nature to keep getting the part closer to the glass, getting more richocheting material at it and before you know it you cant see. I hate that every time I repair it so things are clear as a bell, somebody else has messed it up and I have to gop through it again to get my own work done.

55 Vicky & customline

58 Rack Dump, 55 F350 yard truck, 57 F100

59 & 61 P 400's, 58 F100 custom cab, 69 F100, 79 F150, 82 F600 ramp truck, 90 mustang conv 7 up, 94 Mustang, Should I continue?

Daniel Jessup
Posted 9 Years Ago
View Quick Profile
Supercharged

Supercharged (3.8K reputation)Supercharged (3.8K reputation)Supercharged (3.8K reputation)Supercharged (3.8K reputation)Supercharged (3.8K reputation)Supercharged (3.8K reputation)Supercharged (3.8K reputation)Supercharged (3.8K reputation)Supercharged (3.8K reputation)

Group: Forum Members
Last Active: 5 hours ago
Posts: 2.0K, Visits: 118.9K
Wow, it has been a long time since my last post... I have been busy getting my house ready to sell, making a transition to Ohio, and all that comes with a move. Half of my shop has already been cleared out and many things put into storage or sold. By the way, the most recent contract did fall through. The buyer wanted me to change a window's location, complained about code, went after documentation/permits on my shop, etc, etc, etc. I think he just had a simple case of buyer's remorse.

At any rate, this has left me some time in the shop and the last few nights I have been a little busy. I reinstalled the tie rods, idler arm, and drag link after a serious cleaning and installation of new seals and grease.
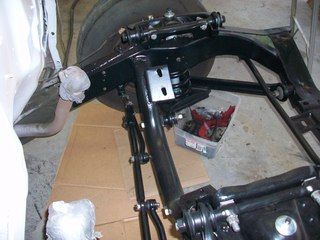
 
 
The front brake drums and hubs were cleaned up and painted, and the bearings and seals cleaned, greased up well, and reinstalled. Nothing too exciting to show concerning installation, I guess this is all pretty boring material. I did not put in the steering gear just yet because I want to finish up that firewall. Hopefully the rain will stop coming, but it is April after all.

I did get in a brand new fuel line (tank to fuel pump) from Tee Bird Products. The shipping was outrageous - I will leave it at that. I also got a set of bushings in that shipment so that I can rebuild the shifter arms on the column. While I was at it, I ordered a set of brake lines (specific lengths all ready to go) from Jacksons' Auto Parts - the box showed up today, CRUSHED, and all of the lines in the box were bent at a 35 degree angle. They were all supposed to arrive straight. Now what? I guess I will contact them tomorrow and see what we can do. I guess I can bend them back but you know once a line is bent, it's bent.

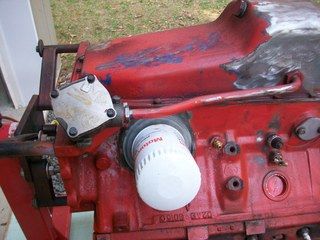
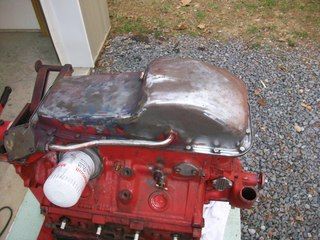
While the front end has continued to receive treatment, I have also been attacking the 292. I degreased it, removed quite a few bolt on's down to make the engine a "long block" so I could clean it up easier. The timing cover and water pump I just left on the block. I did put on another oil pan that was in much better shape, and I added a NEW gerotor oil pump. There are not many miles on the engine (just several hundred) so cleanup was not too bad and the parts are all in great shape.
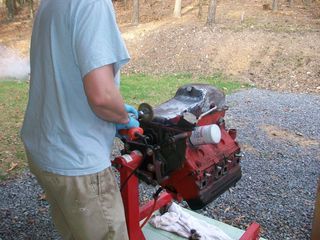


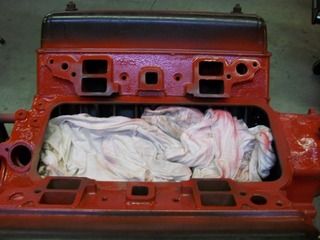
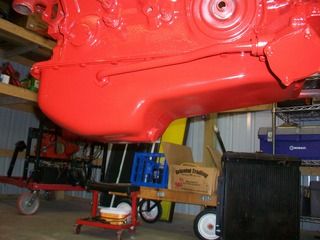
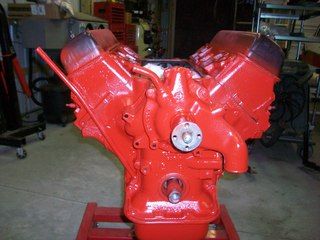
The whole "wire wheel" episode was long, messy, and just downright tedious, but that metal was clean by jove! I am not going to reuse the pitted valve covers, so I Ieft them on. I have rubber valve cover gaskets and chrome valve covers to install anyway. When I paint an engine like this, I like to put clean rags in the lifter valley just to keep out the crap. The engine paint is a simple Duplicolor Engine Red. I don't think it is 55/56 Ford correct but it looks good and it was available. The car is not  a show car so what's the difference. My father-in-law came over tonight and likes the look of it so on we go.

I have some of the bracketry and other parts on my paint rack so hopefully I can get to install those soon. I also have two good sets of exhaust manifolds that I just brought out of the blast cabinet, cleaned up, and then coated with the Eastwood Hi-temp coating. I have two sets because one is original to the 55 and the other is a 57 set. I will most probably use the 57 set depending on what I do with the power brakes situation. I have not decided what to do about that yet, but will most probably get an aftermarket set up instead of the original master cylinder and Ford's way of doing it in 1955. We want to put a dual master cylinder on it anyway.

Once I get the engine running again I will have to post a video. Hopefully I can figure out how to do that.


Daniel Jessup

Lancaster, California

aka "The Hot Rod Reverend" w00t
check out the 1955 Ford Fairlane build at www.hotrodreverend.com


Reading This Topic


Site Meter