|
Author
|
Message
|
|
Daniel Jessup
|
|
|
Group: Forum Members
Last Active: 3 days ago
Posts: 2.0K,
Visits: 131.1K
|
I have always been impressed by others on this site who let us into their world of all things Y block by posting their work in the form of words, diagrams, and photos. The craftsmanship and attention to detail is simply amazing. For the past several years, all that I have been able to do is work on sub-assemblies - carburetors, transmissions, engines, etc. Now I have delved into the realm where only the talented and dedicated dwell - an all out assault on your vehicle, by yourself, to do the mechanical, the body work, the paint, etc. At one time I had visions of grandeur on this scale when I put a 55 Sunliner project in the garage. The need for the family budget finally overwhelmed the whole idea, and alas - it was sold piece by piece. The sum total of its parts was definitely worth much more than its package value, but the old gal helped many a man complete his own Sunliner project in places around the globe. Well, all the while a 55 Fairlane sat idly by waiting her turn for attention. Some of you may remember that several years ago this car received a rebuilt 292 that really screamed even though an original Fordomatic was weighing her down and robbing her horsepower.
Here is the plan... to put her back on the road again with the following changes and facelifts:
1. Remove the 292 and check her out on the portable engine run stand.
2. Remove the original Fordomatic and lose it in the garage somewhere.
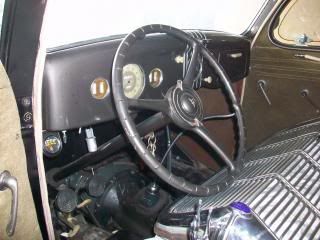
3. Prep and install an original 3 speed/overdrive manual transmission and all associated parts including the column shift.
4. Remove the worn out 55 steering gear and wheel so that I can prep and install a 1956 Steering gear, column, wheel, etc.
5. Remove the entire front end sheet metal to begin the prep for paint. The firewall will come first. Paint with the existing color scheme, SS Urethane red over white. (anyone ever use Summit's paints?)
6. Consider A/C to the mix - the wife is requesting it. 
7. Finish the interior - the dash and sheet metal garnish are all painted and ready to back into the car. The headliner is 90% installed. Need to remove the rear glass first.
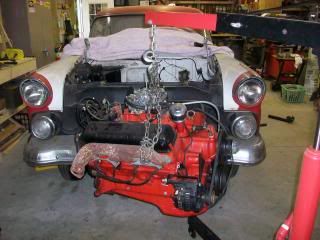
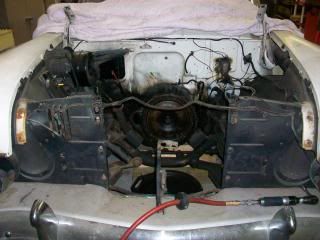
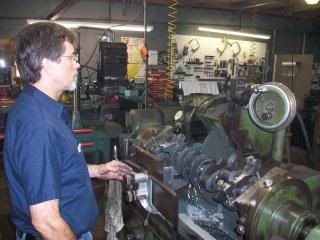
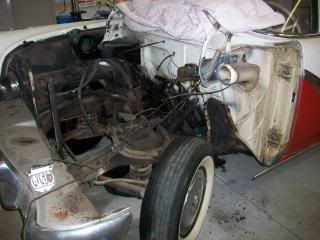
That's enough for now. If you are wondering how I removed the hood by myself, first of all you can see the large blanket there on the cowl. I basically put that all the way across until it bunches up against the rear edge of the hood. Then I put the my engine hoist boom up against the front of the hood near the latch. I unscrew all 6 bolts where the hinges attach the hood to the car and then lower the boom up front. Voila! No scratches and the hood is free. I can then pick up the hood from the front, grabbing both sides and then set it aside. (don't worry, I will have help when I reinstall!
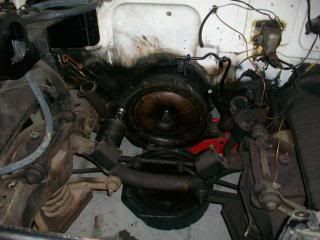
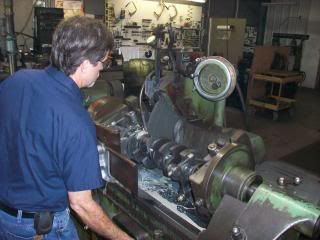
Anyhow, this is what I accomplished this afternoon - the 292 has been removed and has been placed on a run stand. I am going to wire it all up, change the fluids, finish the accessory list, and hopefully fire it up tomorrow. You can see the starter hanging out loose in the Fordomatic. I just unbolted it and left it there before I removed the engine... why frustrate yourself?
Daniel JessupLancaster, California aka "The Hot Rod Reverend" 
check out the 1955 Ford Fairlane build at www.hotrodreverend.com
|
|
|
|
|
texasmark1
|
|
|
Group: Forum Members
Last Active: 7 Years Ago
Posts: 650,
Visits: 2.7K
|
go Daddy go!
"God Bless Texas"location: Houston,TX
|
|
|
|
|
lyonroad
|
|
|
Group: Forum Members
Last Active: 11 Years Ago
Posts: 703,
Visits: 3.1K
|
Daniel Jessup (8/2/2014)[hr Now I have delved into the realm where only the talented and dedicated dwell - an all out assault on your vehicle, by yourself, to do the mechanical, the body work, the paint, etc.
Daniel, I have done a couple of vehicles, well one done and one underway, and I am living proof that in no way am I in the realm of the talented. Given your current experience I expect that your level of expertise will surpass mine in, if it already hasn't, in short order.
I am still trying to wrap my head around your hood removal system. My wife won't help me anymore.
Good luck with your project.
Mark
1956 Mercury M100
1955 Ford Fairlane Club Sedan
Delta, British Columbia
|
|
|
|
|
Daniel Jessup
|
|
|
Group: Forum Members
Last Active: 3 days ago
Posts: 2.0K,
Visits: 131.1K
|
thanks for the kind comments fellas... on that hood removal, here is the procedure:
1. Raise the hood.
2. Get a heavy blanket and roll/bunch it up to lay across the cowl. It should "cushion" between the rear of the head and windshield. The thicker the blanket, the better.
3. Move your engine hoist in position in front of the car and raise the boom to meet the height of the hood. I like to place the tip of the boom to the side of the latch (on a 55). Also, you may want to wrap your tip in foam if you are removing a hood and do not want to worry about scratching the underside. Do NOT raise the hood anymore. You are simply trying to meet the hood at its "resting" height.
4. Once the boom tip is in place, remove the bolts. (I like removing from rear to front on either side so you can see if the rear of the hood will tilt up - it gives you an idea if there is any "pressure" on the hood to move. If you are doing this correctly, there should be not pressure.)
5. Go back to the engine hoist and GENTLY lower the boom until it comes down enough to let the hood rest on the valance. (If you are dealing with a hood you are not repairing, etc, then cover your valance with a blanket also, and you may want to slide cardboard between the hood and the hinge arms.)
6. Slide the engine hoist out of the way, and you can pick up the hood from the front (I guess my "wing measurement" for my arms is wide enough I can do this easily) and set it aside. If you cannot do this yourself, you could always use a couple of straps evenly placed under your hood and then use the boom to remove it and take it to a table or a body work stand.
Daniel JessupLancaster, California aka "The Hot Rod Reverend"
check out the 1955 Ford Fairlane build at www.hotrodreverend.com
|
|
|
|
|
Daniel Jessup
|
|
|
Group: Forum Members
Last Active: 3 days ago
Posts: 2.0K,
Visits: 131.1K
|
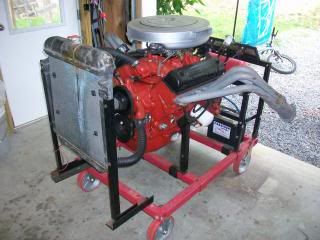
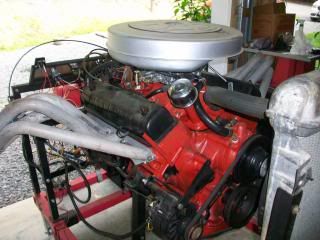
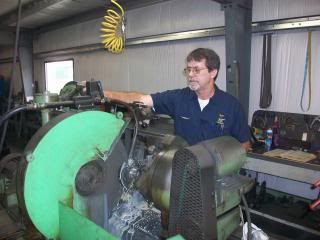
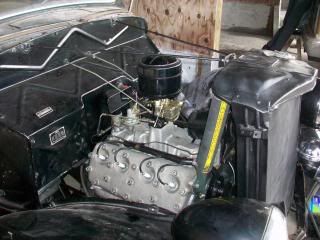
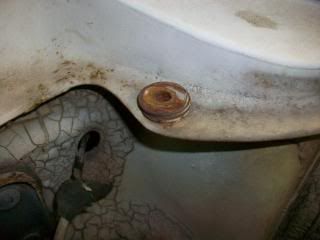
Day 2 on the 55 is down, and I did not have much time today because of school supply shopping with the wife and taking her out to eat (tax free weekend in Virginia for school related items). We still have 3 kids in school. The oldest will graduate this year. Anyway, I did get the engine all buttoned up on the engine stand. In addition to installing those headers, the 54 radiator and electric fan, I also changed the oil and spun on a new filter. The run stand has an electric fan that I installed last year (operated by a toggle switch), a tray for the battery, its own gas tank, a gauge panel (I added a tachometer and a light for the ignition), and nice polyurethane wheels that I installed to replace the original casters that were too short to put the engine hoist under (go figure). The polyurethane wheels make this thing GLIDE across the concrete floor. The difference is amazing - those wheels make the load to push seem much, much lighter. The engine fired right up and sounded good, but I detected a miss - after checking all 8 spark plugs it looks like a few need to be replaced. Over the past 4 years, the engine has not been run that long, and when it has the engine never really got hot enough to burn off any deposits. The compression is still excellent. No leaks as of yet - well I take that back. The radiator cap needs to be replaced. The 54 radiator I installed has no overflow tube so the corrosion you see is the coolant leaking from there and then dribbling down the front of the radiator. I will take some time over the next few months to tune the engine and get it to where I like it for reinstallation.
Tonight on the front end of the 55 I began removing sheet metal. I removed the radiator valance, horns, brackets, hardware, etc, and starting organizing the items I removed. I looked again all over the engine bay and have come to the conclusion that I need to get a steam cleaner to do the best job I can. I remember using Steam Jenny's when I was a teenager and I just loved those things. They cut the grease and grime like butter. I called the only place in town that rented them - $300 a day. That's no typo - $300 a day. I called a place about an hour and a half away - $145 a day. Then, when I was out with my wife I got a lead on an acquaintance of mine that has a steam cleaner I could borrow. I have not called to confirm, but the mutual friends we have said it was so. I will find out early next week - won't a steam cleaner be a big help?!?
 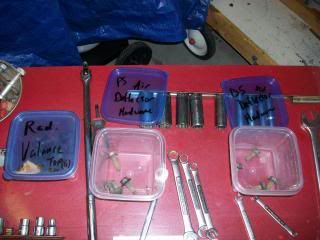
You can see in the second photo what I am doing to store all of the hardware. Instead of throwing everything into a large box, I am using those cheap $ store containers (4 for a buck) and then marking what the hardware goes to, which side, etc. I got in this habit when I rebuilt that 3 speed/overdrive unit this past Spring. I would think this will be a lifesaver (at least something to keep headaches at bay) later on when it is time for reassembly. I did have a snafu tonight - one loud "POP!" when I was at the rear of the shop. I had no idea what it was. I searched to see if something fell, something "sparked" (it almost sounded electrical), or what have you. But wouldn't you know it? When I picked up my air ratchet, I found the end had burst a hole. This air hose was one I got from china freight (harbor freight stores) several years back. It has worked well but I think the rubber is about to give way. I should probably use a whip hose. The hose that burst is attached to a retractable wheel - so I don't relish replacing it anytime soon.
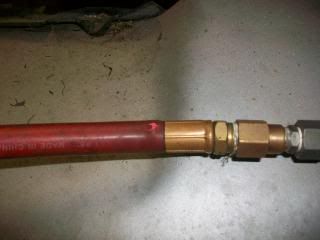 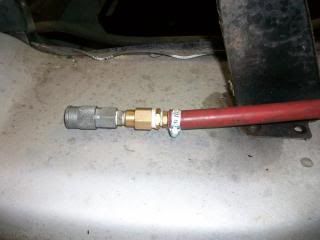
I took some time to repair the hose before I left the shop tonight. How long this hose will last... I am not sure. I have a nice GOODYEAR hose but it is a larger diameter than this one. I definitely do want to use one of those PVC hoses on this unit. During the winter months it would be like unwinding solid cable! 
Tomorrow is the Lord's Day and I will be busy. Maybe I can get back in there tomorrow night after our evening services. On Monday, I am taking the day off to travel down to Felt's Machine Shop in Suffolk, Virginia. They have a crank and a set of heads for me.
Lancaster, California aka "The Hot Rod Reverend"
check out the 1955 Ford Fairlane build at www.hotrodreverend.com
|
|
|
|
|
Daniel Jessup
|
|
|
Group: Forum Members
Last Active: 3 days ago
Posts: 2.0K,
Visits: 131.1K
|
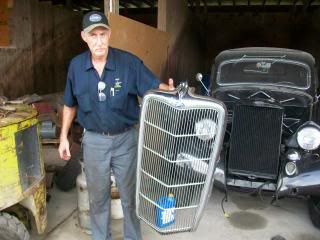
On Monday I took the day off and went down to Suffolk, Virginia to visit Felt's Machine Shop. The place is a family owned and operated business that has been around for a long time. The owner, Jay Felts, knows Y blocks well. He told me his first car was a 53 Ford in which he took out the Flathead and installed a 312. Over the years, Felts has specialized in Ford engines. Anyhow, the visit down to Suffolk was to pick up a 312 crankshaft that had been ground down to 292 main size (we kept the slinger by turning the rear seal area in a lathe) and to pick up a set of ECZ-B heads they had reconditioned for me.
Behind the shop they had the best looking original 1935 Ford sedan I had ever seen in my life. The odometer read just a little over 11,000 miles and it showed. The story was that about 50 years ago this car was garaged and left to sit because Grandpa had passed away. Grandma did not want anyone driving it. She passed away 20 years ago and the family squabbled over the estate for some time until just recently when items such as this car were liquidated. The only issue with the car was that the Flathead had seized up because of the coolant corroding the interior of the block. Felt's resleeved a few cylinders I was told and they had just put the block back into the car. The condition of the car was amazing - check out that grille too.
The next stop was to see a friend of mine - Wayne Francis - who lived about an hour away from Felt's. I had rebuilt a Holley 4000 for him a month ago (thanks Ted for those O-rings!) and was going to make a delivery for him and look at what he had going on as far as projects were concerned. This was the 3rd teapot I had rebuilt for him. Wayne has a nice 56 Fairlane Town Sedan, a 56 Victoria project, and another 56 Fairlane Town Sedan project that he bought for $250 after someone had CHOPPED the entire top and left it that way. He is planning to make a roadster out of it since it is so rough. The doors had real problems staying put and the center support between the doors was very wobbly. (Big 6 ft 6 take note here.) Wayne plans to weld quite a bit of sheet metal in it and make it a 2 door, 2 seater, eliminating the rear seat.
It was a full day as the machine shop is about 5 hours away from where I live so most of the time was spent on the road. But it was worth it to see Wayne, to help him out, to get those parts back from Felt's (they know Y blocks pretty well and the prices are unbelievably low - so low that I would be embarrassed to post how little I paid to have a 312 crankshaft cleaned, magnafluxed, the mains turned to 292 STD, and the rod journals cleaned up at .010 - plus keep the rear slinger. I also had those heads cleaned, magnafluxed, surfaced, new seals installed, etc, for very little money. I do recommend Felt's if you live in that part of the woods. A deceased member of the forum was the one who led me to use them a few years back.
I did not get much done, if anything at all, on the 55, but we had a good day foolin' around with Y blocks! Lancaster, California aka "The Hot Rod Reverend"
check out the 1955 Ford Fairlane build at www.hotrodreverend.com
|
|
|
|
|
Daniel Jessup
|
|
|
Group: Forum Members
Last Active: 3 days ago
Posts: 2.0K,
Visits: 131.1K
|
I am taking my time with the sheet metal removal and assessment, identifying and storing hardware and doo-dads as we go along. I figured there would be some rust out, but not in this particular area as I always believed this was the car's strong suit. I was surprised by the fender splash shield (I obviously broke off the tab) and inner fender strength and condition - not much rust at all and the parts are very, very solid. All of the bolts have backed out of their nuts and hardware fairly easily, with the exception of the one of the lower bolts near the rocker panel.
 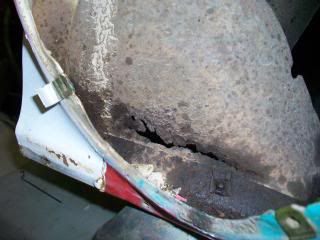 
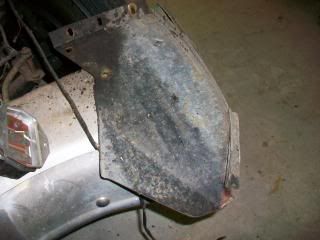   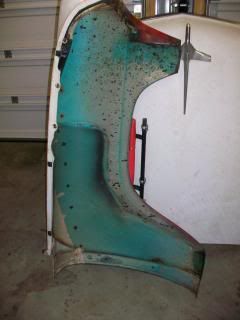
I am pretty sure that the front end sheet metal has never been off the car (but I don't know about that washer stack - read below), so the condition and minimal corrosion surprised me. The fender itself is very solid as you can see - especially around the splash shield area near the rocker panel. There is a bad spot about a foot above that - it will need attention. I think the other side has the same issue. I do not know what that is all about. You can also tell that the front lip inside the headlight housing is a little soft (the lip that attaches to the radiator deflector) - it may need some sheet metal welded in there too. So far the worst I have found is that driver's side air deflector, but the sheet metal to the left and right of the rot is very solid. I have already been banging on it with a hammer to find out how solid it is. I can cut that lip off and weld in some metal for a repair with out having to take out the whole thing, that way the measurements should be a lot easier to make and the fitment of new metal to the piece should go much easier.
If this is all the rot I find, I would be very happy and count myself blessed. However I am expecting more! 
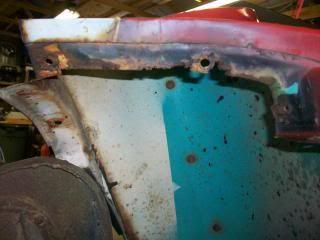
One last item - you see the stack of washers there on the firewall mount for the fender at the rear. What is all of that about? Is that something Ford did? I will have to check the manual - it seemed like a Mickey Mouse setup.Lancaster, California aka "The Hot Rod Reverend"
check out the 1955 Ford Fairlane build at www.hotrodreverend.com
|
|
|
|
|
lyonroad
|
|
|
Group: Forum Members
Last Active: 11 Years Ago
Posts: 703,
Visits: 3.1K
|
Daniel Jessup (8/7/2014)
One last item - you see the stack of washers there on the firewall mount for the fender at the rear. What is all of that about? Is that something Ford did? I will have to check the manual - it seemed like a Mickey Mouse setup.
Daniel, My '55 Club Sedan had a stack (two) of washers there too. I replaced them temporarily with a thick stainless washer. I suspect they are part of the process of aligning the top of the fender with the cowl and leading edge of the door.
Mark
1956 Mercury M100
1955 Ford Fairlane Club Sedan
Delta, British Columbia
|
|
|
|
|
brokengate
|
|
|
Group: Forum Members
Last Active: 9 Years Ago
Posts: 138,
Visits: 6.3K
|
Daniel the washers are a substition for the alignment shims, on my 56 they are u shaped or slotted squares. Pay attention to how many or the measurement of them for your returning fender alignment on rebuild, the slotted make it easy to add or remove, think I've seen repops on ebay. Thanks for the pics you know we love the photo journals.
Ted, Redding, CA
|
|
|
|
|
56_Fairlane
|
|
|
Group: Forum Members
Last Active: Last Year
Posts: 575,
Visits: 14.6K
|
I doubt it came from the factory with a stack of washers like that since it looks like there's some of that white respray on them.
~DJ~ AKA "Bleach"
1956 Ford Fairlane Town Sedan 30K original miles
|
|
|
|