|
Author
|
Message
|
|
Daniel Jessup
|
|
|
Group: Forum Members
Last Active: 3 days ago
Posts: 2.0K,
Visits: 131.1K
|
pegleg (8/25/2014)
Probably the base Caled "Great Lakes" which is actually in North Chicago or Waukegan, Il. It's the basic training site for most of the Navy. I was there a few short years ago (50! )
Frank - shows how ignorant I am, until Brian phoned me from there to let me know he was stationed there I had NO IDEA we had a naval base outside of Chicago! Brian is a good kid and has turned a major corner in his life. He went from suicidal to being quite confident in himself as an individual. A lot of time, PRAYER, and sweat went into that boy and we are proud of him. He is supposed to see me at Christmas time when he gets extended leave.
Crazy thing is... he told me wanted to go on SUB duty and was trying to find some way to be an engineer on one of the nuclear subs we've got!  Daniel Jessup
Lancaster, California aka "The Hot Rod Reverend"
check out the 1955 Ford Fairlane build at www.hotrodreverend.com
|
|
|
|
|
Daniel Jessup
|
|
|
Group: Forum Members
Last Active: 3 days ago
Posts: 2.0K,
Visits: 131.1K
|
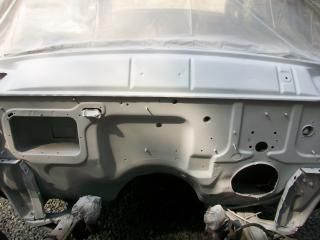
Alrighty back to work on the old Fairlane (after our first whirlwind week at school). I cleaned up the interior a bit and removed the dash and quite a bit of hardware. I already have a painted dash and painted trim pieces ready to install, just wanted to get all of this removed to make the firewall work easier. I also have plans to put in the clutch/brake pedal assembly that I have ready to go. On the list are quite a few grommets, a new wiring harness, and various pieces of anti-rattle/anti-squeak pieces. I am also going to replace the carpet.
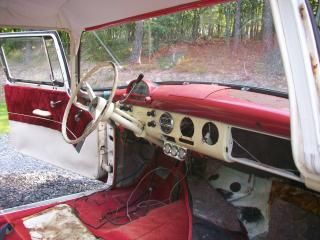 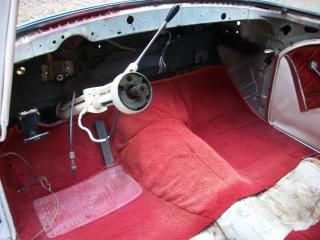
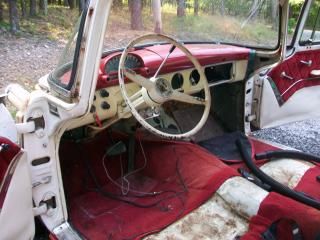
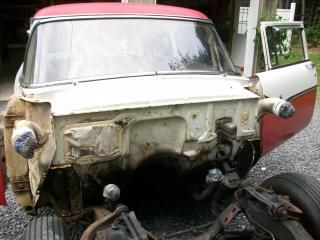 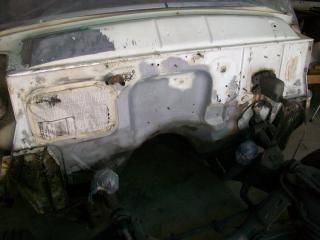
I also pressure washed the firewall and front end trying to degrease it... wasn't too successful there. I need a steam cleaner - anyone got one to loan out?  After it dried I broke out the sandblaster but it did not work too well. The sandblaster is a decent one I got from Tractor Supply a few years back. Of course I was blasting in 90 degree weather and high humidity so that did not help, but my air getting to the tank was dry. I think the tank itself had some condensation in it working against me. I turned it over and put my flashlight through the hole to see the valve. On the interior of the tank at the bottom there were some "runs" of water leading to the valve. If you guys got any tips on sandblasting in hot weather I am all ears! I only got a little bit done on the firewall and had hoped to do a lot more today before being pulled off on another wifey project to make an antique headboard for my oldest daughter's bedroom. Maybe I will put up some photos of that project too. It is being made from a turn of the century door and vintage trim that is about 6" wide. She wants me to make "homemade" crown molding - haha, we will see how that turns out. I did order the Ford Wimbledon White for 66-69 Mustangs from Eastwood yesterday. Hopefully I can get this firewall painted (and maybe the hood hinges) before weather sets in.
Daniel JessupLancaster, California aka "The Hot Rod Reverend"
check out the 1955 Ford Fairlane build at www.hotrodreverend.com
|
|
|
|
|
56_Fairlane
|
|
|
Group: Forum Members
Last Active: Last Year
Posts: 575,
Visits: 14.6K
|
Does your compressor have a water trap or water separator? Your compressor can be the source of moisture especially in high humidity.
~DJ~ AKA "Bleach"
1956 Ford Fairlane Town Sedan 30K original miles
|
|
|
|
|
DryLakesRacer
|
|
|
Group: Forum Members
Last Active: 2 Weeks Ago
Posts: 1.7K,
Visits: 340.1K
|
I use Summit Urethane restoration shop paint for our race cars. It works great; I always add fish eye to it.. California is getting to be a pain to buy paint unless you want to put clear over it which I don't like to do so mail order has become my life line....Good Luck
56 Vic, B'Ville 200 MPH Club Member, So Cal.
|
|
|
|
|
Daniel Jessup
|
|
|
Group: Forum Members
Last Active: 3 days ago
Posts: 2.0K,
Visits: 131.1K
|
56_Fairlane (9/1/2014)
Does your compressor have a water trap or water separator? Your compressor can be the source of moisture especially in high humidity.
I have 2 water traps before the rubber line/hose begins and I have another water trap right before the tank. There is about 60 feet of 1/2" metal pipe before the 2nd trap, and there is about 50 feet of rubber hose before the 3rd trap. I have never had any moisture problems before. I paint all the time with an HVLP gun and get plenty of dry air. I think the sand blaster tank had sat UNOPENED all winter long and what with repeated heating/cooling cycles in my uninsulated garage there was condensing in the tank. I also noticed that the sand valve is pretty small (IMO). Don't know now to remedy that since the bottom of the tank looked like a small threaded opening too. I guess when you have a big tank like that the issue is going to be the "funnel" where all that sand has to hit a valve at some point.
Maybe I can get back into that thing this week.
Daniel JessupLancaster, California aka "The Hot Rod Reverend"
check out the 1955 Ford Fairlane build at www.hotrodreverend.com
|
|
|
|
|
Daniel Jessup
|
|
|
Group: Forum Members
Last Active: 3 days ago
Posts: 2.0K,
Visits: 131.1K
|
DryLakesRacer (9/1/2014)
I use Summit Urethane restoration shop paint for our race cars. It works great; I always add fish eye to it.. California is getting to be a pain to buy paint unless you want to put clear over it which I don't like to do so mail order has become my life line....Good Luck
Sounds good. I am hoping that this stuff does well on my firewall and if so, I will use it on the rest of the exterior. I am not looking for a show car, this is an all weather driver car for my Father-in-Law.
Daniel JessupLancaster, California aka "The Hot Rod Reverend"
check out the 1955 Ford Fairlane build at www.hotrodreverend.com
|
|
|
|
|
Daniel Jessup
|
|
|
Group: Forum Members
Last Active: 3 days ago
Posts: 2.0K,
Visits: 131.1K
|
Not much done today on the '55... I completed a project that the wife and oldest daughter have been begging me to do - an antique headboard for my daughter's bed. The story goes like this... My parents moved out of an old home that was originally built in the 1850's, had been used as one of the hospitals for Stonewall Jackson's army, etc. In the scrap pile when they bought the place years ago and put stuff into storage was a very old door and 6" trim pieces as shown. When they sold the place and moved out they gave me the old door and trim pieces. "What do I want with these?" I said to them. My parents just smiled at me because they had gone behind my back and talked it up to my wife and oldest daughter about the idea of making a headboard out of this old door. Little did I know! 
Anyhow since it was labor day I had some extra time to examine this thing and get the ball rolling to crank it out and get it done. You can google this idea for more photos on the internet - I am sure there are better ones than mine, but suffice to say I turned the door on its side, trimmed off both sides (what was the top and bottom), MADE CROWN MOLDING OUT OF THE OLD TRIM (please don't ask how that went lol - I finally worked it all out), and then put a piece of trim on the top for a shelf. My wife and daughter were thrilled to say the least and it all passed inspection. Best thing is the girls decided it did NOT need to be painted since the old patina was exactly what they were after. Lancaster, California aka "The Hot Rod Reverend"
check out the 1955 Ford Fairlane build at www.hotrodreverend.com
|
|
|
|
|
Daniel Jessup
|
|
|
Group: Forum Members
Last Active: 3 days ago
Posts: 2.0K,
Visits: 131.1K
|
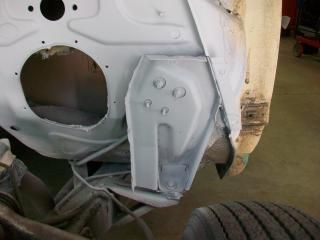
Been a long time since I posted anything, but to be real honest it has been a long time since I did anything in the shop. This past weekend I did some more blasting after I got my issues with the sandblaster sorted out. Once I changed over to a finer grit (I use that Black Diamond black sand from Tractor Supply Company) we got to cooking with gas. No worries and it went well. I am pretty sure the frame and front end will clean up pretty easily. I did make the mistake that weekend of not priming right away so after a few days flash rust had set in. A little bit of Naval Jelly and the rust dissolved right away. I removed the steering gear and column this morning - the three bolts that hold the gear to the frame were in excellent shape. I have seen pretty rough examples because moisture has a tendency to get trapped up inside there. After that I did some more blasting and prepped for "direct to metal" primer/surfacer. I have used the primer before on some stand alone parts but never on a panel... It sprays very well out of the gun and I like the coverage. The company is called "Tamco" and is based in the Richmond, Virginia area. The white paint for the tutone color is a 66-69 Ford Wimbledon White Mustang SS Urethane from Eastwood (made by Kirker). We will see how that shoots out of the gun. I plan to paint the hood hinges first and see how that goes. I might get the 56 steering column out, clean that up, and then paint that with the WW topcoat also.
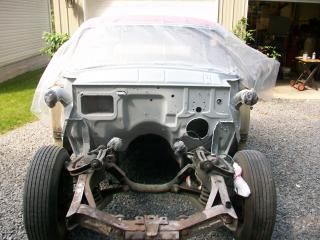 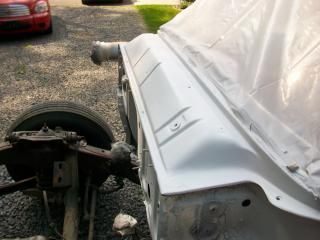
I also had the chance to blast in the cabinet this past week so I got some of the frame pieces finished and linkage rods finished. I also sprayed the Tamco primer on the hood hinges. After doing so much dismantling it feels good to finally have something ready to go back into the car.

Question: I need to modify the split cover plate that goes around the column and screws to the firewall. My cover plate is obviously for a Fordomatic and not for a manual transmission car. Does anyone have good measurements on where that hole goes and its size? Does anyone have a split cover plate they would "part" with?
Daniel JessupLancaster, California aka "The Hot Rod Reverend"
check out the 1955 Ford Fairlane build at www.hotrodreverend.com
|
|
|
|
|
pegleg
|
|
|
Group: Forum Members
Last Active: 4 Years Ago
Posts: 3.0K,
Visits: 8.7K
|
Dan, Hope he makes it. Subs are tough, I kow something about that. Spent 4 years on a diesel boat (s) in the 60's. If he makes through you can be VERY proud of him.
Frank/RebopBristol, In ( by Elkhart) 
|
|
|
|
|
Daniel Jessup
|
|
|
Group: Forum Members
Last Active: 3 days ago
Posts: 2.0K,
Visits: 131.1K
|
He is supposed to be in to see me this Christmas. For some reason,,,,, I can't reach him on his cell phone????  Daniel Jessup
Lancaster, California aka "The Hot Rod Reverend"
check out the 1955 Ford Fairlane build at www.hotrodreverend.com
|
|
|
|