Profile Picture

55 Ford Fairlane Refresh and Driver Resto Blog Begins!

Posted By Daniel Jessup 11 Years Ago
You don't have permission to rate!
Author
Message
Daniel Jessup
Posted 9 Years Ago
View Quick Profile
Supercharged

Supercharged (3.9K reputation)Supercharged (3.9K reputation)Supercharged (3.9K reputation)Supercharged (3.9K reputation)Supercharged (3.9K reputation)Supercharged (3.9K reputation)Supercharged (3.9K reputation)Supercharged (3.9K reputation)Supercharged (3.9K reputation)

Group: Forum Members
Last Active: 2 hours ago
Posts: 2.0K, Visits: 130.8K
Ummmmm, ok after a little more "testing" I think we have a winner, winner, chicken dinner! :p


That took what.... 5 minutes if that? But check out that dust! It's everywhere. We will keep moving along here and see what we can do today. Rolleyes

Daniel Jessup

Lancaster, California

aka "The Hot Rod Reverend" w00t
check out the 1955 Ford Fairlane build at www.hotrodreverend.com


Daniel Jessup
Posted 9 Years Ago
View Quick Profile
Supercharged

Supercharged (3.9K reputation)Supercharged (3.9K reputation)Supercharged (3.9K reputation)Supercharged (3.9K reputation)Supercharged (3.9K reputation)Supercharged (3.9K reputation)Supercharged (3.9K reputation)Supercharged (3.9K reputation)Supercharged (3.9K reputation)

Group: Forum Members
Last Active: 2 hours ago
Posts: 2.0K, Visits: 130.8K
Last night I did some "testing" with two forms of paint removal on the White Tutone where the crow's feet is all showing up. The first was a simple heat gun and razor blade scraper.


It took me over an hour to move that far along with that method, but it was a "no muss, no fuss" way - simply sweep up the chips on the floor. I was concerned over the idea of heating the paint being so close to the Red Tutone which is in excellent shape. Once I got through those layers you could see where the paint had followed this idea - FoMoCo primer, FoMoCo Sea Sprite Green, ? FoMoCo primer? and FoMoCo? White, then aftermarket primer, aftermarket White. How did Ford do their Tutones? Were all bodies painted a solid color and then if doing a Tutone car the white was painted over afterwards? All of the FoMoCo paint is really on there and really stable - no problems except for the few small places I am going to deal with where there is rust pitting.

Next was brushing on "Klean Strip" - it took me an hour and a half to get only this far. :confused:


A few items of observation:

1. It took THREE applications to get the paint removed from where you see the beginning photo to the ending photo, and even at the ending photo there was some sanding with 60 grit done just to clean it up.
2. The aftermarket White Tutone with the crows feet came up as fast as you please. With all of those cracks in the surface it took no time at all. Within 5 minutes it was bubbling up and peeling.
3. The original FoMoCo paint is some tough stuff. Even after following paint stripper manufacturer's directions to the letter it still did not remove all layers after THREE applications.
4. What I had feared about the seepage of paint stripper down to the Red Tutone was true. It eventually worked its way under the paint and ate into it a tick.
5. There is an obvious mess on the floor - Rolleyes

Next up is get out the 7" disk electric sander and go to town. It will be interesting though to see how much dust I kick up here in my little "harry homeowner" garage that is not made for this type of work. :eek::eek:

I also have a DA I can try, but I think that will yield the same results as the electric sander.

I do know this - it might be best to remove the white Tutone from the fenders (in storage right now) by using my sandblaster. Not sure of what it would take to get that done on the entire body - I really don't have a place to do that here and the fender will be fun enough as it is. I guess the neighborhood will have to deal with the black dust cloud coming out of the Hot Rod Reverend's house!! BigGrin

Daniel Jessup

Lancaster, California

aka "The Hot Rod Reverend" w00t
check out the 1955 Ford Fairlane build at www.hotrodreverend.com


Daniel Jessup
Posted 9 Years Ago
View Quick Profile
Supercharged

Supercharged (3.9K reputation)Supercharged (3.9K reputation)Supercharged (3.9K reputation)Supercharged (3.9K reputation)Supercharged (3.9K reputation)Supercharged (3.9K reputation)Supercharged (3.9K reputation)Supercharged (3.9K reputation)Supercharged (3.9K reputation)

Group: Forum Members
Last Active: 2 hours ago
Posts: 2.0K, Visits: 130.8K
Sometimes while working on this project I like to take some time out and do something to a sub-assembly or rebuild a few items to get some sense of "completion". This can be a carburetor, a set of rocker arms, oil pump, and the latest was just another rendition of a wall clock for the office.


This one was a little more challenging in setting the clock in the cavity because of the eyebrow trim, but it turned out nice and I like it.

Ridiculous price on those new Chrome Headlight Eyebrows - I am embarrassed to even say.

Daniel Jessup

Lancaster, California

aka "The Hot Rod Reverend" w00t
check out the 1955 Ford Fairlane build at www.hotrodreverend.com


Daniel Jessup
Posted 9 Years Ago
View Quick Profile
Supercharged

Supercharged (3.9K reputation)Supercharged (3.9K reputation)Supercharged (3.9K reputation)Supercharged (3.9K reputation)Supercharged (3.9K reputation)Supercharged (3.9K reputation)Supercharged (3.9K reputation)Supercharged (3.9K reputation)Supercharged (3.9K reputation)

Group: Forum Members
Last Active: 2 hours ago
Posts: 2.0K, Visits: 130.8K
Got back from being out of town and just had to get in the garage for some therapy. I decided to remove all of the trim (save the rear bumper and the windshield/glass trim) so I could begin the body work and paint process.

Some photos and some questions for you fellas that have more experience than I ...

First up, the doors. The passenger door is the "worst" of the two but won't require much. I am going to treat some of the rust on the inside cavity and then paint inside, making sure that the drain holes are good.


Next, a wonderful find... the previous owner decided to hold each of the Fairlane Crowns on the doors with this goo :eek: Must be pretty good stuff. After 25 years or so they never fell off!


All of the upper window openings have rust like this:


That will be fun.

Of course we had a slew of clips and fasteners to deal with but I've gotta ask a question from this photo


Which one is original? I assume the one on top that is "square" right? The other one (like some of the other clips) simply broke off in my hand when I gave a gentle tug on the SS trim pieces.

And then how about this? Check out the paint - serious crow's feet pattern going on. This paint job is about 25 years old but the white is in serious trouble like this all the way around the car. The red is in excellent shape and looks like it could have been painted 3 years ago. What gives?


I went ahead and took 120 to a patch of the white paint on the rear quarter panel just to see, then I took it to 400. I cleaned it with thinner and this is what it looked like still, although you could not physically feel any crow's feet you can still see them.


Can I paint over this if I knock it down with something as serious as 120 and then maybe follow up with my 2K primer surfacer?

Daniel Jessup

Lancaster, California

aka "The Hot Rod Reverend" w00t
check out the 1955 Ford Fairlane build at www.hotrodreverend.com


Daniel Jessup
Posted 9 Years Ago
View Quick Profile
Supercharged

Supercharged (3.9K reputation)Supercharged (3.9K reputation)Supercharged (3.9K reputation)Supercharged (3.9K reputation)Supercharged (3.9K reputation)Supercharged (3.9K reputation)Supercharged (3.9K reputation)Supercharged (3.9K reputation)Supercharged (3.9K reputation)

Group: Forum Members
Last Active: 2 hours ago
Posts: 2.0K, Visits: 130.8K
Great! do you have a photo or two to put up on the website forum here? I would like to see it.

Daniel Jessup

Lancaster, California

aka "The Hot Rod Reverend" w00t
check out the 1955 Ford Fairlane build at www.hotrodreverend.com


beachbumrod
Posted 9 Years Ago
View Quick Profile
Hitting on all eight cylinders

Hitting on all eight cylinders (6 reputation)Hitting on all eight cylinders (6 reputation)Hitting on all eight cylinders (6 reputation)Hitting on all eight cylinders (6 reputation)Hitting on all eight cylinders (6 reputation)Hitting on all eight cylinders (6 reputation)Hitting on all eight cylinders (6 reputation)Hitting on all eight cylinders (6 reputation)Hitting on all eight cylinders (6 reputation)

Group: Forum Members
Last Active: 9 Years Ago
Posts: 2, Visits: 2
Nice plan, I am not that involved in mine yet but do have it on the road. 
Daniel Jessup
Posted 9 Years Ago
View Quick Profile
Supercharged

Supercharged (3.9K reputation)Supercharged (3.9K reputation)Supercharged (3.9K reputation)Supercharged (3.9K reputation)Supercharged (3.9K reputation)Supercharged (3.9K reputation)Supercharged (3.9K reputation)Supercharged (3.9K reputation)Supercharged (3.9K reputation)

Group: Forum Members
Last Active: 2 hours ago
Posts: 2.0K, Visits: 130.8K
Alright, so after a few private messages, some public messages, and my own research on that Mr. Gasket Fuel Pressure Regulator finally I caved in and purchased one - it is a 12-1803 unit. New in the box from Holley, it has a mounting bracket, screws to mount the bracket to a firewall or other stable mount, and two "self-tapping" screws to secure the regulator to the bracket.


Not impressed with the hardware - the sheet metals screws had too large a head - they kept hitting the regulator housing. Next thing, the "self-tapping" screws were too long but we did trick that one out quickly. (the fittings and washers in the photo were from my own stash)

What I like up front - TWO outlets (for what I am doing here I can put a gauge on one end and of course the line to the carb on the other. When I got to looking at what I was going to do to mount it, I decided to take this route as you can see. Even with the air cleaner on the carb, once I install a gauge it will be easy to read when we pop the hood.

Steps taken...

Fabricate a support bracket from stock


Next, attach the regulator bracket to the support bracket (on the level BigGrin)


Now fit the regulator to the bracket assembly with the fittings already installed from the bench.


Ok now for some plumbing. After removing this mess...


I bent up some hard line to go from the regulator to the carburetor. It basically goes underneath of the upper radiator hose (at thermostat housing), takes a dive to the other end and turns back towards the carb just before the passenger side head. Then a couple of roller coaster "dipsy-do's" to get some clearance and then up to the carburetor.


I did put a filter just after the pump as pictured here...


All I had on hand was a cheapie - will have to get another one before this old 55 is put on the road permanently.

I do like the clearance now though and this is a much better routing back to the carburetor. We also have more room for the connection made at the thermostatic switch for the cooling fan.


Oh and I am still sanding and working on this guy too!


Daniel Jessup

Lancaster, California

aka "The Hot Rod Reverend" w00t
check out the 1955 Ford Fairlane build at www.hotrodreverend.com


Daniel Jessup
Posted 9 Years Ago
View Quick Profile
Supercharged

Supercharged (3.9K reputation)Supercharged (3.9K reputation)Supercharged (3.9K reputation)Supercharged (3.9K reputation)Supercharged (3.9K reputation)Supercharged (3.9K reputation)Supercharged (3.9K reputation)Supercharged (3.9K reputation)Supercharged (3.9K reputation)

Group: Forum Members
Last Active: 2 hours ago
Posts: 2.0K, Visits: 130.8K
Here it is May 7th and I feel like I've got nothing done! My air compressor (the heart beat of the shop) went down and I chase the problem for a week or so. It ended up being the start capacitor. No biggie, get it ordered, be here in 4 days, etc. Capacitor shows up - wrong one. Right box, right label, wrong capacitor in the box! Aaarrrrrggghhhh, another 4 days and we have what we need.

Pressure washer went crazy blowing water everywhere. Seems Karcher uses a lot of molded, high density pvc in their units - this one had a cracked elbow. 5 days and replaced that.

My wife drove through some truckers' explosion and she says the smoke and debris made it where she could not see a thing, van covered in all kinds of good, plastic?, black dots, and I don't know what all. 10 hours of a buff job and we are all shiny again - just in time for Mother's Day. BigGrin

I did get those vents squared away. They look good. The seals went into the units without much fanfare, and I put a tick of white lithium grease on the pivots.
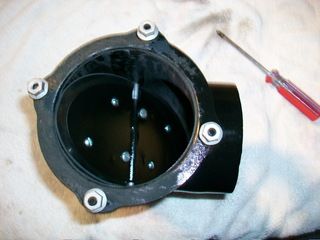
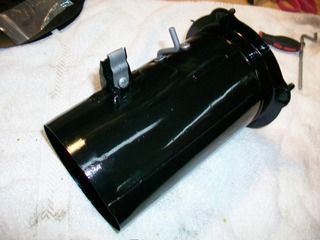
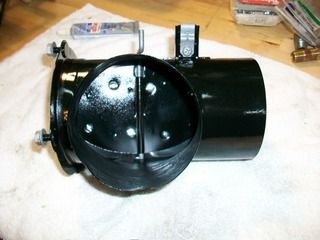
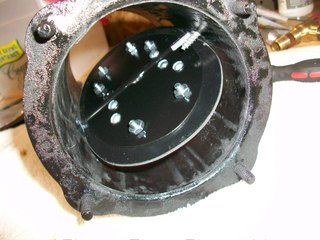
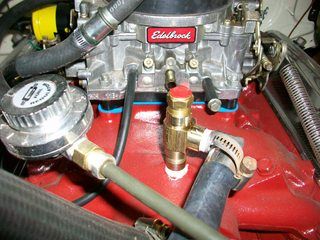
I also got a chance to mount an electric fan and plumbed a thermostatic switch after a visit to Lowe's and the plumbing section. You can see the tee I put in right there behind the thermostat housing on the intake. I could not figure a way to get a good tee and still have good access if I used the original sending unit location on the head at the rear (there is already a sending unit there for the mechanical gauge.)
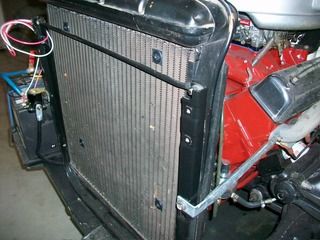
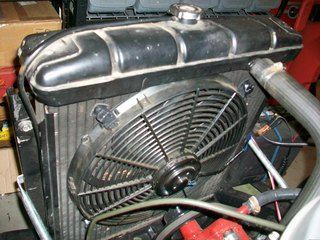
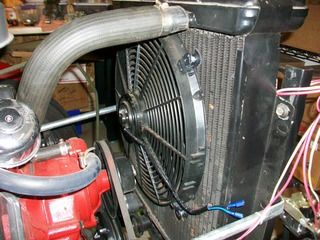

The electric fan went in without too much trouble as well. It is a pretty good unit that I had been using on my portable engine run stand. Would you believe you can get a very good mounting kit on ebay shipped to you for $1? that's right, that's what it cost me - and it looked pretty healthy too and held up that fan nice and tight.

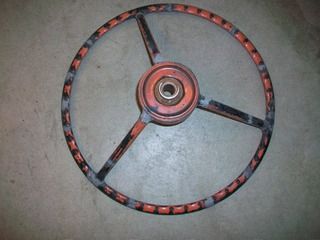
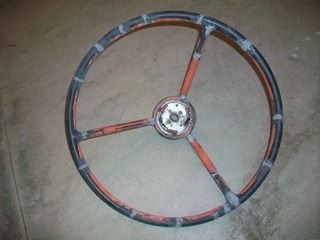
And then we have everyone's favorite job - the dreaded steering wheel! :o

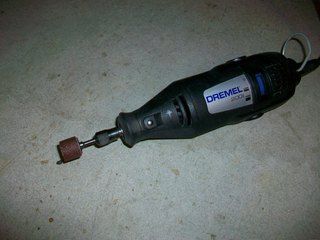
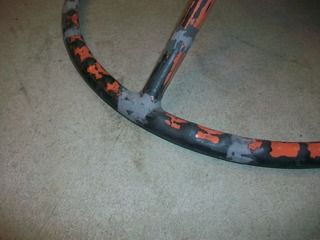
I used PC7 epoxy to fill in those cracks and crevices after opening them up and then took a dremel tool to the thing to sand it as level as I dared...ended up using a drum roll. (queue stupid joke :rolleyesSmile


After I knocked down every bulge I took 120 grit sandpaper to it. Once I got down with the whole hour and a half job (man this is tedious work!) I was a dusty mess! Good thing I used a dual cartridge filter mask. I need to paint the wheel with some primer/surfacer after wiping it down with Acetone. After that I will probably have to fill in some low spots here or there with some glaze. I am not going to spend a whole lot of time on it - it is a driver after all not a show car.

Plan to see my father-in-law soon, but it looks like it will still be a little while before the 55 is back on the road...

Daniel Jessup

Lancaster, California

aka "The Hot Rod Reverend" w00t
check out the 1955 Ford Fairlane build at www.hotrodreverend.com


Daniel Jessup
Posted 9 Years Ago
View Quick Profile
Supercharged

Supercharged (3.9K reputation)Supercharged (3.9K reputation)Supercharged (3.9K reputation)Supercharged (3.9K reputation)Supercharged (3.9K reputation)Supercharged (3.9K reputation)Supercharged (3.9K reputation)Supercharged (3.9K reputation)Supercharged (3.9K reputation)

Group: Forum Members
Last Active: 2 hours ago
Posts: 2.0K, Visits: 130.8K
The son and I had a good afternoon together. We did not get too much down on the car or any Y block parts, but we did get to use our brains, hands, and a little math to put together a 2x4 shelving unit in the basement. My garage is just too full of parts, tools, and the like to be able to move around there without my fat rear end knocking something over, getting grease all over me, etc. It is like working in a can of sardines. You guys that have smaller workshops I don't know how you do it!

Anyway, I enjoyed the time with my 13 year old boy, EJ.


We just made it from scrap lumber and all as you can see. The measurements are 72" high by 29" deep and 48" wide. She is straight and true on the level. We started putting some boxes and totes on the shelves before I had a chance to grab the camera. She will sit in the basement for a good while - pretty heavy shelving here.

The kits for the vent seal replacement came in while I was out of town...


Whereas the originals were in two pieces (I am pretty sure the originals were installed as a two piece assembly in each tube) the new seals are one piece. Also, there are a good number of machine screws and nuts to put the flappers back together. However, methinks I have one too many holes and will need some more hardware! Ouch.

Daniel Jessup

Lancaster, California

aka "The Hot Rod Reverend" w00t
check out the 1955 Ford Fairlane build at www.hotrodreverend.com


Daniel Jessup
Posted 9 Years Ago
View Quick Profile
Supercharged

Supercharged (3.9K reputation)Supercharged (3.9K reputation)Supercharged (3.9K reputation)Supercharged (3.9K reputation)Supercharged (3.9K reputation)Supercharged (3.9K reputation)Supercharged (3.9K reputation)Supercharged (3.9K reputation)Supercharged (3.9K reputation)

Group: Forum Members
Last Active: 2 hours ago
Posts: 2.0K, Visits: 130.8K
those crestliner wheels are all out beautiful. I don't know if Ford ever made a better looking steering wheel in the 50s!

Daniel Jessup

Lancaster, California

aka "The Hot Rod Reverend" w00t
check out the 1955 Ford Fairlane build at www.hotrodreverend.com


Reading This Topic


Site Meter