Profile Picture

Almost no compression

Posted By dennis22 4 Years Ago
You don't have permission to rate!
Author
Message
dennis22
Posted 4 Years Ago
View Quick Profile
Supercharged

Supercharged (412 reputation)Supercharged (412 reputation)Supercharged (412 reputation)Supercharged (412 reputation)Supercharged (412 reputation)Supercharged (412 reputation)Supercharged (412 reputation)Supercharged (412 reputation)Supercharged (412 reputation)

Group: Forum Members
Last Active: 3 Years Ago
Posts: 160, Visits: 57.6K
New set of rings ordered and I will lap the valves while I wait. Hopefully that fixed the issue. Thanks!


Thanks, Dennis.

56 F100 - 272 Y Block
NSW, Australia.


dennis22
Posted 4 Years Ago
View Quick Profile
Supercharged

Supercharged (412 reputation)Supercharged (412 reputation)Supercharged (412 reputation)Supercharged (412 reputation)Supercharged (412 reputation)Supercharged (412 reputation)Supercharged (412 reputation)Supercharged (412 reputation)Supercharged (412 reputation)

Group: Forum Members
Last Active: 3 Years Ago
Posts: 160, Visits: 57.6K
Promising update-

So after a bit more research about piston rings I read an article from Wiseco that suggests (my quick summary follows)- that the second ring doesn’t do too much in the way of compression but it’s job is to remove any oil the oil rings didn’t remove. (You guys probably already knew this).
See article below.

http://blog.wiseco.com/2nd-ring-purpose-and-function-explained?hs_amp=true

Anyway that got me thinking about Charlie’s internet idea about carb or brake cleaner in the combustion chambers, I hadn’t tried that yet because I had tunnel vision on the odd ring causing the issue.

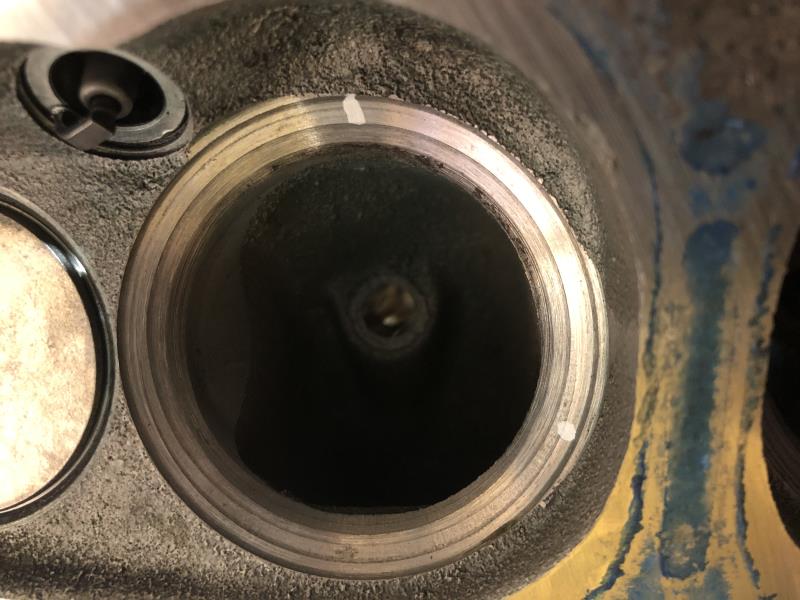
So I propped the heads up, installed the plugs and sprayed brake cleaner in and filled the combustion chamber and watched it drain out past the intake valve🤦‍♂️😩. Upon closer inspection it looks like one of the cut lines is kind of washed out, see pics below.

So I’m off to the machine shop tomorrow to have them rectify the issue. It’s a shame because it’s cost me the price of intake and head gaskets and my time pulling it apart again and the engine would have probably been back in the truck now. But I guess this is half the fun of having these old cars, it’s never ending and that’s ok for the moment, haha.

No5 chamber. You can see the line definition is washed out between (short side) the two white dots


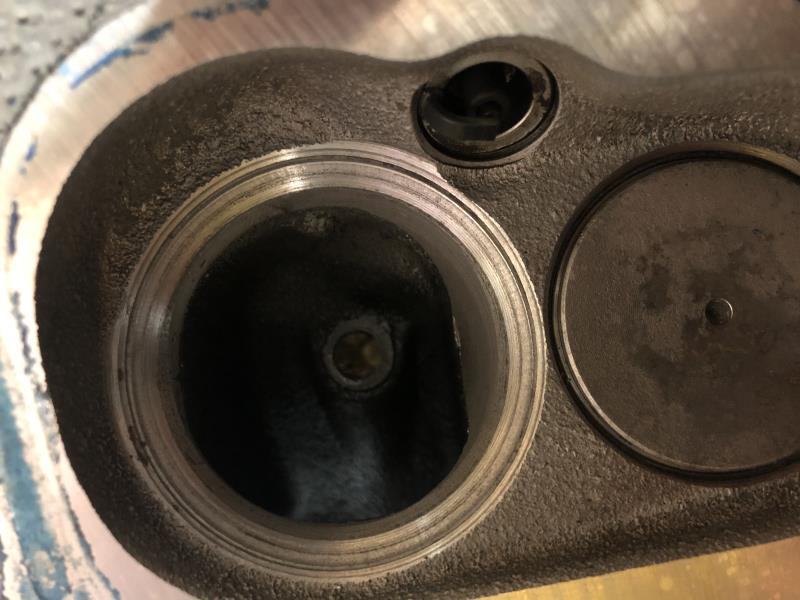
No6 chamber. You can see the lines are all defined


Anyone need a new set of rings, haha😅


Thanks, Dennis.

56 F100 - 272 Y Block
NSW, Australia.


Robs36Ford
Posted 4 Years Ago
View Quick Profile
Supercharged

Supercharged (186 reputation)Supercharged (186 reputation)Supercharged (186 reputation)Supercharged (186 reputation)Supercharged (186 reputation)Supercharged (186 reputation)Supercharged (186 reputation)Supercharged (186 reputation)Supercharged (186 reputation)

Group: Forum Members
Last Active: 7 days ago
Posts: 70, Visits: 302.5K
Valves not seated is a big leak. Need to ask:
Are the valves square to the seat?  Check by spinning them with the Lapping tool or similar to see if the valve is bent or not in line with the seat.
Were the valves Lapped to the seat fully? Seeing the seat with irregular shapes suggests it was either not cut square to the valve guide or the valve is bent.


1936 Ford 3W Coupe : 56 T-Bird 312, 47 Packard 3 speed, 40 juice brakes.
1968 Merc Cyclone FB GT 390, Getting a better front clip!
1977 Ford F-250 Supercab RWD Explorer Long box.
1976 Chev Camaro RS LT
Future rebuild : 1949 Ford F-1

Lord Gaga
Posted 4 Years Ago
View Quick Profile
Supercharged

Supercharged (2.0K reputation)Supercharged (2.0K reputation)Supercharged (2.0K reputation)Supercharged (2.0K reputation)Supercharged (2.0K reputation)Supercharged (2.0K reputation)Supercharged (2.0K reputation)Supercharged (2.0K reputation)Supercharged (2.0K reputation)

Group: Forum Members
Last Active: 9 hours ago
Posts: 457, Visits: 182.4K
When you get the heads back hand lap the valve seats. All you need is a cheap suction cup ltool and some compound. Be absolutely sure all traces of lapping compound are GONE when the job is done! AND make sure that the rings are installed right way up. Especially important on the second ring for oil control.

"FREE SAMPLE"
Dave C
Posted 4 Years Ago
View Quick Profile
Supercharged

Supercharged (250 reputation)Supercharged (250 reputation)Supercharged (250 reputation)Supercharged (250 reputation)Supercharged (250 reputation)Supercharged (250 reputation)Supercharged (250 reputation)Supercharged (250 reputation)Supercharged (250 reputation)

Group: Forum Members
Last Active: 4 Years Ago
Posts: 101, Visits: 31.2K
If you don't want to buy the suction cup.. I use a cordless drill. Put lapping compound on valve and seat attach drill to valve at the keepers. Spin the valve an lift it off the seat and back occasionally. Do this for maybe 20-30 seconds. Remove valve and clean compound off and look at the way the valve is seating. 
I do this for my drag car every time I resurface the valves. Works like a champ.

Dave  
dennis22
Posted 4 Years Ago
View Quick Profile
Supercharged

Supercharged (412 reputation)Supercharged (412 reputation)Supercharged (412 reputation)Supercharged (412 reputation)Supercharged (412 reputation)Supercharged (412 reputation)Supercharged (412 reputation)Supercharged (412 reputation)Supercharged (412 reputation)

Group: Forum Members
Last Active: 3 Years Ago
Posts: 160, Visits: 57.6K
Rob,Dave, & lord Gaga-

I’m dropping the heads back to the machinist this afternoon.

I have a valve grinding tool and Dave I have used the drill method before on some older heads, but this time Since they are new seats I’ll stick to the hand method.

Thanks for all the feed back! I’ll let you know how it all turns out.


Thanks, Dennis.

56 F100 - 272 Y Block
NSW, Australia.


Lord Gaga
Posted 4 Years Ago
View Quick Profile
Supercharged

Supercharged (2.0K reputation)Supercharged (2.0K reputation)Supercharged (2.0K reputation)Supercharged (2.0K reputation)Supercharged (2.0K reputation)Supercharged (2.0K reputation)Supercharged (2.0K reputation)Supercharged (2.0K reputation)Supercharged (2.0K reputation)

Group: Forum Members
Last Active: 9 hours ago
Posts: 457, Visits: 182.4K
Great. forgot to mention; use a light spring under the valve to lift it occasionally to spread the compound. Use a back and forth rotation.  Don't over do it. Wipe the compound off and look for a even grey color on valve and seat. Water based compound is best. Wash heads well with detergent and water, dry well and spray with WD40. Best wishes.


"FREE SAMPLE"
dennis22
Posted 4 Years Ago
View Quick Profile
Supercharged

Supercharged (412 reputation)Supercharged (412 reputation)Supercharged (412 reputation)Supercharged (412 reputation)Supercharged (412 reputation)Supercharged (412 reputation)Supercharged (412 reputation)Supercharged (412 reputation)Supercharged (412 reputation)

Group: Forum Members
Last Active: 3 Years Ago
Posts: 160, Visits: 57.6K
Small update-

The machinist fixed the valve seat in an hour and was fairly embarrassed that the head left his shop like that.

This afternoon I cleaned the remaining gasket material from the head surface and dissembled the valves for lapping.

I have one head done and I’ll do the other head tomorrow then give them a good clean.

Thanks for all the help and information fellas. Hopefully this will be the last time I have the heads off for a while🤞😅


Exhaust valve before


Exhaust valve after


Exhaust seat before


Exhaust seat after


Looks like the machinist didn’t want to make the same mistake twice


Thanks, Dennis.

56 F100 - 272 Y Block
NSW, Australia.


Lord Gaga
Posted 4 Years Ago
View Quick Profile
Supercharged

Supercharged (2.0K reputation)Supercharged (2.0K reputation)Supercharged (2.0K reputation)Supercharged (2.0K reputation)Supercharged (2.0K reputation)Supercharged (2.0K reputation)Supercharged (2.0K reputation)Supercharged (2.0K reputation)Supercharged (2.0K reputation)

Group: Forum Members
Last Active: 9 hours ago
Posts: 457, Visits: 182.4K
Nice work Dennis!

"FREE SAMPLE"
dennis22
Posted 4 Years Ago
View Quick Profile
Supercharged

Supercharged (412 reputation)Supercharged (412 reputation)Supercharged (412 reputation)Supercharged (412 reputation)Supercharged (412 reputation)Supercharged (412 reputation)Supercharged (412 reputation)Supercharged (412 reputation)Supercharged (412 reputation)

Group: Forum Members
Last Active: 3 Years Ago
Posts: 160, Visits: 57.6K
Thanks Lord Gaga,

I did notice an inconsistency in the grey lapping markings on 2 intake valves. I’m wondering if I should have the machinist address these issues or if they are ok to leave? What do you guys think?

Good intake valve lap


Suspicious intake valve lap (I have done this one 3 times to see it it would come good)


Thanks, Dennis.

56 F100 - 272 Y Block
NSW, Australia.


Reading This Topic


Site Meter