|
By dennis22 - 6 Years Ago
|
Hi guys,
I have a bit of a curly one I need help with... or at least use the forum as a sound board.
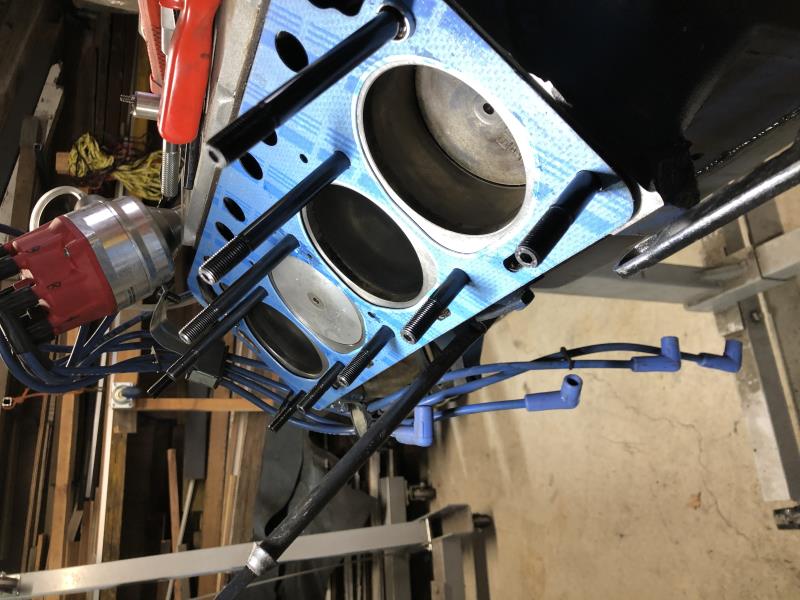
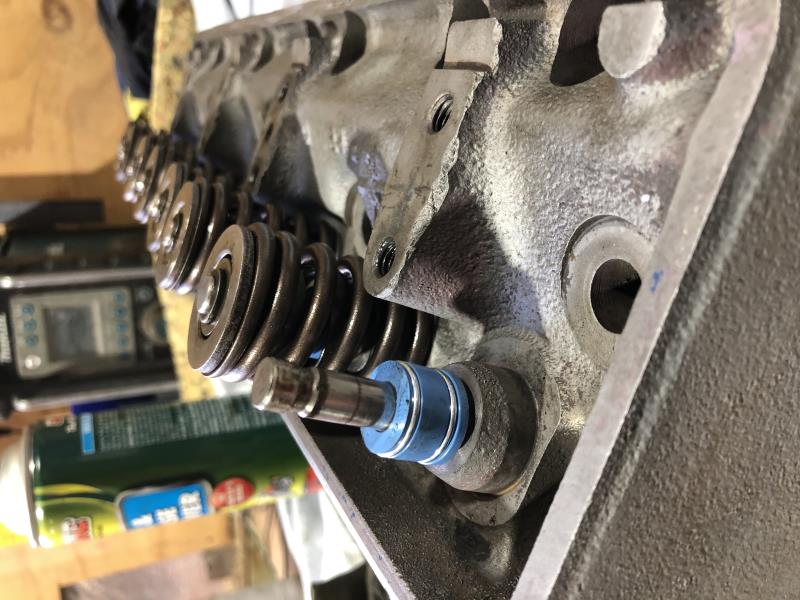
I just got my heads back from the machinist, installed my new head studs, gaskets (corners toward the front) and torqued down the head (80ft-lbs 3 times as the ARP/Mummert guide suggests). I then installed my new adjusters and pushrods and went about setting the valve lash. I filled the engine up with new oil and installed a new filter and used a drill to prime her up.
Since I had the plugs out, I was blocking the spark plug holes with my thumb while turning the crank with a wrench to get the compression stroke. The passenger side (1-4) gave me plenty of pressure by feel of thumb when rotating the engine but when it came to no5 piston... not even a breath of air, but 6,7,8 all seem fine, Something is wrong, I have tried several times holding my thumb over the no5 plug hole but nothing. I tried a gauge on all other cylinders and got roughly 40 psi but 0 on no5 (keep in mind I’m hand cranking).
I did use a dial gauge on both intake and exhaust and compared it to no1 cylinder to make sure the valves are opening/closing all the way and it was ok.
I am leaning toward a ring problem, as I put some oil in no5 cylinder and got some pressure by feel of thumb over plug hole.
Bit of background-
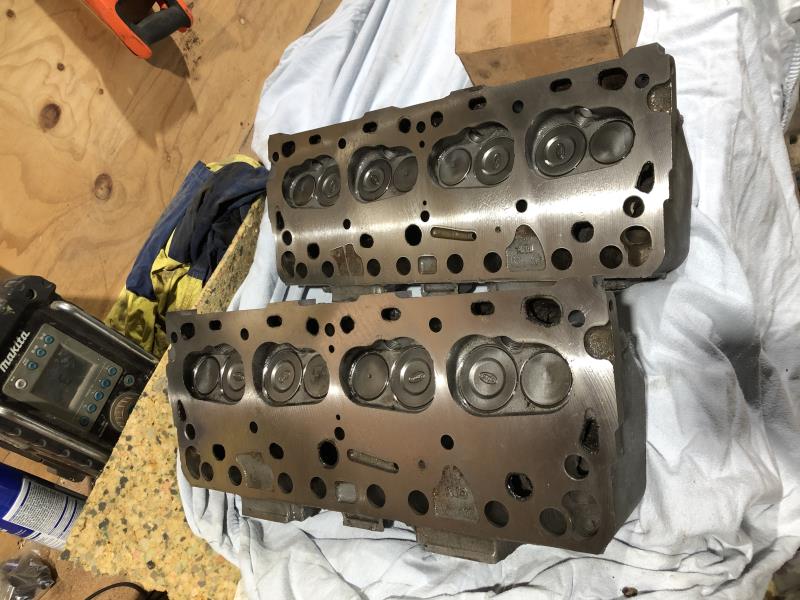
The heads received
- new hardened exhaust seats
- full valve grind job
- machined head surface
- .530 valve guide cut and positive seals
The machinist has over 30years experience and was recommended by a reputable mechanic, so I don’t think it’s the heads or head gasket.
Block history-
The 272 engine was sleeved after a failed cylinder boring attempt and 20thou pistons were fitted (didn’t sonic check and went for 292 std Pistons size) (different machinist)
Thinking about it, after the rebuild the engine has always sounded like it had a bit of a miss but I thought that was because I didn’t have the head work done but I was sure I checked the compression before and after the rebuild but it’s been a couple of years and only just got the heads done. The engine hasn’t seen many hours- less than 5 and most on an engine stand.
I did snap a piston ring when installing the rings, so there is one different brand ring but I can’t remember which piston it’s on.
On the weekend I’ll tear it all back down and pop out no5 piston and see what the story is. It’s a big hit to the morale having to pull it all back down again and discard the newly installed gaskets and oil but it’s all experience and valuable lessons.
|
|
By Ted - 6 Years Ago
|
If the engine has set for an extended period of time, then stuck piston rings are a real possibility and especially if the vehicle was not garaged. There are potential fixes for this other than tearing the engine back down.
Before doing any disassembly, I’ll suggest performing a leak down test. A leak down test will point to exactly where the lack of compression is with the likely candidates being the intake valve, exhaust valve, head gasket, or piston ring seal.
|
|
By dennis22 - 6 Years Ago
|
Thanks Ted, I will get a leak down test kit this week and see what the result is.
The engine has sat for 18 months while I was away but was stored inside and was dry.
How do you ‘un-stick’ piston rings?
|
|
By Ted - 6 Years Ago
|
dennis22 (7/14/2020)
How do you ‘un-stick’ piston rings?
Four ounces of ATF in each cylinder and then pressurizing each cylinder with 100+ psi air. Let it sit overnight and pressurize the cylinders once more. Clear the oil from the cylinders, reinstall the spark plugs, start the engine and bring it up to operating temperature. This doesn’t work all the time but sure beats tearing down an engine when it does work.
|
|
By dennis22 - 6 Years Ago
|
Thanks Ted.
I already have the engine out of the car and I have ordered some ARP main studs and rod bolts, which I should have installed when I rebuilt the thing a couple of years ago🤦♂️- i’m sure many of us have made that same mistake only to “do it right” later on with the benifits of hindsight, so I think I’m just going to tear into it anyway, get everything right.
Just waiting on the leak down test kit to arrive before I get to far ahead of myself.
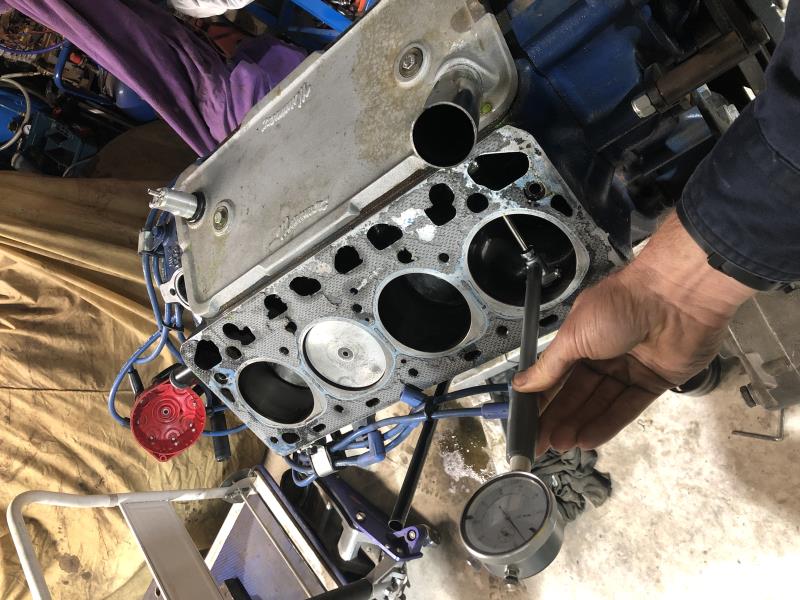
I ordered a dial bore gauge and outside micrometer so for the sake of learning and my piece of mind, I’m going to pull every piston and check Piston and cylinder diameter and record everything and also have a look at the rings while the pistons are out. Already getting ahead of myself....
|
|
By dennis22 - 6 Years Ago
|
Update-
So I couldn’t get my hands on a quality leak down test kit, seems like they are all on back order and have a 2-3month lead time. So I ordered an 18mm spark plug/compressed air adaptor and put some air into the cylinders. I tried a couple of cylinders but I couldn’t detect any change or notice anything different.
I pulled the heads off and popped out No5 & No1 cylinder and had a look. Everything looks ok to me although I did notice No5 piston compression ring gaps had lined up but not sure if that would cause the almost loss of all compression. The rings moved freely and look to be in good condition on both pistons. I did snap a compression ring when I rebuilt the engine and had to replace 1x Bottom comp ring with a different type And I suspected that could be the culprit but It Turns out that was on No1 cylinder.
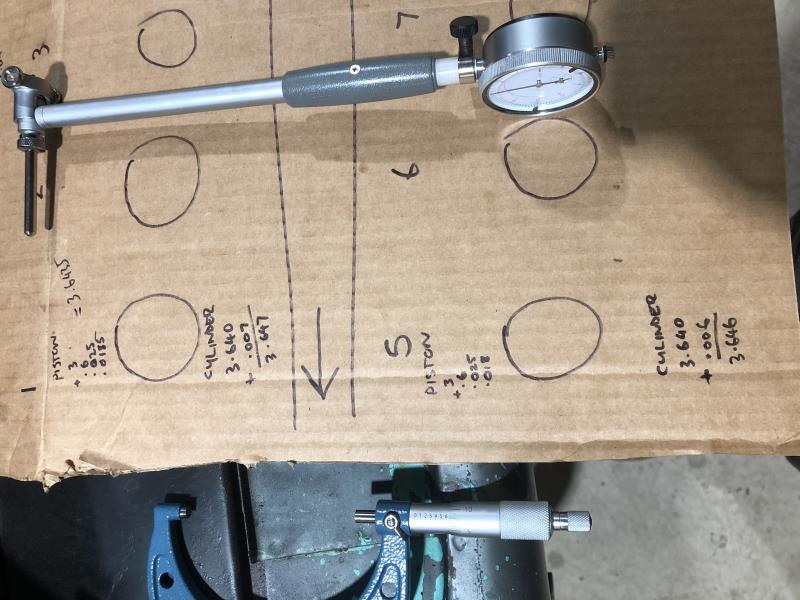
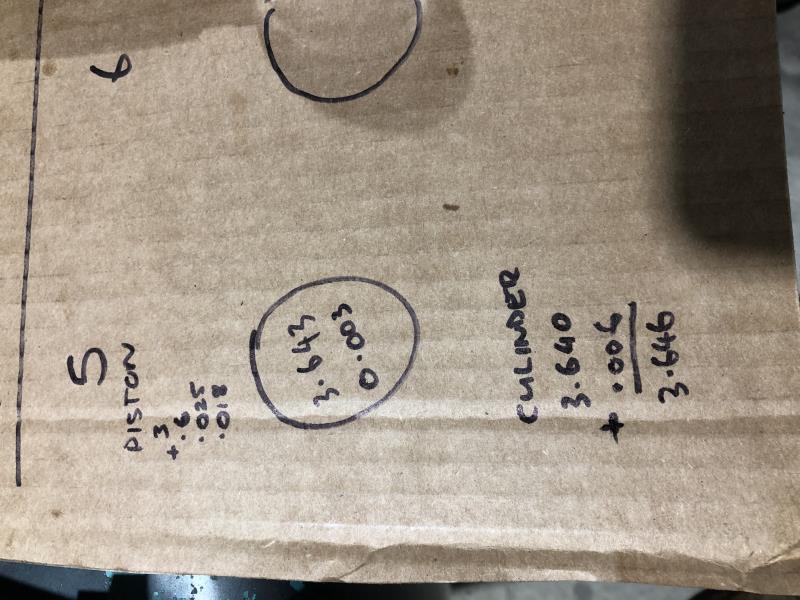
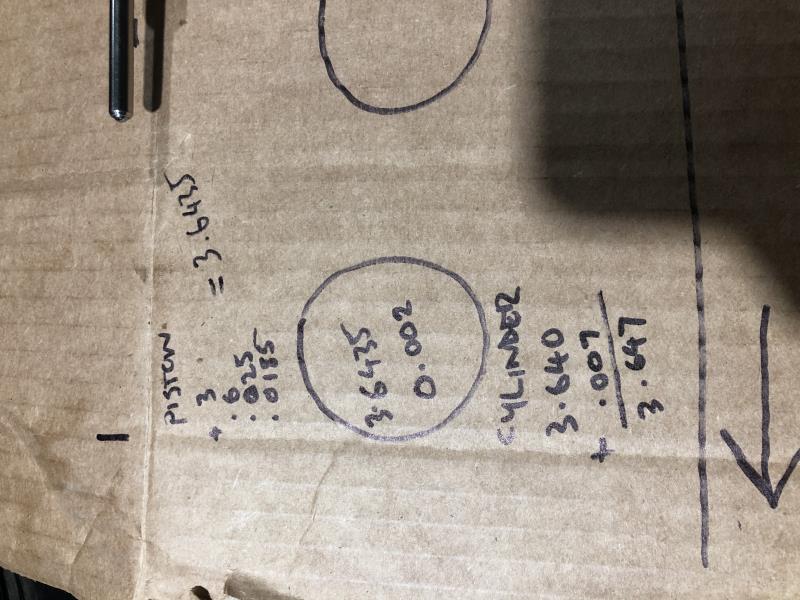
Next step was to measure both pistons and both cylinder bore diameters. I got a difference of -0.003 between piston/cylinder 5. What should the difference between piston and cylinder be?
I will have to remove the rest of the pistons on the weekend and measure them compared to their cylinders but 5 & 1 look ok to me. (Bore measurements were taken from top/middle/bottom on both axis with 0.001 difference, piston measurements were taken from about 1/2 to 1 inch down from the skirt)- please correct me it that is incorrect.
I don’t think it’s anything to do with the heads because they just got machined and new ex seats fitted. Can you test heads on the bench?
Happy to hear if anyone has any ideas!

|
|
By RB - 6 Years Ago
|
|
This may not be relevant in your case, but had a 390 that after rebuilding heads and reassembly had low/no compression. It turned out the head bolts bottomed out before clamping the head properly. Guy forgot to install the hardened washers under the bolt head plus the block had been decked in the past
|
|
By dennis22 - 6 Years Ago
|
|
Thanks for the suggestion RB, the block has been decked but but I installed head studs after the heads came back from the machine shop.
|
|
By charliemccraney - 6 Years Ago
|
Re bench testing the heads, I've heard of setting them up to that the chambers are up and the deck surface is level and spraying carb or brake cleaner into the chamber to see if it leaks by a valve.
- pretty sure it was heard on the internet, so take that for what it is worth.
|
|
By dennis22 - 6 Years Ago
|
|
I’ll give it a shot
|
|
By Joe-JDC - 6 Years Ago
|
|
A simple adapter with rubber gasket to cover the intake port, and a vacuum port fitting. Pull vacuum on the closed valve and see if it holds. Local shop tests all valve jobs by pulling 80" vacuum before letting heads go out door. Joe-JDC
|
|
By dennis22 - 6 Years Ago
|
Thanks Joe,
I just checked with the machine shop an they don’t test the heads before they go out.
Would having the compression ring gaps aligned cause a loss in compression (almost none by feel of thumb over plug hole) when hand cranking but be less noticeable when the engine is running?
|
|
By blocky - 6 Years Ago
|
|
going to make a fool of myself (yet again) but on pic no. 2 is the piston all the way up the bore or is that just the position it was in when you took the pic. also have you got the rings facing up / down the correct way??
|
|
By dennis22 - 6 Years Ago
|
Hi Blocky, yeah mate thats just how it was when I took the photo not at TDC.
Checking all the rings are installed correctly is one of my checks once I have all the cylinders out. I’ll measure each bore and piston diameter and compare differences, although the issue is with No5 I still want to check the rest while everything is apart.
Checklist
- check rings installed correctly
- check piston to bore tolerance
- check valves for tightness (carb cleaner or vacuum test somehow)
- any other suggestions?
|
|
By charliemccraney - 6 Years Ago
|
|
Ring gaps aligned will not result in no compression. When you consider the exposed area between the gap and crown of the piston compared to the volume of the cylinder, any compression loss will not be detectable by conventional means. It's something like .00004" square, likely smaller than that.
|
|
By blocky - 6 Years Ago
|
|
just a thought but i hope no 5 is not undersize. good luck.i thought these strange problems only happened to me. cheers
|
|
By dennis22 - 6 Years Ago
|
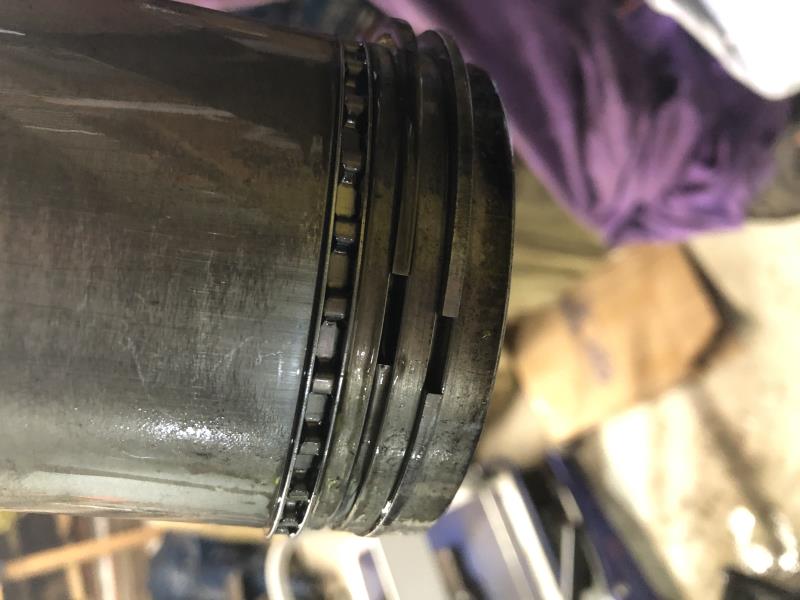
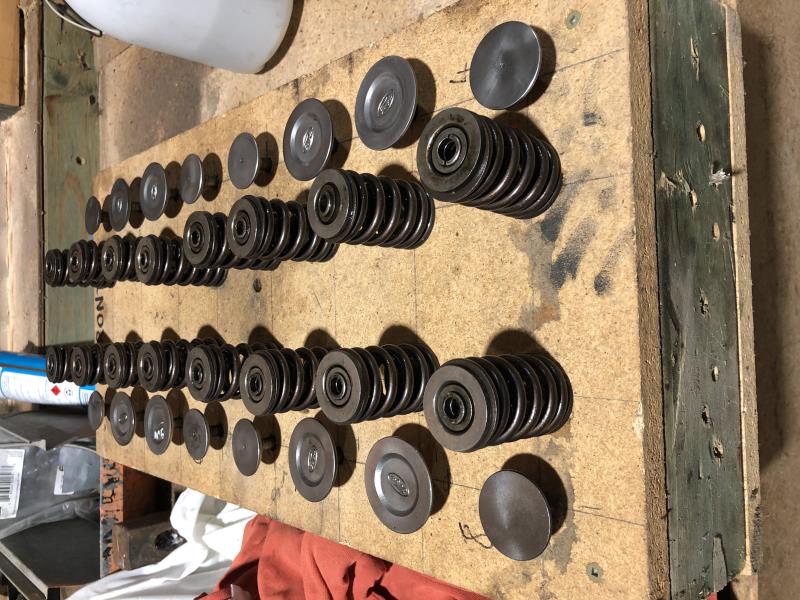
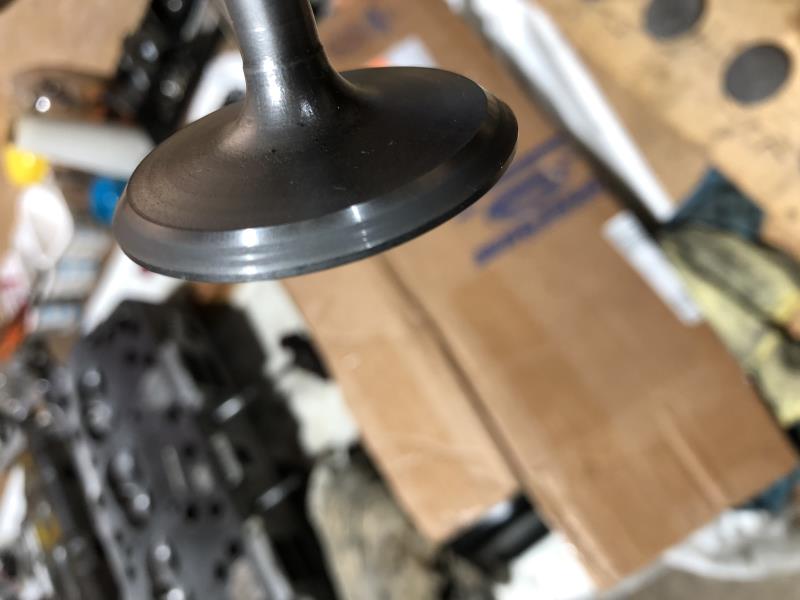
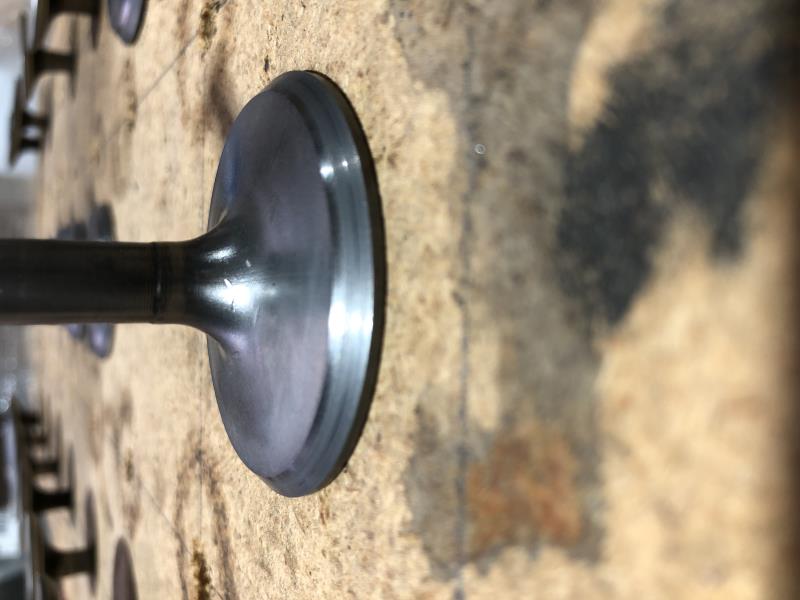
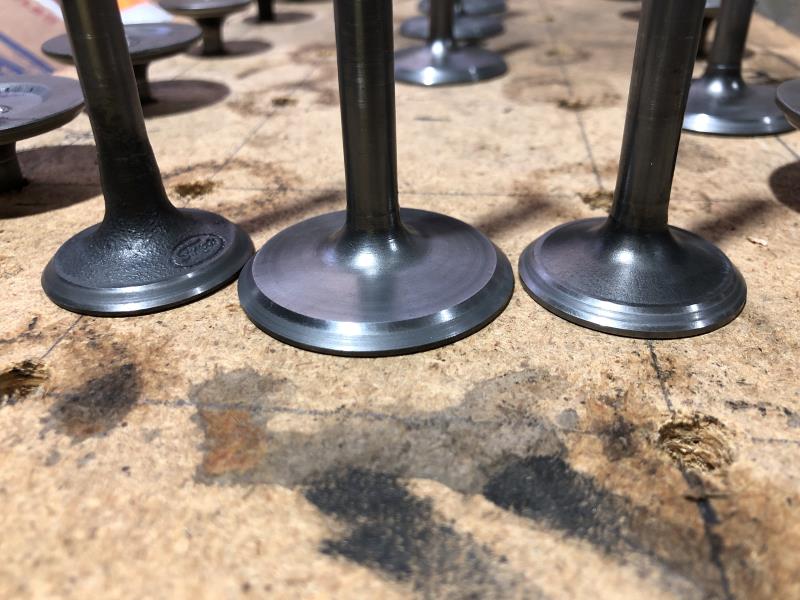
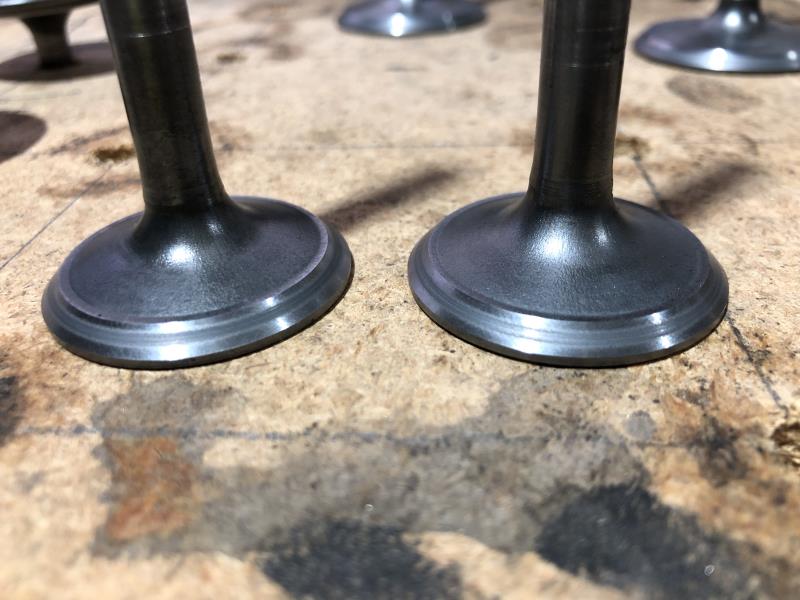
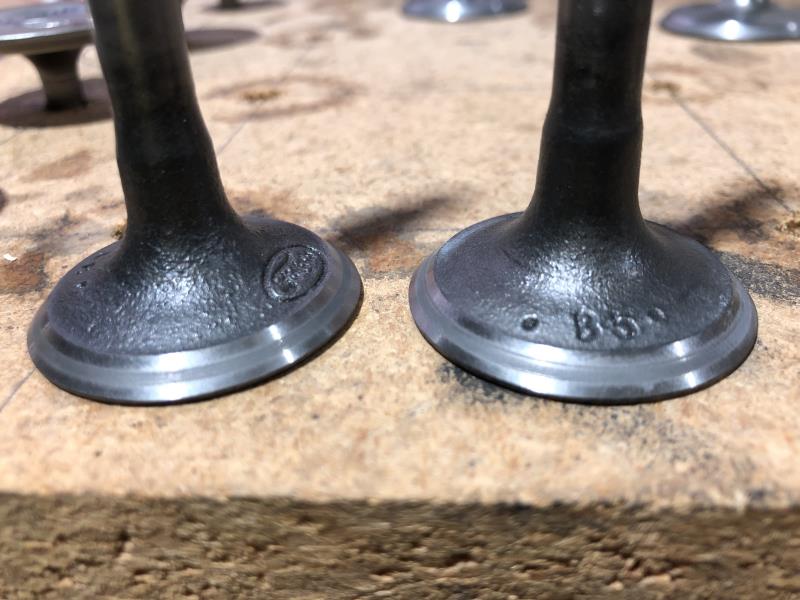
Ok, I found an clue to why No5 had almost no compression, turns out My memory had failed me. Last night I pulled No1 & 5 pistons and everything looked ok apart from the odd ring that I snapped and replaced with another new ring when I rebuilt the engine. But the ring I thought I snapped and replaced on No1 cylinder was actually the ring on No5. I just popped out No2 & 6 and they both have serrated bottom compression rings, same as No1 so No5 is the odd one out- see pics below.
Now I don’t have the knowledge or experience to tell me this is the cause of the issue but it sure seems like it could be. When I snapped the ring I called the supplier and ordered 2 more rings (one as extra). When I received the ring I realized it wasn’t the same and phoned the supplier back, they said the original set was about 30yrs old and it was the last pack so they sent me modern replacements. I’m hoping they didn’t send me 2x top rings and now I can’t find the instructions for the new rings. Anyway what do you guys think? Could it be the cause? I’m not sure it’s even the same size as the rest.
No1 serrated bottom face of bottom (same as 2,3,4,6,7,8) compression ring
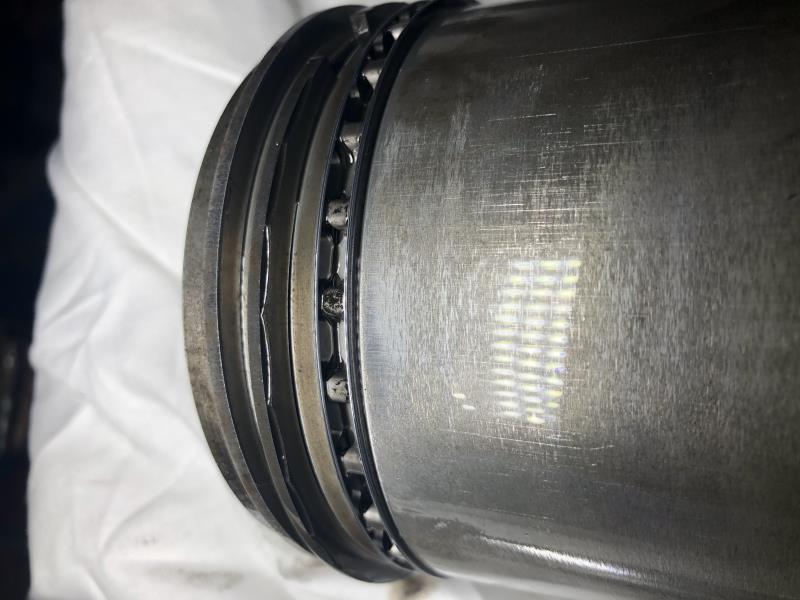
No1 different angle
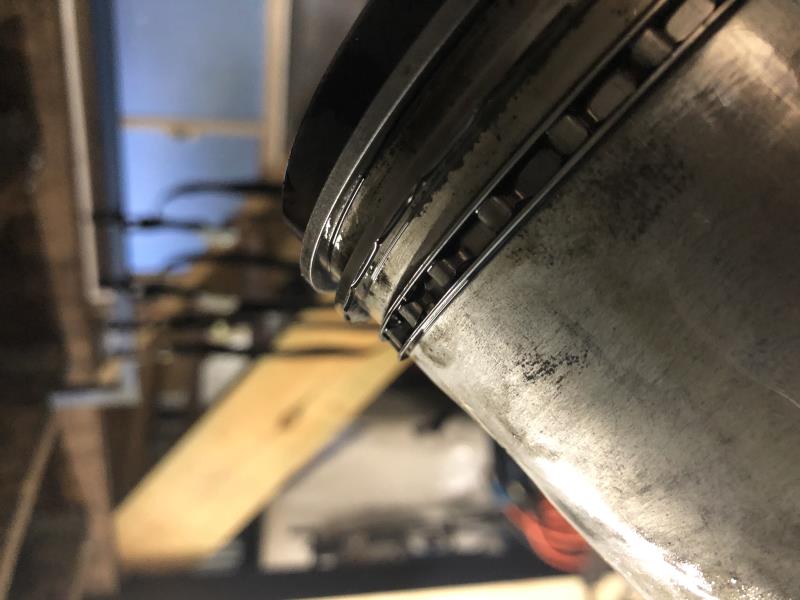
No5 non serrated bottom ring
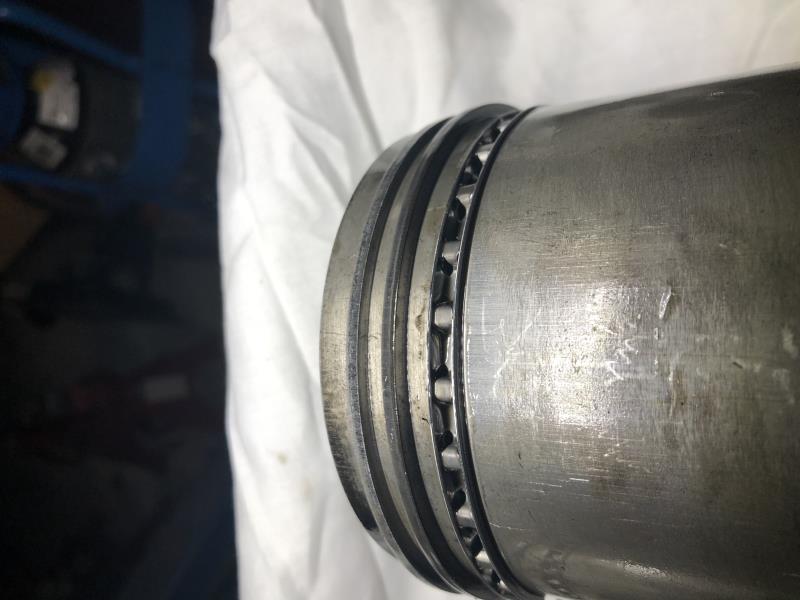
No5 different angle
|
|
By Lord Gaga - 6 Years Ago
|
Get a new set of good old GRANT cast iron rings and be done with it!!
(Be sure to check end gaps)
|
|
By 2721955meteor - 6 Years Ago
|
|
after installing inserts and new valves i would at least lapel valves with fine compound. have rectified several new alum heads that 1 or 2 of the valves where not sealing.in both cases it would be a long time to pound in. best to reface the hardened seat and valve on the cylinder in question,while head is off i would lap the rest . easy to confirm seat corectness with laping by hand
|
|
By blocky - 6 Years Ago
|
|
yes get a new complete set
|
|
By dennis22 - 6 Years Ago
|
|
New set of rings ordered and I will lap the valves while I wait. Hopefully that fixed the issue. Thanks!
|
|
By dennis22 - 6 Years Ago
|
Promising update-
So after a bit more research about piston rings I read an article from Wiseco that suggests (my quick summary follows)- that the second ring doesn’t do too much in the way of compression but it’s job is to remove any oil the oil rings didn’t remove. (You guys probably already knew this).
See article below.
http://blog.wiseco.com/2nd-ring-purpose-and-function-explained?hs_amp=true
Anyway that got me thinking about Charlie’s internet idea about carb or brake cleaner in the combustion chambers, I hadn’t tried that yet because I had tunnel vision on the odd ring causing the issue.
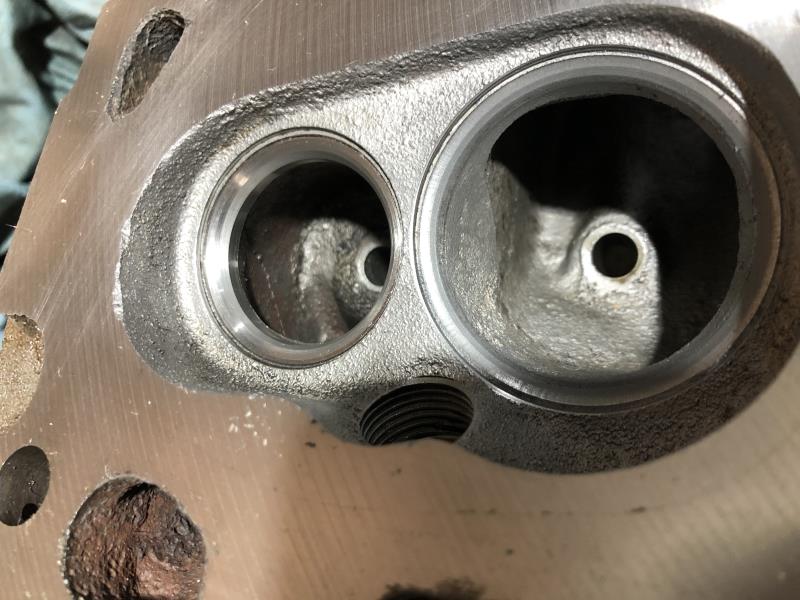
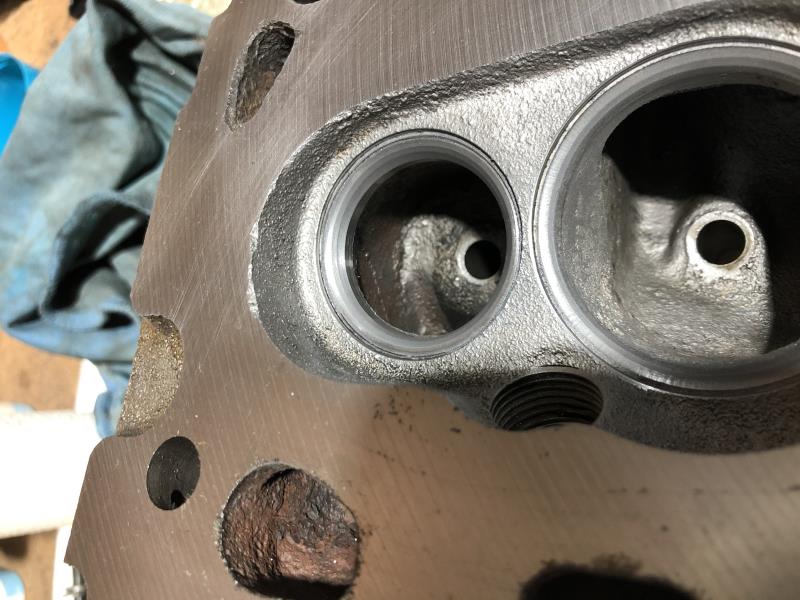
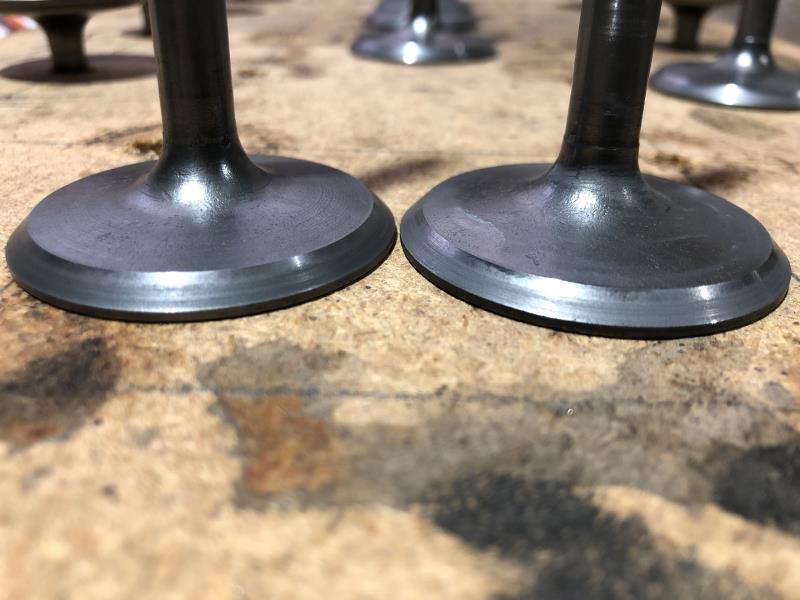
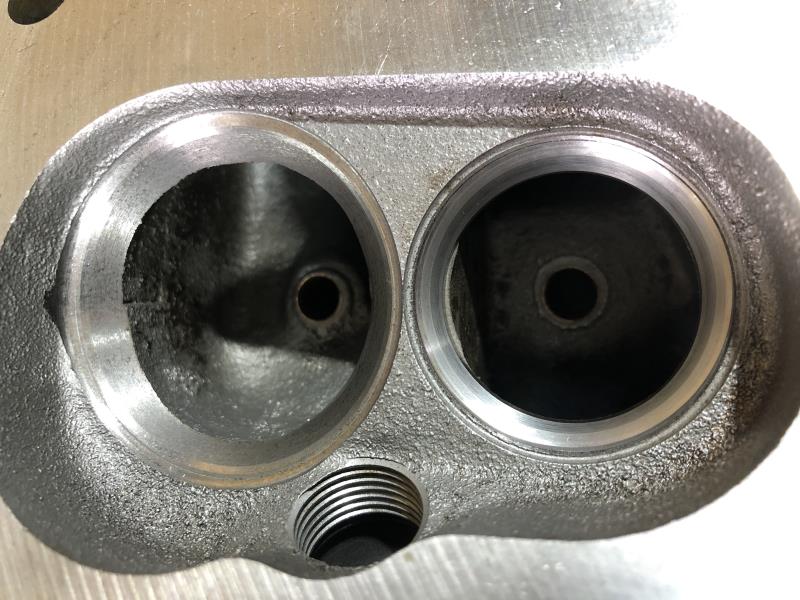
So I propped the heads up, installed the plugs and sprayed brake cleaner in and filled the combustion chamber and watched it drain out past the intake valve🤦♂️😩. Upon closer inspection it looks like one of the cut lines is kind of washed out, see pics below.
So I’m off to the machine shop tomorrow to have them rectify the issue. It’s a shame because it’s cost me the price of intake and head gaskets and my time pulling it apart again and the engine would have probably been back in the truck now. But I guess this is half the fun of having these old cars, it’s never ending and that’s ok for the moment, haha.
No5 chamber. You can see the line definition is washed out between (short side) the two white dots
No6 chamber. You can see the lines are all defined
Anyone need a new set of rings, haha😅
|
|
By Robs36Ford - 6 Years Ago
|
Valves not seated is a big leak. Need to ask:
Are the valves square to the seat? Check by spinning them with the Lapping tool or similar to see if the valve is bent or not in line with the seat.
Were the valves Lapped to the seat fully? Seeing the seat with irregular shapes suggests it was either not cut square to the valve guide or the valve is bent.
|
|
By Lord Gaga - 6 Years Ago
|
|
When you get the heads back hand lap the valve seats. All you need is a cheap suction cup ltool and some compound. Be absolutely sure all traces of lapping compound are GONE when the job is done! AND make sure that the rings are installed right way up. Especially important on the second ring for oil control.
|
|
By Dave C - 6 Years Ago
|
If you don't want to buy the suction cup.. I use a cordless drill. Put lapping compound on valve and seat attach drill to valve at the keepers. Spin the valve an lift it off the seat and back occasionally. Do this for maybe 20-30 seconds. Remove valve and clean compound off and look at the way the valve is seating.
I do this for my drag car every time I resurface the valves. Works like a champ.
Dave
|
|
By dennis22 - 6 Years Ago
|
Rob,Dave, & lord Gaga-
I’m dropping the heads back to the machinist this afternoon.
I have a valve grinding tool and Dave I have used the drill method before on some older heads, but this time Since they are new seats I’ll stick to the hand method.
Thanks for all the feed back! I’ll let you know how it all turns out.
|
|
By Lord Gaga - 6 Years Ago
|
Great. forgot to mention; use a light spring under the valve to lift it occasionally to spread the compound. Use a back and forth rotation. Don't over do it. Wipe the compound off and look for a even grey color on valve and seat. Water based compound is best. Wash heads well with detergent and water, dry well and spray with WD40. Best wishes.
|
|
By dennis22 - 6 Years Ago
|
Small update-
The machinist fixed the valve seat in an hour and was fairly embarrassed that the head left his shop like that.
This afternoon I cleaned the remaining gasket material from the head surface and dissembled the valves for lapping.
I have one head done and I’ll do the other head tomorrow then give them a good clean.
Thanks for all the help and information fellas. Hopefully this will be the last time I have the heads off for a while🤞😅
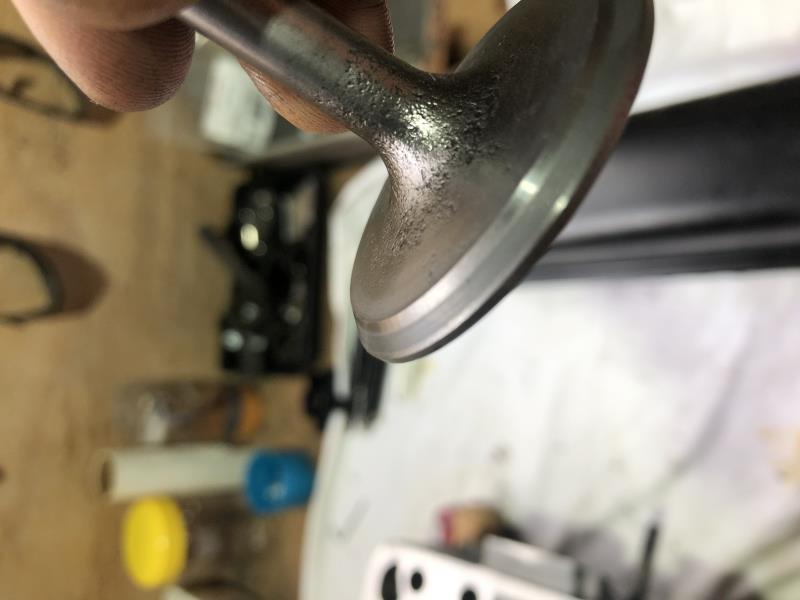
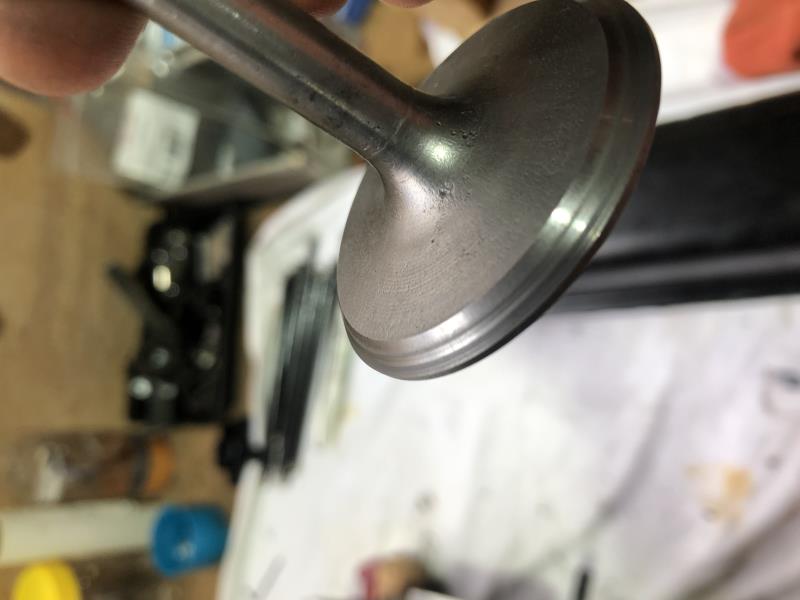
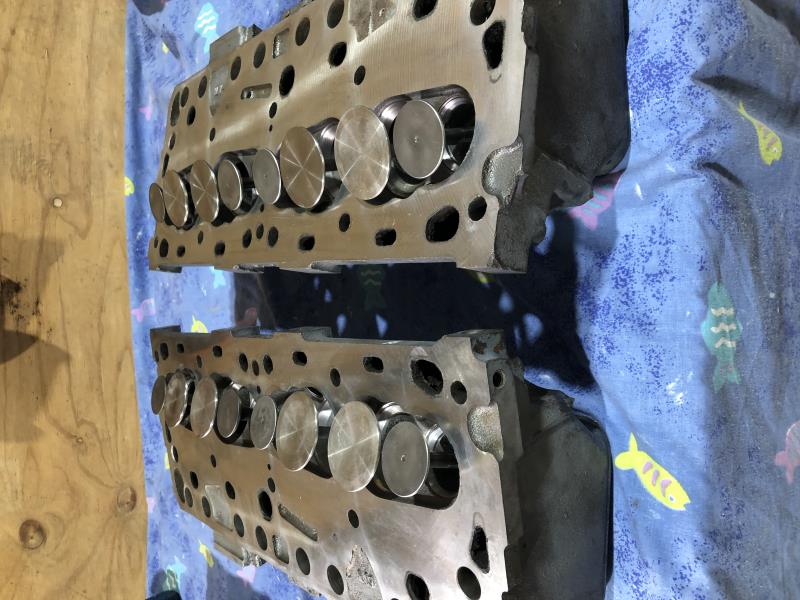
Exhaust valve before
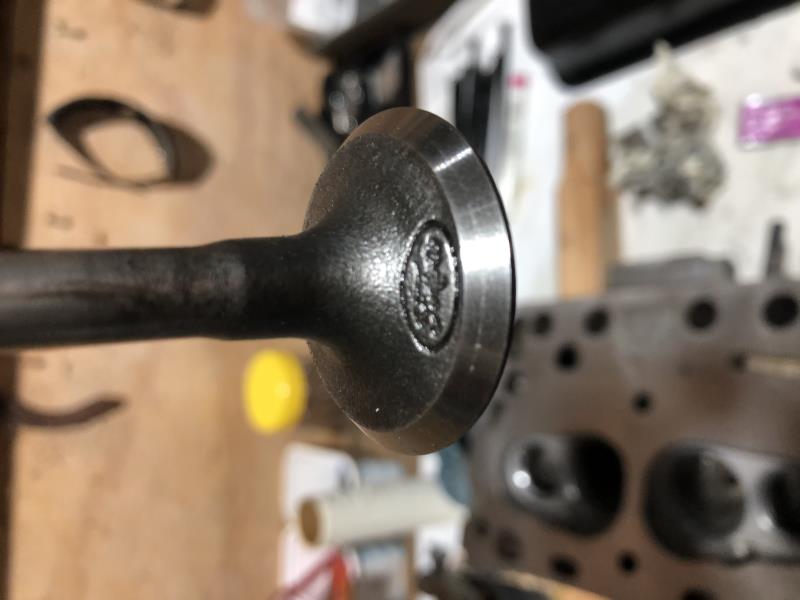
Exhaust valve after
Exhaust seat before
Exhaust seat after
Looks like the machinist didn’t want to make the same mistake twice
|
|
By Lord Gaga - 6 Years Ago
|
|
Nice work Dennis!
|
|
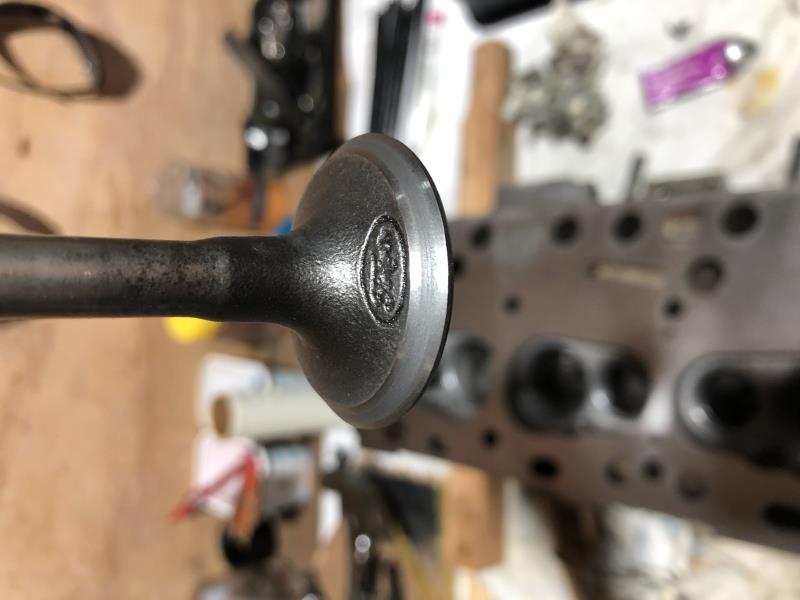
By dennis22 - 6 Years Ago
|
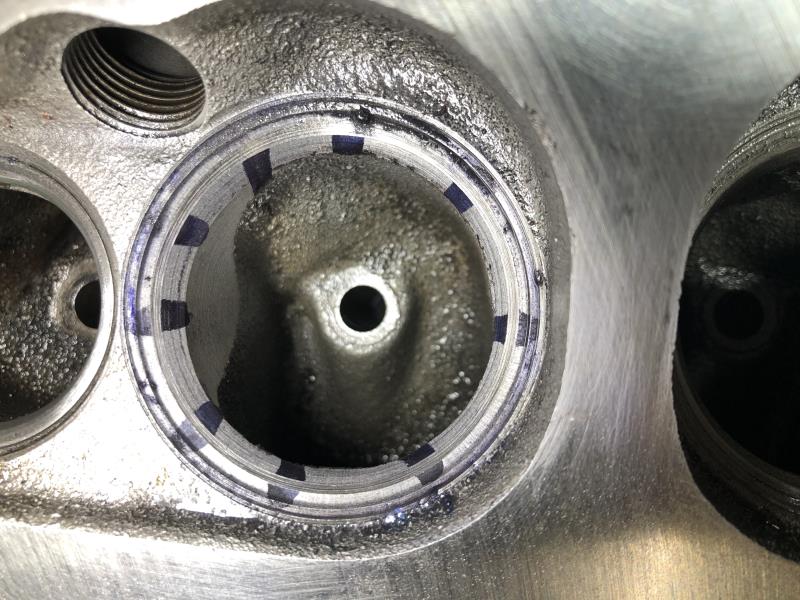
Thanks Lord Gaga,
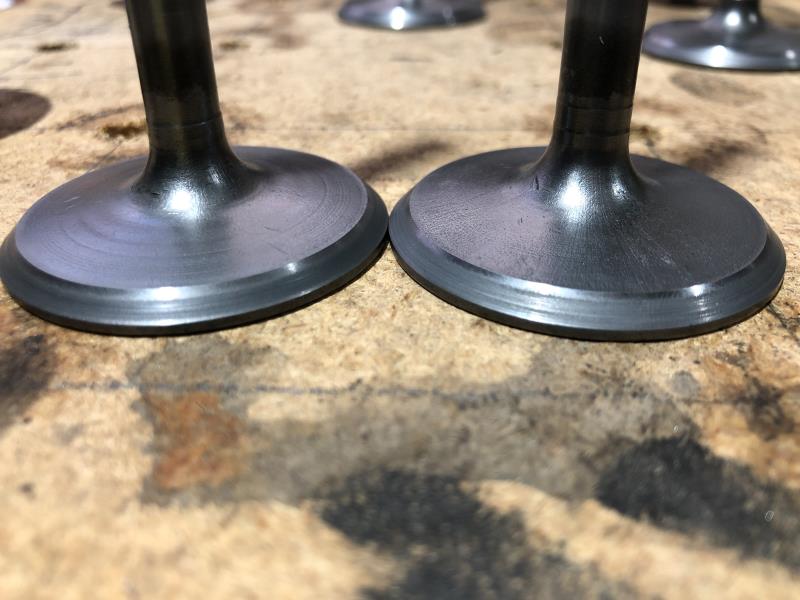
I did notice an inconsistency in the grey lapping markings on 2 intake valves. I’m wondering if I should have the machinist address these issues or if they are ok to leave? What do you guys think?
Good intake valve lap
Suspicious intake valve lap (I have done this one 3 times to see it it would come good)
|
|
By Stiggy - 6 Years Ago
|
dennis22 (8/15/2020)
Thanks Lord Gaga, I did notice an inconsistency in the grey lapping markings on 2 intake valves. I’m wondering if I should have the machinist address these issues or if they are ok to leave? What do you guys think? Good intake valve lap Suspicious intake valve lap (I have done this one 3 times to see it it would come good)
|
|
By Cliff - 6 Years Ago
|
|
Take it back
|
|
By Lord Gaga - 6 Years Ago
|
|
On that second photo....looks like the valve or seat was ground at the wrong angle....who IS this guy?! I'd go somewhere else.
|
|
By dennis22 - 6 Years Ago
|
Cliff, lord Gaga-
Yep I’ll take it back an have him fix those issues.
There are only 2 machinists in my area and the other guy takes months to do anything and Ive also had bad results using him. Unfortunately I’d have to travel 1 hour north or south from town for another machinist but wouldn’t even know where to look or who is good. Hence the fact I’m using this guy, I was recommended to him by a reputable mechanic.
3rd time lucky I hope🤞🤦♂️
|
|
By dennis22 - 6 Years Ago
|
I took all the valves back and asked for the 3 intake valves to be re-ground. I also took up 4 spare intake valves Incase there was an issue with the 3 valves.
So the machinist ground those 3 valves and also ground the spare 4 as back up spares. I get home and drop those 3 valves in for a lap (280grit) and check the result.... slightly better but not perfect. I pulled out one of the “good ground” valves to reference it against the newly ground valves and he has gone and re-ground all 16 valves + the 4 spare and made them worse than before. I was furious to say the least as I only asked for the 3 valves with issues to be ground.
I really need some expert advice on what a freshly ground valve should look like after lapping including recommended seat width, seat angle and back cut with angle.
This will be the 3rd time I have had to return for corrective work and just want some additional information so I know how to steer the conversation the correct direction. I have searched online but can’t pin down and useful information.
These are some of the valves, some look ok with a consistent contact band but others have 2 or 3 pronounced bands, others look like they have lots of broken bands where the compound was rubbing on high spots. From what I have read, the seat contact ‘band’ shouldn’t be too thick and should be consistent all the way through the seat contact.
Any feed back would be very much appreciated.


|
|
By Lord Gaga - 6 Years Ago
|
Oh man, I feel for you. He might not be dressing the grinding stones often enough...I don't know. You're right, The seats on some of those intakes look too wide. Also the contact should be more towards, but not at, the outer edges of the valves. In a perfect world that is. If this isn't a high performance engine and as long as the contact isn't too narrow and the valves seat and seal you'll be OK
Nothing more to offer but best wishes!
|
|
By Cliff - 6 Years Ago
|
|
The contact bands should be in the middle of the seat, .050 solid band all the way around, if the contact is closer to the rim of the valve that's fine, at this point your machinist is out to lunch, find a independent garage that has a valve grinder or if there is a speed shop by you talk to them.
|
|
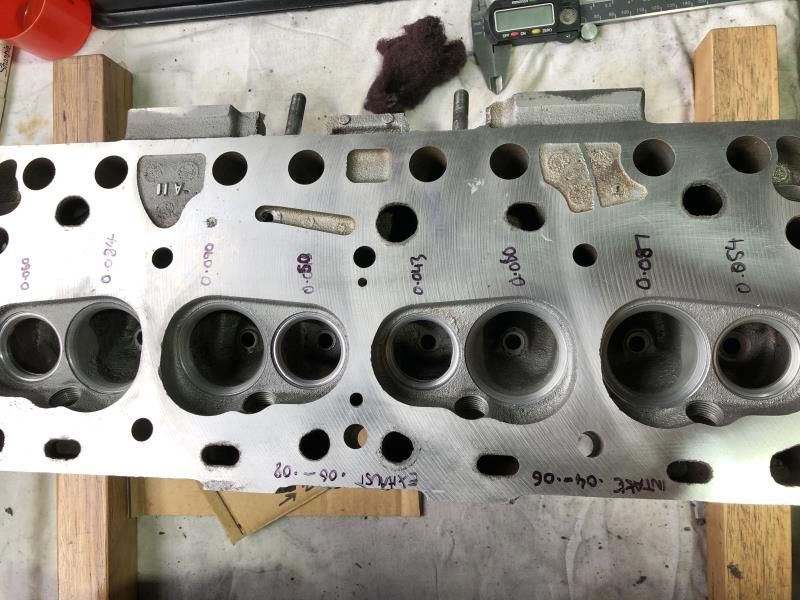
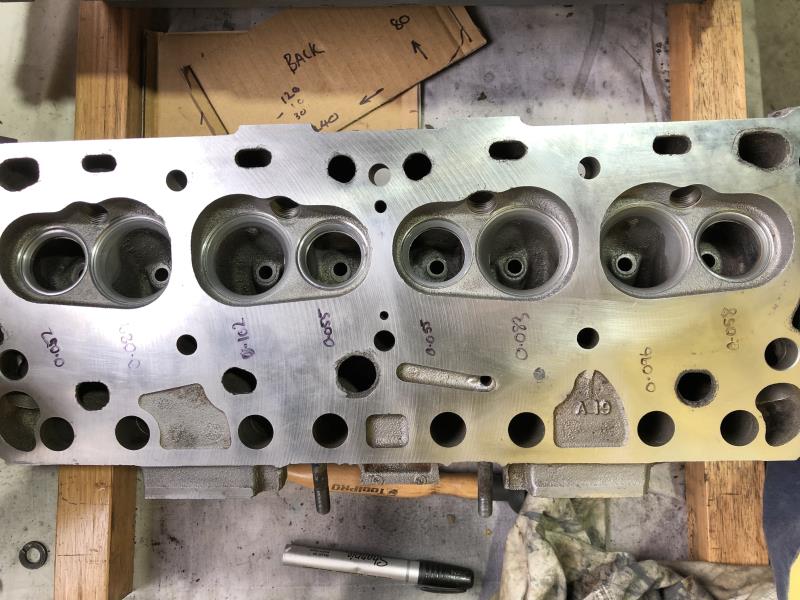
By dennis22 - 6 Years Ago
|
I measured all the seats and the intake seat width varies from 0.060-0.102 and the exhaust from 0.043-0.060. In hindsight I should have asked all the question first but I have only learnt all this from this experience, as I trusted him to deliver, so I’ll head back to the shop and have him explain the process and what the parameter were that he set out to achieve and why are there such fluctuations.
Thanks LordGaga- Im about sick of it, but it’s been a great learning experience. I’ll ask if he uses a carbide cutter or stone. Part of me thinks it will be ok, but I don’t want to pull the heads off again later down the track so I want everything to be the best possible to ensure longevity.
Thanks Cliff- I will talk to him and see what he can do. Either correct his work or I’ll ask for a partial refund so I can have someone else correct the work.
|
|
By Lord Gaga - 6 Years Ago
|
The seat width is very important to flow.
There are almost as many theories on seat width as there are head masters.
Most of the machinists we spoke with prefer an intake-seat width of 0.040-0.060 inch. Narrower seats generally improve flow but are also less durable. Narrow seats work best on drag-race applications where the engine is freshened often. Harder seat materials (e.g., induction-hardened seats) allow you to run slightly narrower seat widths than in the past while retaining excellent durability. Since exhaust valves operate at extreme temperatures, they require a wider seat to conduct heat away from the valve through the seat. Most shops specify 0.060- to 0.080-inch seat width for the exhaust side.
|
|
By dennis22 - 6 Years Ago
|
Thanks LordGaga,
I found that info online and thats what I’m using as my base line. I’ll see the machinist next week and go from there. I’m keen to drop this engine back in and get the truck running.
|
|
By 2721955meteor - 6 Years Ago
|
to me those seats look ok,a final check with a marking pen and turning the valve by hand will show the seat valve to head. remember with to days gas they will pound in,with out hardened seat inserts just put a small amount of oil in the gas. the valves look ok but what does the seat look like, the marking pen or a soft pencil on seat then rotate the dry clean valve and seat in head will show the true storey. hardened seat inserts are difficult as the accuracy of the cut in the head is critical,with no clear sign that the insert is ok(the marker will indicate) . if the insert is not bang on you can grind the valves all you want with poor results.
i have a old valve refaced as well as seat grinder,it takes a lot of patience to do a good job,if i would charge for my time it would cost you a fortion. the machine shop,at least hear use a cutter foreheads and grinder for valves and demand have guide be on spec
0
|
|
By Cliff - 6 Years Ago
|
|
No, it's not OK, find someone with a 3 angle cutter (Serdi) and it's a 20 min job , it takes me about 2 hours to do it with stones most people will not take the time to do it right.
|
|
By Cliff - 6 Years Ago
|
|
Buy a Neway seat cutter set (used if you can) and do it at home (easy to use but slow) it's not to much money if you only get 2 cutter heads.
|
|
By dennis22 - 6 Years Ago
|
Just chatted to another machine shop 1.5 hours away and I’m dropping the heads off on Friday. The guys said they use the same machines that they use in formula one and can do Anywhere up to 9 angle valve jobs and can cut a valve seat with a tolerance of 1 micron (0.000039). Hopefully I’m on the right track! Plus I’m getting a partial refund from the previous machinist.
This time around, I’m already in deep so I’m thinking I may as well get new intake seats, new valve guide inserts and explore the possibility of getting oversized valves.
Edit- just read that larger valves in the ECZ-G heads does not help and simply cleaning up the bowls will benefit flow more.
|
|
By Lord Gaga - 6 Years Ago
|
On the road to recovery!
What you're thinking of doing would be nice...Y not?
|
|
By dennis22 - 6 Years Ago
|
Another update-
So the heads have been at the machinist for a week and they are not happy with the previous work to the extent that the valve seats have been cut so deep they are worried about drilling for new intake seats Incase they hit a water passage. So they have come up with a plan to find some 2inch intake valves (from a scruby) and use the added diameter in the valve to cut a new seat to suit. Alternately they could make 8 custom valves which would cost about $80 each + machine work on top of that- which they said they don’t want to do for my sake.
I did mention that the larger valves could potentially effect the air flow (I think I read the larger valves are closer to the edge of combustion chamber and can “shroud” the valve) so he said he would cut the valve angle for best flow.
Hopefully I receive some good news and can pick the heads up late next week and not pay through the nose.
|
|
By Hoosier Hurricane - 6 Years Ago
|
|
Your G heads have 1 15/16 inch intake valves. 2 inch valves are .062 bigger in diameter, which means one side of the valve will be .031 closer to the chamber wall. I doubt you would ever know the difference in performance.
|
|
By Cliff - 6 Years Ago
|
|
Use sbc 2.02, 200 long they fit like they were made for it.
|
|
By dennis22 - 6 Years Ago
|
John- thanks for the info, good to know!
Cliff- thank you, I’ll let the shop know!
|
|
By Cliff - 6 Years Ago
|
Check this out
https://www.ebay.com/itm/Manley-10798-8-Set-8-street-flo-Stainless-Steel-Intake-Valves-2-02-Dia-200L/382213329188?hash=item58fdb09124:g:kiEAAMXQrhdTSEuF
|
|
By Lord Gaga - 6 Years Ago
|
Hoosier Hurricane (9/4/2020)
Your G heads have 1 15/16 inch intake valves. 2 inch valves are .062 bigger in diameter, which means one side of the valve will be .031 closer to the chamber wall. I doubt you would ever know the difference in performance.
If anything, wouldn't larger exhaust valves help performance more? That's what Karol Miller did with the G heads on his '56.
|
|
By dennis22 - 6 Years Ago
|
|
Heads are ready to pick up tomorrow😁(finally). It’s been 11 weeks since old mate butchered them. Hopefully everything is as it should be and I’ll have the engine in the truck and driving by the end of the weekend. I’ll keep you guys updated.
|
|
By dennis22 - 6 Years Ago
|
Heads look ok. The SBC 2.02 +.200 intake valves look like they worked a treat. The SBC valves were .060 too long so the shop machined .060 off the top.
They Vac tested them and assured me that the work done was correct so I just hope they are correct.


|
|
By Lord Gaga - 6 Years Ago
|
|
Looking Good!
|
|
By Cliff - 6 Years Ago
|
|
That's the way to do it.
|
|
By dennis22 - 6 Years Ago
|
|
Cliff- thanks for putting me onto the 2.02 +.200 SBC intake valves, bloody saved the day there mate! Thanks!
|
|
By dennis22 - 6 Years Ago
|
LordGaga- thanks for all the help throughout this ordeal. I’m glad to finally have the heads back and hopefully not have to remove them for a long time.
Also thanks everyone who offered advice and support, it was a great learning experience although next time I’ll probably just work more OT and buy a set of Mummert heads😆😁.
|