|
Author
|
Message
|
|
mctim64
|
|
|
Group: Forum Members
Last Active: Last Month
Posts: 2.4K,
Visits: 5.0K
|
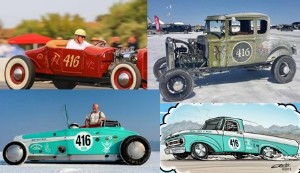
OK, now that the cat's out of the bag it's time to bring you up to speed.  I must give Charlie Burns credit for this because he was the one that gave me a taste of land speed racing. Last Aug. after our not to stellar performance at Bonneville I realized that I wouldn't have another chance at the "Brick"as Charlie had told me of his plans for a new LSR truck using parts from the '57 F-100. Land Speed Racing bug had clearly got it's hooks into me so what could I do, I had to build my own. Bigredtodd had hinted at an interest in getting involved so with a little coaxing (not much) I had a new partner to build with. The new truck is going to be a '62 long bed Uni that will first run in E class then move up to some bigger engines and faster speeds and hopefully to the 200+ mark. After building a 478ci Caddy engine for Todd's '60 we decided that no money would change hands if he could just find me a good base for the project. This is what he found. I must give Charlie Burns credit for this because he was the one that gave me a taste of land speed racing. Last Aug. after our not to stellar performance at Bonneville I realized that I wouldn't have another chance at the "Brick"as Charlie had told me of his plans for a new LSR truck using parts from the '57 F-100. Land Speed Racing bug had clearly got it's hooks into me so what could I do, I had to build my own. Bigredtodd had hinted at an interest in getting involved so with a little coaxing (not much) I had a new partner to build with. The new truck is going to be a '62 long bed Uni that will first run in E class then move up to some bigger engines and faster speeds and hopefully to the 200+ mark. After building a 478ci Caddy engine for Todd's '60 we decided that no money would change hands if he could just find me a good base for the project. This is what he found.  Of course this is what we would like it to look like when completed.  The truck went back to Todds place for some suspension mods so I will let him take it from here and tell you what he did. The truck went back to Todds place for some suspension mods so I will let him take it from here and tell you what he did.  Bla bla
 God Bless. God Bless.  Tim http://yblockguy.com/ Tim http://yblockguy.com/
350ci Y-Block FED "Elwood", 301ci Y-Block Unibody LSR "Jake", 312ci Y-Block '58 F-100, 338ci Y-Block powered Model A Tudor
tim@yblockguy.com Visalia, California Just west of the Sequoias
|
|
|
|
|
unibodyboy
|
|
|
Group: Forum Members
Last Active: 8 Years Ago
Posts: 118,
Visits: 2.4K
|
Tim,
Looks like an awesome plan. Also love the color scheme.
Do have one question though, why the long wheel base? Don't get me wrong, I love the looks but I'd imagine you are gaining a few hundred pounds and some additional drag.
Happy New Year!
My name is Greg and I am addicted to Y's.
|
|
|
|
|
charliemccraney
|
|
|
Group: Moderators
Last Active: Last Year
Posts: 6.1K,
Visits: 443.0K
|
unibodyboy (1/1/2011)
Do have one question though, why the long wheel base? Don't get me wrong, I love the looks but I'd imagine you are gaining a few hundred pounds and some additional drag. High speed handling. A long wheel base is easier to keep straight.
Lawrenceville, GA
|
|
|
|
|
57FordPU
|
|
|
Group: Forum Members
Last Active: 4 Years Ago
Posts: 726,
Visits: 73.6K
|
Amen to the long wheel base to help high speed stability. The brick only has 110" wheelbase and it was a handful even at my slower speeds. I also had a two hundred pound tractor weight bolted up under the bed which helped a great deal.
Charlie Burns Laton, Ca (South of Fresno)
BurnsRacing981@gmail.com
|
|
|
|
|
Glen Henderson
|
|
|
Group: Forum Members
Last Active: 10 Years Ago
Posts: 1.4K,
Visits: 7.5K
|
Tim and Todd, I've been following this project over on the other site and it's looking good. Some great ideas on lowering these trucks that could be applied to a street project. Keep us updated.
Glen Henderson
Freedom is not Free
Letohatchee, AL
|
|
|
|
|
mctim64
|
|
|
Group: Forum Members
Last Active: Last Month
Posts: 2.4K,
Visits: 5.0K
|
I was hoping Todd would have posted by now, we've been working on this project since Oct. and Todd has done most of the work. I didn't want to get ahead and have him back track in posts but I guess what I have been doing wont mess up the order of things.Todd has already done the lowering and I went up to his place a couple of weeks ago to get the front and rear axles to rebuild them and then take them back for install, so I stripped everything and started cleaning parts.  

With everything dissmantled it all went into the hot tank.  
 
After cleaning I installed a new set of 4.11 gears in the rear, turned all the drums, installed new hard 3" studs all the way round and fit new king pins and bushings.  
bla bla bla
God Bless. Tim http://yblockguy.com/ 350ci Y-Block FED "Elwood", 301ci Y-Block Unibody LSR "Jake", 312ci Y-Block '58 F-100, 338ci Y-Block powered Model A Tudor
tim@yblockguy.com Visalia, California Just west of the Sequoias
|
|
|
|
|
mctim64
|
 Posted 15 Years Ago
|
|
Group: Forum Members
Last Active: Last Month
Posts: 2.4K,
Visits: 5.0K
|
New Years Eve day was sunny for a change so I had a chance to get out and paint the pieces for the front and rear axles. 
 
New Years Day it rained again but I was able to do some assembly work in the garage. I was looking forward to a visit from Frank Rice who had just spent the night at Charlies but I got a call from him saying that he missed my turn off and was almost to Bakersfield already. Oh well, next time.  
bla bla, I'm still having trouble posting but I'm working through it. bla bla
God Bless. Tim http://yblockguy.com/ 350ci Y-Block FED "Elwood", 301ci Y-Block Unibody LSR "Jake", 312ci Y-Block '58 F-100, 338ci Y-Block powered Model A Tudor
tim@yblockguy.com Visalia, California Just west of the Sequoias
|
|
|
|
|
Ted
|
|
|
Group: Administrators
Last Active: 2 days ago
Posts: 7.6K,
Visits: 206.0K
|
Tim. Thanks for the posts and keeping us up to date.
  Lorena, Texas (South of Waco) Lorena, Texas (South of Waco)
|
|
|
|
|
BIGREDTODD
|
|
|
Group: Forum Members
Last Active: 11 Years Ago
Posts: 324,
Visits: 2.4K
|
Okay, okay...clearly I'm behind the 8-ball here... For those of you who are following elsewhere this will be a bit repetitive, but hey--it's a Y-block powered race truck, and you're kind of a weiner if you get tired of looking at Y-block powered anything on a Y-block site, right? As Tim showed you above, we started with an amazingly solid, rust-free CA truck that had been holding down a tomato garden. Only rust through was the front edge of the hood. Tim had already sourced a replacement when we went to pock up the truck. I have to warn you, there are a TON of pictures, as I wanted to document everything if any questions came up, and since Tim wasn't here to watch me butcher his race truck First was the lowering. The goal is a 6-7" drop in front, and a fairly aggressive rake. Here's where we start. Short block needs to stay for checking pan clearance, and eventual steering box clearance (I will be moving the box upward and forward to match new axle location).  As a notch for axle clearance is more than likely, boxing plates will be required to maintain strength. I decided that tying them into the existing bracing would be the cleanest approach. Here you can see where I marked to trim some of the existing bracing for a straight butt joint. As a notch for axle clearance is more than likely, boxing plates will be required to maintain strength. I decided that tying them into the existing bracing would be the cleanest approach. Here you can see where I marked to trim some of the existing bracing for a straight butt joint.  Then checked the fit, and also marked for the slight cureved cut at the bottom of the frame. I used 3/16" plate: Then checked the fit, and also marked for the slight cureved cut at the bottom of the frame. I used 3/16" plate:  Cut and tacked: Cut and tacked:  Welded and ground: Welded and ground:  Same on the other side: Same on the other side:  As I go to work on the axle, here are the plates that I had made for the saddles that will be located underneath the I-beam. I only need 2 for the finished install, but I needed 4 for the mock-up process (you'll see):  Started with the axle upside down, level and sitting squarely on stands: Started with the axle upside down, level and sitting squarely on stands:
 Cleaned the areas that will be welded: Cleaned the areas that will be welded:  I used long bolts to locate the aforementioned plates, and threaded nuts underneath the plate to build in and suport some additional caster angle for high-speed stability. You'll note that there's some space between the plate and the I-beam. With the 10 degrees of additional caster built in, the tie rod to leaf spring clearance was a concern, and it was an opportunity to safe guard against interference. Maintaining stock caster angle would make this a non-issue. I used long bolts to locate the aforementioned plates, and threaded nuts underneath the plate to build in and suport some additional caster angle for high-speed stability. You'll note that there's some space between the plate and the I-beam. With the 10 degrees of additional caster built in, the tie rod to leaf spring clearance was a concern, and it was an opportunity to safe guard against interference. Maintaining stock caster angle would make this a non-issue.  Here's the plate located on the screws, before tacking it in place: Here's the plate located on the screws, before tacking it in place: 
Todd in Central California...about half way between Fresno and Sacramento
1956 Thunderbird - 1960 F-100 - 1961 Starliner - 1961 Imperial
|
|
|
|
|
BIGREDTODD
|
|
|
Group: Forum Members
Last Active: 11 Years Ago
Posts: 324,
Visits: 2.4K
|
Continued... Anyone who has lowered a 1957-64 F-100, or a 1955-66 Chevy/GMC is probably familiar with this site. I will be moving the axle c/l forward 2 1/2". This will help with stability, weight distribution, etc. If it were no benefit, I'd still do it simply because it will look much better than this. The factory didn't do a very good job of locating the axle centerline, IMHO:

This is about where I finished off the weekend. There will be more to come as I have to finish welding the axle perch/mount, determine the final location and depth of the notches and install them, as well as move the steering box up approximately 6", and forward 2 1/2". This will cure any potential issues with bump steer, as the stock geometry will be maintained. If you've made it this far without posting a response already, that's probably what you were wondering about, right? 
Here are a couple of shots of clearances as they stand right now. Keep in mind the weight of the front clip and a complete wet engine will drop the front another 1 1/4". I'll be fabricating new shock mounts (upper & lower to utilize shorty gas shocks) and installing notches and bump-stops:

May not look like it, but there's about 3" to the pan. This will increase when the axle moves forward, as the pan is sloped from front to rear:
 Keep in mind the after will be dropping another 1 - 1 1/2" after the engine is complete, the front clip is reinstalled, and the shorter front tires are installed. But so far we have gone from this:

To this:

Here's a few close-up shots of the perches and boxing plates welded in...
Front:

Back:

That should do it:

Just going to round the sharp corners of the mounting plate, and call it good.
Todd in Central California...about half way between Fresno and Sacramento
1956 Thunderbird - 1960 F-100 - 1961 Starliner - 1961 Imperial
|
|
|
|