|
Author
|
Message
|
|
Ted
|
|
|
Group: Administrators
Last Active: Yesterday
Posts: 7.5K,
Visits: 205.9K
|
Tedster (8/18/2019)
...One thing I noticed last year, was experimenting with valve lash. After tightening it up some below .018" to maybe .015" the manifold vacuum really dropped off. I assumed then a valve was hanging open. Now I'm not so sure, .015" shouldn't cause this - maybe it was more the result of an already excessively retarded camshaft timing? One thing I expect to see is improved engine manifold vacuum at the initial (say, 6° BTC) factory settings. I'm not sure how jetting and carburetor calibration will be affected. The Rollmaster timing sets for the Y with the multi-keyed crankshaft gears permit up to 8° of advance (measured in crankshaft degrees). Many of the oem camshafts have advance built into them from the git go so no problems there when simply installing them with the timing marks aligned or counting the links. The major issue with not degreeing in the cams is getting caught up with machining variances with the various parts. Hence the reason the cam timing needs to be checked during assembly. The valve lash setting is an important tuning tool. Decreasing the valve lash increases the running duration of the camshaft. At the intake closing event, decreasing the lash makes it later which in effect is the same as retarding the camshaft. It also increases the degrees of intake/exhaust valve overlap which affects the manifold vacuum. As the amount of overlap increases, so does the amount of time both valves are open and subsequently the opportunity for a 'vacuum leak' leading to the exhaust which in turn equates to a reduced manifold vacuum.
  Lorena, Texas (South of Waco) Lorena, Texas (South of Waco)
|
|
|
|
|
Tedster
|
|
|
Group: Forum Members
Last Active: 4 Years Ago
Posts: 513,
Visits: 153.3K
|
Thanks for the reply. With relatively low compression, it's still unlikely to run into engine knock or ping as a result of an advanced camshaft? (I realize this will shift the operating point and require resetting the base ignition timing) This is one of the few benefits to an OEM or stock engine, it has always burned just about any grade of gasoline without complaint.
I'll experiment of course a little bit with my homebrew degree wheel and see where the different advance keys place the overlap. A fresh chain does place the cam "straight up", or near enough. I should be able to estimate the actual amount of previous cam retardation more accurately by observing the new cam position using the known advance key positions. I expect to use the 8° key (4° at cam).
|
|
|
|
|
Tedster
|
|
|
Group: Forum Members
Last Active: 4 Years Ago
Posts: 513,
Visits: 153.3K
|
OK first thing I should thank Ted for supplying a keyway diagram for the Rollmaster crankshaft gear in the cam degreeing article at Eaton Balancing. It's definitely not intuitive to install and the supplied instructions are sparse at best. This saved a lot of time.
Using the 8° slot on the crank gear, TDC thankfully fell just about exactly where predicted. With #1 valves at overlap and my calibrated eyeball the cam is now phased roughly as many degrees advanced as it was retarded with the worn out timing set installed. Total camshaft degree change then is probably on the order of 8° or thereabouts. -4 to +4. Doesn't appear to be any valves kissing the pistons.
|
|
|
|
|
Tedster
|
|
|
Group: Forum Members
Last Active: 4 Years Ago
Posts: 513,
Visits: 153.3K
|
Success!
Checked cranking compression on a few cylinders before firing it up. The cylinders that previously measured 150 cold ... still measure 150 cold. Hm. So, I checked the outliers, cylinders that previously measured 140 and 145 ... they now measure 150. I quit checking after a few. 150 psi it is I guess. It is a lot snappier on the compression gauge I suppose, it pumps up quickly.
I did remember to back off the distributor timing a skosh before firing it up, it started right up but timing was still well advanced. I bumped it down to 10° BTDC and was rewarded with a low smooth idle. It pulls 21 in. Hg of manifold vacuum at 550 RPM.
So the vacuum gauge was right all along, late valve timing, I just didn't know how to properly read it. And I think the deal with chain stretch, it might be tough to notice if it is slow and gradual, over time. Checked for leaks, runs, errors, everything looked good. Haven't driven it yet, but I can't imagine it will run any worse on the road. Thanks for everyone's help.
|
|
|
|
|
Ted
|
|
|
Group: Administrators
Last Active: Yesterday
Posts: 7.5K,
Visits: 205.9K
|
charliemccraney (8/11/2019)
Interesting. I know it will probably fall on deaf ears, but did you tell those companies that they are doing it wrong? If they don't know, they can't fix it. I have brought this issue up with Comp Cams in the past and it does just fall on deaf ears. As a result, I just don’t use Comp Cams in any of my engine builds. While I use Isky camshafts for a majority of the Y builds, I’ve had no issues with lifter bank angles when using Clay Smith or Crower camshafts in the Y engines. The problem with the camshafts being ground on the wrong lifter bank angles is that the engines will still crank and run. In these cases, engine performance will not be optimal as the two banks will be running differently with one bank being more advanced than the other. As a general rule, always double check the cam degree in process by degreeing in the #6 cylinder along with the #1 cylinder. This allows you to double check your methodology while also verifying that the camshaft is the same on both banks. Because the #1 and #6 cylinders share the same TDC on the degree wheel, it’s a simple matter to just move the dial indicator to the other cylinder for an additional check on the cam timing. Anything more than 1 degree of crankshaft difference between the banks on these two cylinders should be investigated further. In the case of Joe's EMC camshaft, we did go to the trouble of checking each lobe so that the manufacturer could properly address this. To my surprise, that manufacturer fessed up that it was a problem on their end and they have since corrected it.
Lorena, Texas (South of Waco)
|
|
|
|
|
Tedster
|
|
|
Group: Forum Members
Last Active: 4 Years Ago
Posts: 513,
Visits: 153.3K
|
Took it out for a little shakedown cruise. It definitely starts easier, idles better, snappier acceleration, cruises nice and has a slight deceleration rumble that I kind of like. The ignition timing is going to need a bit more sorting out before I can make a better determination, I think a few more degrees of initial might help. It's at 36° total right now and comes in quick, but it could use more, I think. I didn't hear any ping. The vacuum advance too is a little anemic, only adding maybe 5° or so at the crank. It's the older style vacuum canister that utilizes shims, a (red) spring, and a fiber tube. I'm a little unclear, do the shims affect the total degrees of advance or, just how fast? Not sure if simply removing shims will extend the the vacuum advance out far enough. Seems to me that the tube inside the spring, its length would act as a stop limiter iirc. 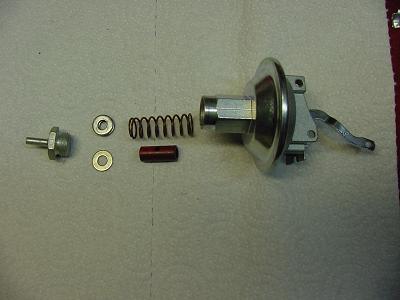
|
|
|
|
|
FORD DEARBORN
|
|
|
Group: Forum Members
Last Active: 6 days ago
Posts: 803,
Visits: 113.5K
|
It's been awhile since I set one of these up but will try to explain it as I remember. The washers will affect the spring tension somewhat The fiber tube, which were available in various lengths, limit diaphragm travel. The tube and the washers determine the total stack. Looking at some old notes, the distributor in this instance had 3 washers and a .971 fiber tube. By removing 2 .040 washers the distributor vac. advance went from 6* max. to 11* max.. That's 5* distributor increase = an additional 10* at the crank.. Hope this helps, JEFF.................
64F100 57FAIRLANE500
|
|
|
|
|
Tedster
|
|
|
Group: Forum Members
Last Active: 4 Years Ago
Posts: 513,
Visits: 153.3K
|
Yes, that definitely helps, thanks. I figured that's how it had to work. Removed the last shim/washer, and bumped the initial up. I'll see what that does to the curve with a timing light and seat of the pants dyno. It seems to me I can shorten the tube by a small amounts, maybe thickness of a shim at a time, and sneak up on it if necessary.
Noticed the spark plugs sure look a lot better, very consistent. Don't know what or whether cam phasing has anything to do with that. Typically I pull #5 as a reference. Turns out, when I pulled the plugs last week, #5 wasn't very representative of the rest. Some were looking fairly fouled, even. I wondered maybe PV going bad?
I did rebuild the carburetor while timing set &c was apart, but in any case they are burning great, reasonably clean base ring considering all the idle time and a light tan smudge on ceramic.
Is it possible for a power valve to fail without pooling fuel below it? It was dry in the chamber below it when I took it apart, but it seemed to lose pressure slowly, with the high tech method of sucking on it. So I replaced it.
|
|
|
|
|
KULTULZ
|
|
|
Group: Forum Members
Last Active: Yesterday
Posts: 1.8K,
Visits: 306.4K
|
Briefly, add shims to the advance spring if you want to slow down the advance rate. Eliminate or reduce the number of shims if you want a quicker advance rate.
____________________________
|
|
|
|
|
Tedster
|
|
|
Group: Forum Members
Last Active: 4 Years Ago
Posts: 513,
Visits: 153.3K
|
KULTULZ (8/26/2019)
Briefly, add shims to the advance spring if you want to slow down the advance rate. Eliminate or reduce the number of shims if you want a quicker advance rate. Right, but I suspect this advance can is for a dump truck. When I ran the engine up with a timing light, the initial at 10° the mechanical came in quick straight to 36°, I'd previously swapped in a lighter spring and tweaked the arm for less tension, but checking the vacuum advance was like hitting a wall, it is limited it appears by the length of the tube? Advance stopped at about 40° or so. Do you have access to a list of those different fiber tubes maybe? They might be marked by color. This is a service replacement distributor, it has the old style vacuum advance but the latter year mechanical innards, versus the older style with the heavy comma or kidney shaped weights.
|
|
|
|