|
Author
|
Message
|
|
Rudder2fly
|
|
|
Group: Forum Members
Last Active: Last Year
Posts: 160,
Visits: 35.5K
|
I think what I am going to do is take a couple of thousands of the seal holder where it mates to the block and reinstall the same seal half and side rails.
56 VIC Gene Stoehr Sr.
|
|
|
|
|
Rudder2fly
|
|
|
Group: Forum Members
Last Active: Last Year
Posts: 160,
Visits: 35.5K
|
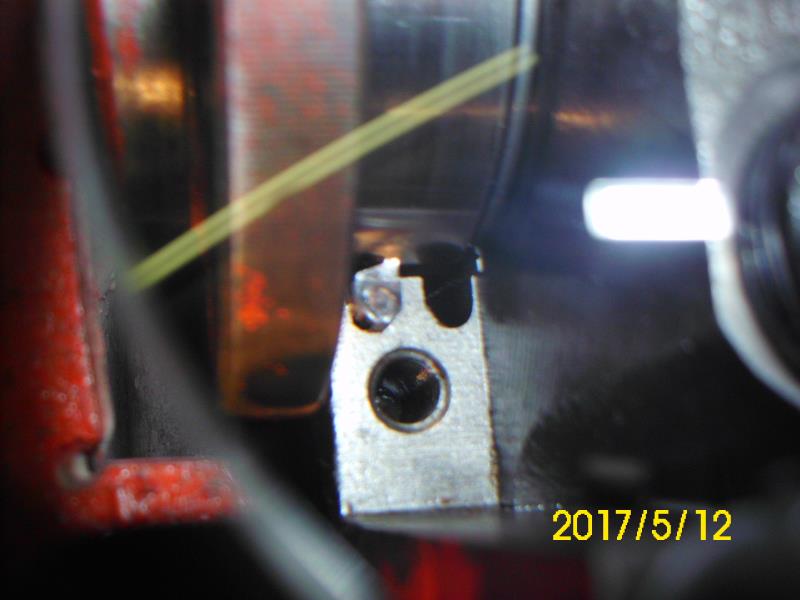 The leak is from the seal lip. All other leak sources show no sign of oil. I have 2 pictures that show seal offset and what looks like good compression of the seal lip in the engine block. When I place the lower half that would be in the seal retainer on the upper half I don't think there is enough compression or any of the seal lip. Has anyone taken a light sanding of this seal to get more compression of the seal? 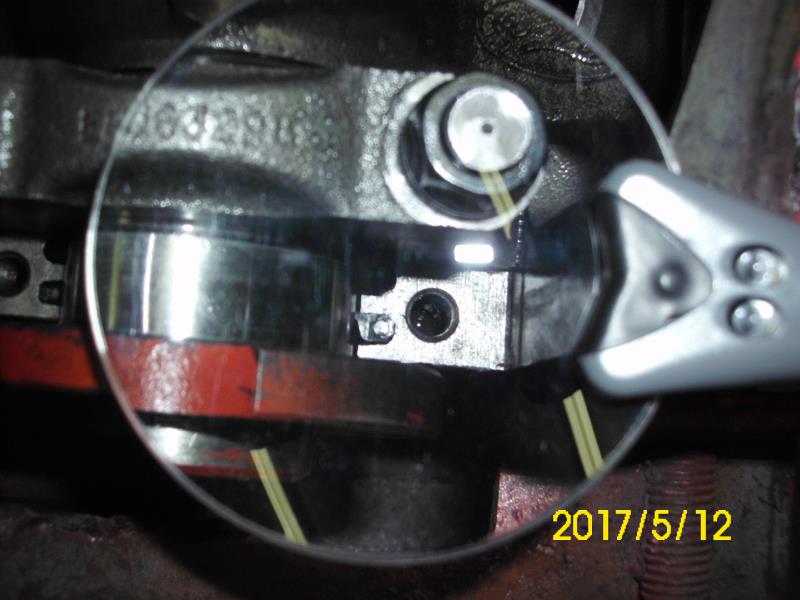 56 VIC Gene Stoehr Sr.
|
|
|
|
|
Ted
|
|
|
Group: Administrators
Last Active: Yesterday
Posts: 7.5K,
Visits: 205.8K
|
Hard to tell from the picture but are you offsetting the seal in the groove so it’s sticking out ~1/4-3/8” from the parting line? This is important as it allows the seal halves to match up to their ends in a more exact manner. I also like to put some Coppercoat sealer at both the block and the seal retainer where they meet up with each other. Unfortunately leaks that occur at the seal retainer side seals can be confused with the rear main seal itself. I put much emphasis on getting those rubber side seals and nails properly in place. This involves installing the side seals with the seal holder about 1/8” from being seated in place. A dollop of RTV is placed at the top of each side seal groove and then the side seals are started. It helps to take a small blade screwdriver and wedge the seal holder over so that the side seal can be inserted within the hole so that only 3/8” of side seal is sticking up. Then the other side seal is inserted in the same manner with that same small blade screw driver prying the rear main seal retainer over so that seal can also be more easily slid in place. At this point and with both side seals sitting about 3/8” above the retainer, the nails are tapped in place on the seal retainer groove side with a hammer. With a screw driver blade on top of the side seals while the nails are being tapped down, just enough pressure is applied to the tops of the side seals so that the nails and seals are flush with the top of the seal retainer. The seal retainer is tightened down and then the side seals are tapped again in which to insure that they are flush with the top of the retainer. At this point you should see a slight squeeze of RTV at the chamfer at the seal retainer where it meets the block. Also confused with the rear main seal leaking are the two oil pan bolt holes in the seal retainer. Studs were standard fare here and if removed should have sealer put back on them. If the studs are missing, then a liberal coating of RTV on the oil pan bolts at that particular location is expected to seal the deal assuming the area is clean of oil so that the RTV can do its job.
  Lorena, Texas (South of Waco) Lorena, Texas (South of Waco)
|
|
|
|
|
miker
|
|
|
Group: Forum Members
Last Active: Last Month
Posts: 1.9K,
Visits: 194.9K
|
Gene, here's an old link on this topic. This winter I replaced the "orange" seal in my 312 with the newer black style. So far so good. Engine was in the car, and I followed the last post. Good luck http://forums.y-blocksforever.com/Topic106586.aspx
miker
55 bird, 32 cabrio F code
Kent, WA
Tucson, AZ
|
|
|
|
|
Rudder2fly
|
|
|
Group: Forum Members
Last Active: Last Year
Posts: 160,
Visits: 35.5K
|
I have completed the cross member repair and suspension rebuild. 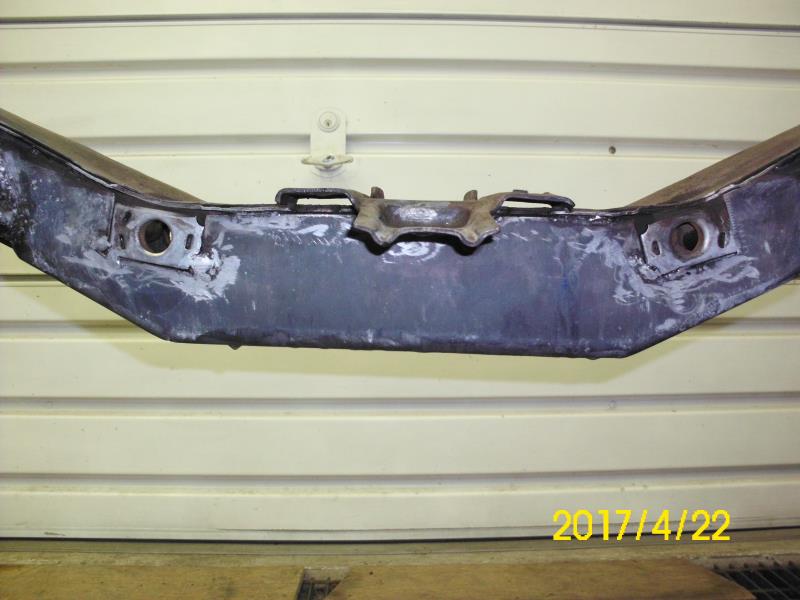 56 VIC Gene Stoehr Sr.
|
|
|
|
|
Rono
|
|
|
Group: Forum Members
Last Active: Last Year
Posts: 1.3K,
Visits: 80.0K
|
Gene; I know you must be anxious to get the motor back in and get on the road again, but in my opinion you should replace that front cross member while everything is all apart. Much easier that way. Just completed this task on my 56 Ranch Wagon. Rono
 Ron Lane, Meridian, ID Ron Lane, Meridian, ID
|
|
|
|
|
Rudder2fly
|
|
|
Group: Forum Members
Last Active: Last Year
Posts: 160,
Visits: 35.5K
|
|
|
|
|
|
Rudder2fly
|
|
|
Group: Forum Members
Last Active: Last Year
Posts: 160,
Visits: 35.5K
|
Success, I ran the engine about 15 minutes. Looks very good as to oil leaks. I was a little disturbed that I had a little shake in the engine and it was not as smooth as it had been. I had crossed #2 and #3 plug wires that will give you shake every time. SMOOTH NOW!
56 VIC Gene Stoehr Sr.
|
|
|
|
|
Rudder2fly
|
|
|
Group: Forum Members
Last Active: Last Year
Posts: 160,
Visits: 35.5K
|
I have the engine about ready to run again. Thanks for these new suggestions to my problem. I will post the result when the engine is running.
56 VIC Gene Stoehr Sr.
|
|
|
|
|
charliemccraney
|
|
|
Group: Moderators
Last Active: 3 hours ago
Posts: 6.1K,
Visits: 442.8K
|
Some other options I've thought of, if whatever you did does not work Use allen bolts with washers / shims under them to bring the top of the bolt flush with the surface of the retainer. Use rtv to fill in the small gap between the bolt and retainer, taking care not to fill in the allen socket. That will provide very sturdy additional surface area for proper support, probably about equal to what is available with an unmodified retainer. Another is to use a stud and allen nut (or socket nut). Same basic idea as the allen bolt but you may be able to machine the allen nut for tighter clearances within the retainer.
Lawrenceville, GA
|
|
|
|