|
Author
|
Message
|
|
Dad's Bird
|
 Posted Last Year
|
|
Group: Forum Members
Last Active: 4 Months Ago
Posts: 13,
Visits: 115
|
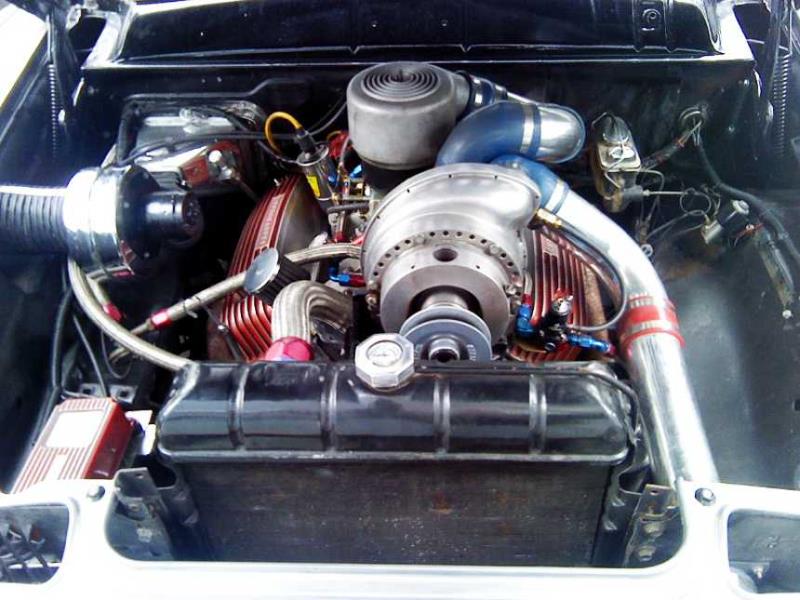
Hi, I am still assembling the truck 292 to put in my T-Bird. The crank damper I have is in the condition shown in the photo. It appears that there is room in the front cover to place the seal further out towards the front of the engine to make it ride in a new place on the damper snout. Is that worth trying? Or is a .017" grove not bad enough to worry about? I haven't tried looking for a repair sleeve yet. And one other thing - the T-bird damper is much tighter on the crank than the truck one that I removed. How much interference is needed on these? I haven't measured them, but man that damper was hard to get off of the 312 it was on! Thanks!  '55 T-Bird
Battle Ground, WA
|
|
|
|
|
55blacktie
|
|
|
Group: Forum Members
Last Active: Yesterday
Posts: 1.4K,
Visits: 2.0K
|
Have you considered sending it to Damper Dudes to be rebuilt?
|
|
|
|
|
Ted
|
|
|
Group: Administrators
Last Active: Yesterday
Posts: 7.6K,
Visits: 206.0K
|
While relocating the seal in the front cover is a possibility, it does increase the risk of having an oil leak in that area. To ensure that the seal is ‘square’ to the damper, the seal does need to be seated all the way back to its original resting position. The ideal fix for the groove in the damper is installing a sleeve on the damper snout that effectively gives the seal a new surface to ride upon. Jeff brings up a good point in having the damper rebuilt which would address not only that grooved seal surface but would also replace the rubber that holds the damper ring in place. Assuming the damper is the original and has never been previously serviced, that elastomer rubber is well past its life expectancy. Other comments always welcome so let's hear them.
  Lorena, Texas (South of Waco) Lorena, Texas (South of Waco)
|
|
|
|
|
MoonShadow
|
|
|
Group: Forum Members
Last Active: Yesterday
Posts: 4.6K,
Visits: 39.1K
|
I had one damper that came off hard and seemed hard pressing on. I bought come crocus cloth 2000 grit Grit and worked on the end of the crank and inside of the damper for a looser fit. Still needed a little pressure to press on so not too loose.
Y's guys rule!
Looking for McCullouch VS57 brackets and parts. Also looking for 28 Chrysler series 72 parts. And early Hemi parts.
MoonShadow, 292 w/McCulloch, 28 Chrysler Roadster, 354 Hemi)
Manchester, New Hampshire
|
|
|
|
|
DANIEL TINDER
|
|
|
Group: Forum Members
Last Active: Yesterday
Posts: 1.7K,
Visits: 154.4K
|
I bought a NOS one, and after measuring the crank OD & dampener ID with precision tools (and reviewing the recommended spec. range), I sent it to a machine shop to be altered. The resulting measurement match seemed correct, but it went on fairly easy (go figure). Just hoping the crank bolt will be enough to secure it.
So, be advised, if alterations are attempted, likely better to error on the extreme tight side of the specs., as material once removed can’t easily be replaced.
6 VOLTS/POS. GRD. NW INDIANA
|
|
|
|
|
FORD DEARBORN
|
|
|
Group: Forum Members
Last Active: Last Month
Posts: 824,
Visits: 113.5K
|
Giving this some thought, it seems reasonable that the seal could be moved inboard enough to ride on an unworn area of the damper. As mentioned above, the seal needs to be seated to it's original resting position to be square with the damper. Shimming the seal inboard with a washer style shim either obtained or fabricated would keep the seal square to the damper. It may sound far fetched but I would want to be sure that the seal, after being moved inboard, will not interfere with the oil slinger. The above scenario should be an easy inexpensive way to mate a new seal with a fresh area on the damper. However, there is still the 70 some year old elastomer rubber that appears to be rock hard, cracked and brittle in the provided photo....
64F100 57FAIRLANE500
|
|
|
|
|
paul2748
|
|
|
Group: Forum Members
Last Active: Yesterday
Posts: 3.7K,
Visits: 498.1K
|
It seems to me hat fixing the surface correctly by using a sleeve instead of moving things (the seal) around should be the only recommended fix. It's been a while since I installed one, but isn't the seal pressed in the front cover. If the seal is not properly seated all the way in isn't there a danger of it coming loose?
54 Victoria 312; 48 Ford Conv 302, 56 Bird 312
Forever Ford
Midland Park, NJ
|
|
|
|
|
55blacktie
|
|
|
Group: Forum Members
Last Active: Yesterday
Posts: 1.4K,
Visits: 2.0K
|
This is the first time I've ever heard anyone suggest shimming/moving the seal.
|
|
|
|
|
RamVet
|
|
|
Group: Forum Members
Last Active: 5 Months Ago
Posts: 1,
Visits: 15
|
Recently removed a damper from a 312 and it was snug. Sent it to Damper Dudes (highly recommend) and they made it new again. Wanted to be careful putting the damper on since it felt snug by hand. Got about an 8" piece of steel all-thread that was the same as the crank bolt (can't remember threads off the top of my head). Slid the damper on the crank snout (with grease), threaded the all-thread into the crank, slid a crank washer and short piece of pipe and another washer on the all-thread. Ran a nut down to the pipe and put double nuts (tightened together) on the end to hold the all-thread. Twisted the nut by the pipe the pipe to apply pressure while holding the nuts on the end. Damper went on with no drama and the all-thread protected the threads in the crank. Something to consider.
|
|
|
|
|
55blacktie
|
|
|
Group: Forum Members
Last Active: Yesterday
Posts: 1.4K,
Visits: 2.0K
|
That's something to consider, but having bought the correct puller and sent the dampener to Damper Dudes to be rebuilt, I intend to use a tool that was specifically designed to install it.
|
|
|
|