|
Author
|
Message
|
|
Rowen
|
|
|
Group: Forum Members
Last Active: 5 Years Ago
Posts: 435,
Visits: 29.3K
|
Has anyone ever used this kit? I just purchased it. I did speak with one of their techs and was told it IS a DIRECT bolt in. Only supposed to need the vac hose for the booster. Any feed back would be appreciated. I plan this install for march. I also have a complete front end rebuild kit that will go in at the same time. When the time comes I'll keep a mini blog about the install. 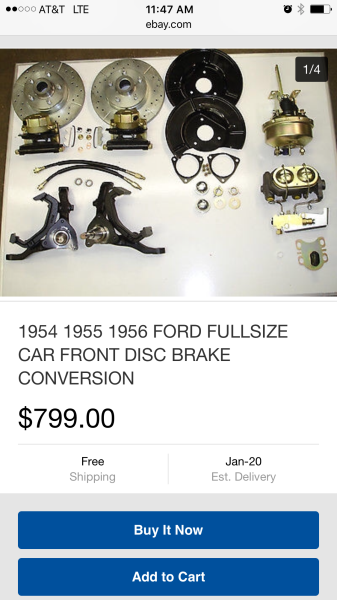 Rowen
Rowen
55CV
Woodland, Ca
|
|
|
|
|
Rowen
|
|
|
Group: Forum Members
Last Active: 5 Years Ago
Posts: 435,
Visits: 29.3K
|
It's not in the photo. The kit is by tomsclassic
Rowen
55CV
Woodland, Ca
|
|
|
|
|
Rono
|
|
|
Group: Forum Members
Last Active: Last Year
Posts: 1.3K,
Visits: 80.0K
|
I am in the process right now of installing a "Drop N' Stop" kit on our 56 Ranch Wagon. Pretty similar to the kit you have I think. Were you given the option for spindle drop? I am using a 1&1/2" drop for this conversion, but used a 2&1/2" drop on my 56 Customline. Yes they are pretty much a "bolt On" kit, however, when you switch from a single master to a double master you will need to modify or make a new rear brake line. I also rebuilt my front suspension and replaced the front cross member. I'll post some pictures soon. Rono
 Ron Lane, Meridian, ID Ron Lane, Meridian, ID
|
|
|
|
|
DryLakesRacer
|
|
|
Group: Forum Members
Last Active: Last Month
Posts: 1.7K,
Visits: 340.1K
|
May be a crazy Rono, but if you have installed a set of Aerostar springs and like your ride height would this system work for you too without the spindle change on the stock spindles.
Also when you show photos please show a few of the mounting of the booster and master on the firewall showing the clearance to the exhaust and rocker arm cover..thanks.
56 Vic, B'Ville 200 MPH Club Member, So Cal.
|
|
|
|
|
Rowen
|
|
|
Group: Forum Members
Last Active: 5 Years Ago
Posts: 435,
Visits: 29.3K
|
Rono, it did give a choice. I chose the stock height due to the Aerostar springs. I specifically asked the tech about that and he said it will make no difference in the install. I should expect the same ride height as I currently have. I can always put my stock springs back in if I ever want to change it again. (NOT!)
Rowen
Rowen
55CV
Woodland, Ca
|
|
|
|
|
Rono
|
|
|
Group: Forum Members
Last Active: Last Year
Posts: 1.3K,
Visits: 80.0K
|
I wanted to lower the ride height in the front and give the Ranch Wagon a bit of a rake. I have heard about some of the guys using the Aerostar springs, but I just kept the stock springs, media blasted them and painted them with Eastwood rubberized undercoating. I will post some pictures of the booster and master set-up when I get to that point. The booster and master I got did not come with the Drop N Stop kit . I got a 7" chrome booster and a machined dual master with the proportioning valve mounted off the master with a bracket. It looks like a similar set-up to the Tom's Classic dual master. These dual masters have equal size chambers where the dual master set-up on the Drop N Stop (if you buy their booster and dual master) uses an in-line proportioning valve where the front chamber of the master is larger for the front brake line. I haven't used this type of set-up before and hope it works out okay. It does come with an offset bracket to raise the booster up high enough to clear the valve covers (I hope). Rono
Ron Lane, Meridian, ID
|
|
|
|
|
Rono
|
|
|
Group: Forum Members
Last Active: Last Year
Posts: 1.3K,
Visits: 80.0K
|
|
|
|
|
|
Rono
|
|
|
Group: Forum Members
Last Active: Last Year
Posts: 1.3K,
Visits: 80.0K
|
Rowen; Been sick with the flu for the past week, but here are some pictures of where I stand with this conversion. The new rotors, calipers and flex lines are installed and now I'm working on the hard lines. I want to try to use the original brake line from the rear end up to the T fitting by the steering box. The original line from this T to the original master cylinder has to be removed and plugged. then a new line exiting this T can be run to the rear port on the proportioning valve. There are two front line ports in the valve, but one I will use for the stop light switch. The left front port on the valve really faces in the wrong direction to make the connection with the front brake T where the flex line connects and I haven't decided how to route this line yet so it looks decent. As far as a vaccume line from the booster to a full time vaccume port on the carb, the previous owner installed a T where the distributor vaccume is so I will try to use that fist, but I don't know if it will work because I am still running the original Load-o-matic distributor. Rono 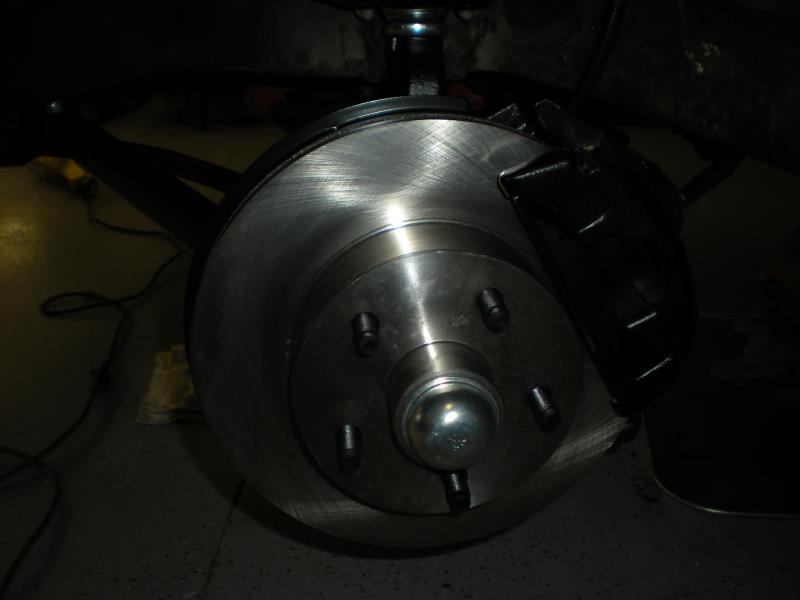 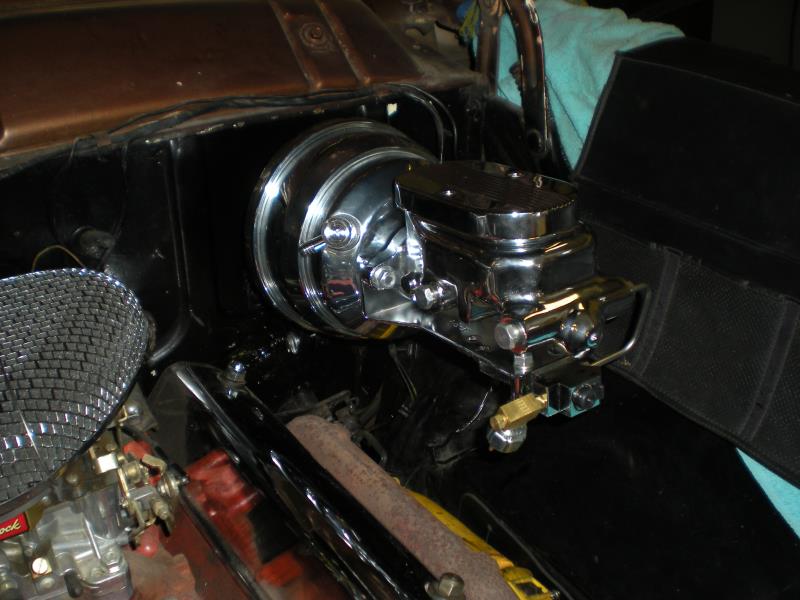 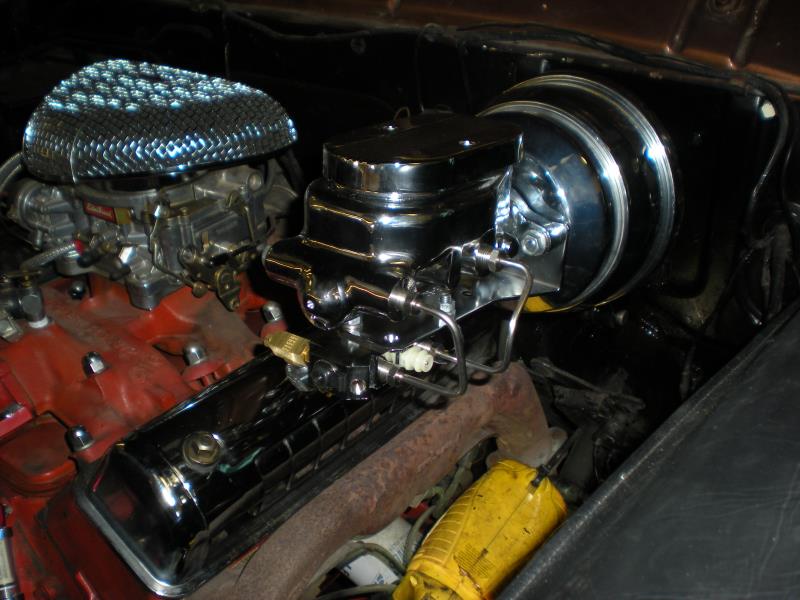
Ron Lane, Meridian, ID
|
|
|
|
|
Kahuna
|
|
|
Group: Forum Members
Last Active: 6 Years Ago
Posts: 471,
Visits: 2.4K
|
Say Ron
Have you gotten any more done on your conversion?
Any experience as to how well it works? Or, how much
adjusting has to be done?
Thanks
Jim
|
|
|
|
|
Rono
|
|
|
Group: Forum Members
Last Active: Last Year
Posts: 1.3K,
Visits: 80.0K
|
Jim; Haven't road tested the car yet, it's still up on jack stands. We did finish the conversion but then had to replace the left front and rear floor pans, so the seats are still out of the wagon and we are waiting for the new carpet to arrive. That should be tomorrow. The proportioning valve that I got with the booster and master set-up is non-adjustable although it is set-up for a disk/drum combination. One thing I am a bit concerned about is the pedal height. I do have a high pedal with the rod adjustment almost all the way in. There is some free-play but not much. The issue is the booster and where it attaches to the bracket that mounts to the firewall. I have shimmed the booster out from the bracket about 5/8". If I have to shim the booster out further to put more adjustment on the push rod, I'll have to make new brake lines from the proportioning valve and I'd rather not have to do that. I'll let you know when the rubber meets the road how it goes. Rono
Ron Lane, Meridian, ID
|
|
|
|