|
By RossL - Last Year
|
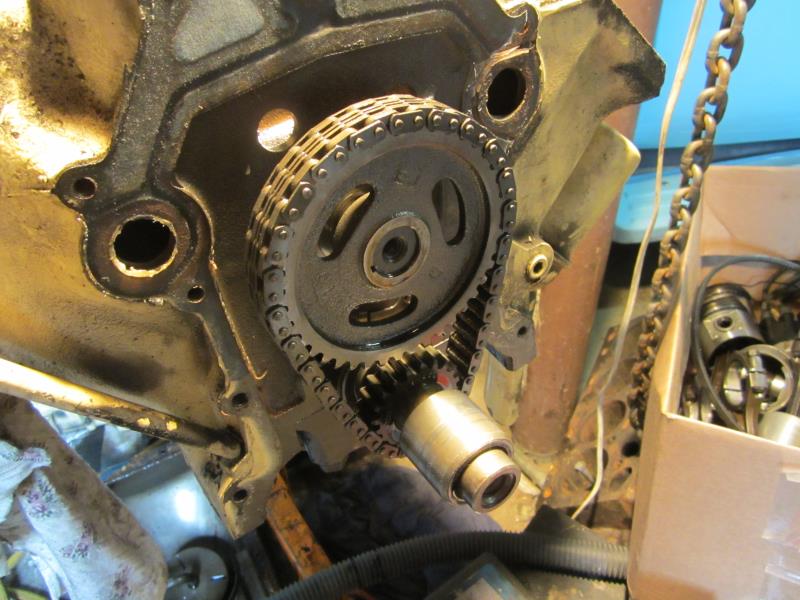
I want to check the orientation and condition of my timing set. Unless it looks brand new I will just replace it.
Can anyone tell me the size of the bolt holding the crank pulley? Do I have to remove the radiator or oil pan to remove the timing cover?
|
|
By 55blacktie - Last Year
|
Are you missing the bolt or just want to know socket size? The socket size is 13/16ths. I recommend you use the correct puller when removing the dampener. Damper Dudes said that mine was in better shape than most they receive because I didn't use a hammer to remove it. The correct puller & replacement bolt (if needed) are available from Tbird parts suppliers.
You do not have to remove the oil pan, but you do need to remove the front bolts that are attached to the pan & front motor mount. You'll need to support the engine while removing the timing cover. If you can remove the dampener without removing the radiator, you won't need to remove the radiator to remove the timing cover. My radiator was already removed when I removed the dampener.
|
|
By paul2748 - Last Year
|
You will have a lot more room to work if you remove the radiator. You still have to drain the cooling system so removing the radiator is not a big deal.
.RossL (12/10/2025)
I want to check the orientation and condition of my timing set. Unless it looks brand new I will just replace it. Can anyone tell me the size of the bolt holding the crank pulley? Do I have to remove the radiator or oil pan to remove the timing cover?
|
|
By RossL - Last Year
|
55blacktie (12/10/2025)
Are you missing the bolt or just want to know socket size? The socket size is 13/16ths. I recommend you use the correct puller when removing the dampener. Damper Dudes said that mine was in better shape than most they receive because I didn't use a hammer to remove it. The correct puller & replacement bolt (if needed) are available from Tbird parts suppliers. You do not have to remove the oil pan, but you do need to remove the front bolts that are attached to the pan & front motor mount. You'll need to support the engine while removing the timing cover. If you can remove the dampener without removing the radiator, you won't need to remove the radiator to remove the timing cover. My radiator was already removed when I removed the dampener.
Until I remove the radiator it's hard to fit a socket and extension inside the pulley. I cannot see the bolt at all.......... I will remove the radiator and see what I come up with.
You had the damper rebuilt? I thought I read they dio not have any rubber to wear out?
|
|
By Ted - Last Year
|
|
RossL (12/11/2025)
You had the damper rebuilt? I thought I read they did not have any rubber to wear out?
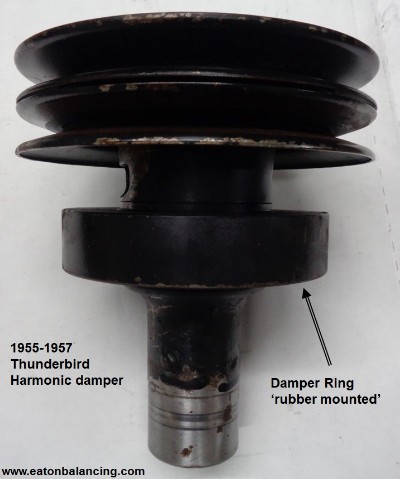
Unlike the car and truck FYB dampers where the timing marks are located on the damper ring, the timing marks on the Thunderbird damper are locked to the pulley. The T-Bird damper ring is located behind the belt pulley and in front of the timing cover. The damper ring is ‘rubber’ mounted and can fail with age.
|
|
By RossL - Last Year
|
Ted (12/11/2025)
RossL (12/11/2025)
You had the damper rebuilt? I thought I read they did not have any rubber to wear out?Unlike the car and truck FYB dampers where the timing marks are located on the damper ring, the timing marks on the Thunderbird damper are locked to the pulley. The T-Bird damper ring is located behind the belt pulley and in front of the timing cover. The damper ring is ‘rubber’ mounted and can fail with age.
Does the rubber dry out and crack? Hopefully a visual will tell me more once I get it off
|
|
By Ted - Last Year
|
|
RossL (12/11/2025)
Does the rubber dry out and crack? Hopefully a visual will tell me more once I get it off.
The rubber loses both its adhesion and elastomer properties over time. Picture that rubber being like the tires on your vehicle. Environmental conditions will be a major contributor in how long that rubber actually holds up but don’t rule out leaking oil speeding up its demise.
If you see cracks or fraying in the rubber, consider getting the damper rebuilt. Another clue is in the placement of the damper ring on the shaft. If it shows visible signs of moving (unpainted surface showing), then you know that the damper has already slipped forward or backward. For the Thunderbird dampers, I prefer to mark the damper ring with a mark that aligns with the TDC mark that's on the rear belt pulley so I can always catch when the damper does starts to slip on the shaft.
Total failure occurs when the damper ring comes loose and rattles against the timing cover.
|
|
By 55blacktie - Last Year
|
|
Pretty much anything & everything made of rubber on my 55 Tbird had to be replaced due to dry rot.
|
|
By RossL - Last Year
|
Removed the radiator, used a 13/16" socket with an impact wrench and the bolt came out. I tried to make a "puller" out of some metal I had. I welded a nut and inserted the metal bar into the pulley, using a threaded rod to push. The metal plate bent, not sure about the strength of the metal but it took the weld. After it bent, I had to cut the end off of the bar to remove it from the pulley.
I ordered the proper tool today. Should I anticipate any issues when using the puller?
|
|
By 55blacktie - Last Year
|
You should not have any problems using the correct puller; however, you might have considered buying the correct installation tool while you were at it. I realize that no one likes spending money on tools that seldom will be used, but sometimes you're money-ahead by doing so. Having the right tool saves time & prevents damage.
I forgot about using an impact wrench to loosen the bolt. Definitely needed to remove the radiator.
|
|
By RossL - Last Year
|
55blacktie (12/15/2025)
You should not have any problems using the correct puller; however, you might have considered buying the correct installation tool while you were at it. I realize that no one likes spending money on tools that seldom will be used, but sometimes you're money-ahead by doing so. Having the right tool saves time & prevents damage. I forgot about using an impact wrench to loosen the bolt. Definitely needed to remove the radiator.
I have to check into the installation tool.
|
|
By RossL - Last Year
|
|
Can I use a generic install tool like this one, or do I need a specialized tool for this? https://www.autozone.com/p/oemtools-engine-harmonic-balancer-kit-57144/391373?searchText=harmonic+balancer+puller
|
|
By Ted - Last Year
|
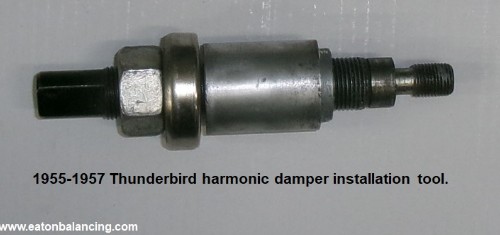
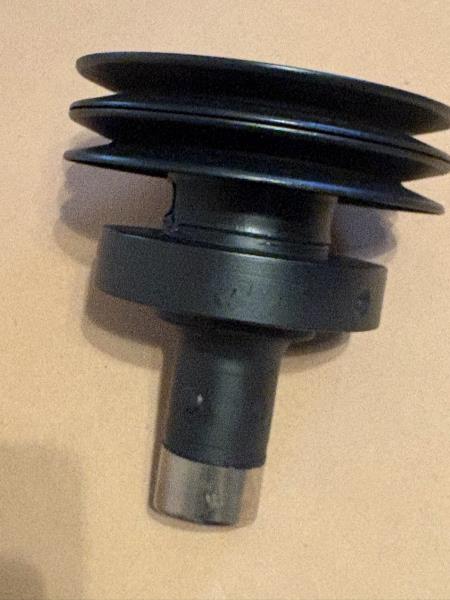
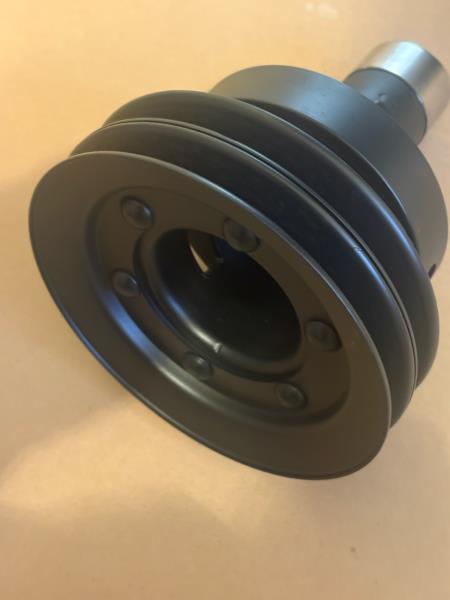
As long as a 9/16-18 adapter is included with the set, most of those damper installer tools will work with the car and pickup Ford Y dampers. Due to the recessed depth of the Thunderbird dampers, I had to machine a spacer to work in conjunction with the installer tool to facilitate the damper installing process. Here’s a picture of my Thunderbird damper installation tool.
|
|
By RossL - Last Year
|
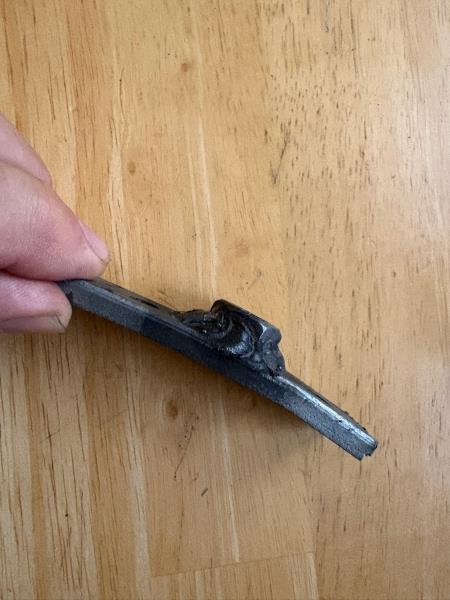
I tried the correct tool from Hills Thunderbird. I was using the crank shaft bolt for a contact point for the tool to press against. The end of the tool keeps walking off the crank bolt, at one point the tool bent (see picture below). I was able to straighten it with heat. Now I inserted the tool directly into the crank, which is what Hill's recommended. I ground off the treads on the end of the tool to keep them from galling the threads on the crank.
I am using a breaker bar and socket to turn the tool. The pulley doesn't want to budge. I am going to try an impact wrench, maybe the jolts will help it break free???? To do this I have to move the AC condenser for the impact wrench to fit.
Any problem using the impact wrench?
|
|
By 55blacktie - Last Year
|
Ross, I'm sorry that you're having difficulty removing the dampener; mine was easy. Although it's been a while, I only remember using an impact wrench to remove the bolt. However, I've experienced difficulty on other things that also should have been easy. I think we all have.
Merry Christmas.
|
|
By KULTULZ - Last Year
|
You also have to consider the quality of the tool.
Most likely off-shore junk sold for big bucks.
|
|
By Ted - Last Year
|
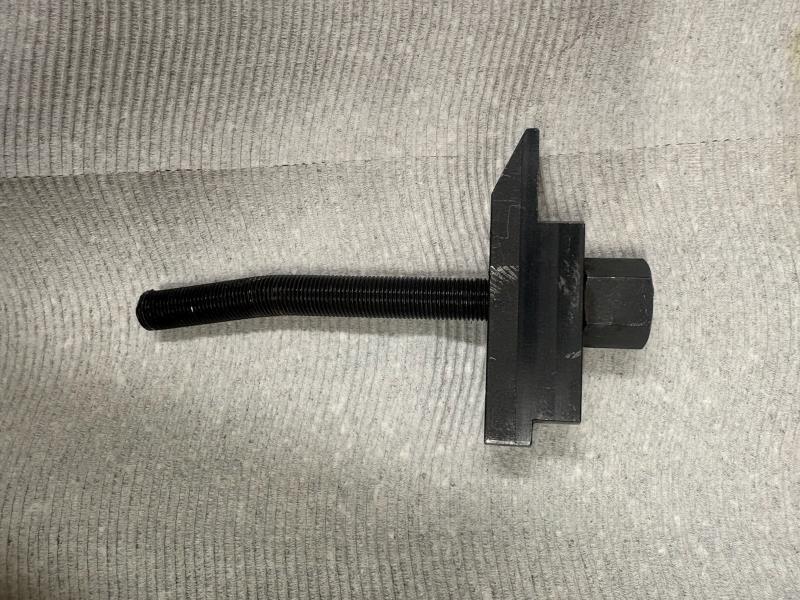
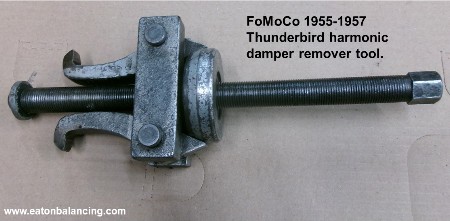
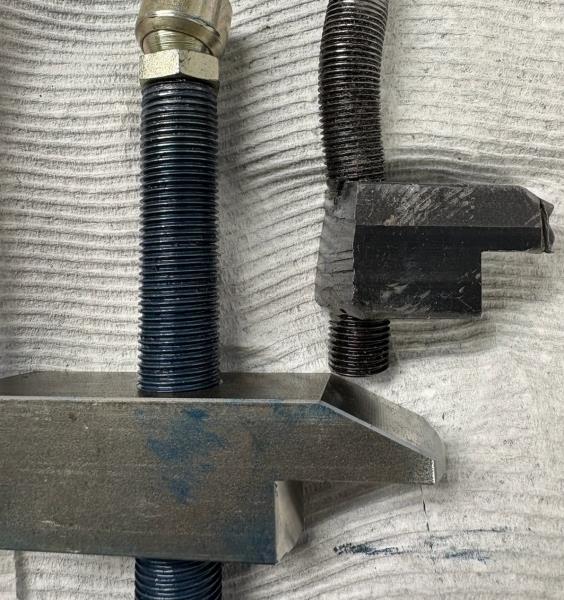
An impact wrench typically helps with the damper removal process. Here are pictures of both a homemade damper removal tool which requires a spacer to help with using the shorter bolt and also the factory damper removal tool for the Thunderbird dampers.

|
|
By RossL - Last Year
|
Ted (12/18/2025)
An impact wrench typically helps with the damper removal process. Here are pictures of both a homemade damper removal tool which requires a spacer to help with using the shorter bolt and also the factory damper removal tool for the Thunderbird dampers.
When a part of the tool bends out of shape the tool cannot be removed from the pulley and must be cut out (I'm still working on that). I ordered a new tool It looks like this, the end swivels, last one did not have this feature. If this one doesn't work should I try heat????

https://www.classictbird.com/Tool-Damper-Pulley-Removal/productinfo/TL7/
|
|
By 55blacktie - Last Year
|
|
I could not remember what my puller looks like, so I just retrieved it from my toolbox. It's the same as the TL7 tool that Ross posted. Neither the tool nor my dampener was damaged during removal. I don't know where the tool was made, but I paid about $40 for it.
|
|
By RossL - Last Year
|
RossL (12/17/2025)
I tried the correct tool from Hills Thunderbird. I was using the crank shaft bolt for a contact point for the tool to press against. The end of the tool keeps walking off the crank bolt, at one point the tool bent (see picture below). I was able to straighten it with heat. Now I inserted the tool directly into the crank, which is what Hill's recommended. I ground off the treads on the end of the tool to keep them from galling the threads on the crank.
I am using a breaker bar and socket to turn the tool. The pulley doesn't want to budge. I am going to try an impact wrench, maybe the jolts will help it break free???? To do this I have to move the AC condenser for the impact wrench to fit.
Any problem using the impact wrench?
I straightened it as best I could. I had to heat it up a few times. The shaft bent again (maybe the heat weakened the metal?) that's why I ordered the tool from Casco. With the shaft bent the puller cannot be removed from the pulley...... I have to figure out a way to cut it without any collateral damage. New Tool should be here tomorrow

|
|
By 55blacktie - Last Year
|
|
Although I make a conscious effort to watch my language when around people, if this happened to me while alone, working in the garage, I would, to quote Kramer, "Let the expletives fly."
|
|
By RossL - Last Year
|
After trying a few options, I decided to use an Oscillating Multi Tool with a Carbide Blade to cut the steel block. It was about the only thing that would fit into the pulley. After about 15 minutes this is what I have

|
|
By 55blacktie - Last Year
|
I hope you already had the oscillating tool. considering your success (I was expecting the worst), maybe that's something I need to add to my toolbox.
Is Hill's going to refund your money for the puller?
|
|
By RossL - Last Year
|
55blacktie (12/19/2025)
I hope you already had the oscillating tool. considering your success (I was expecting the worst), maybe that's something I need to add to my toolbox. Is Hill's going to refund your money for the puller?
I already had the tool. Cheap version from Walmart. I bought to cut wood, never considered it for this job until I saw the blades in Home Depot. 3 carbide blades were $43. The vendor that sold me the puller said he would refund and send back to Hills
|
|
By 55blacktie - Last Year
|
I thought the oscillator looked like something from Harbor Tool. If I were a professional mechanic, I would look elsewhere for tools, but okay for something that's not used often. I've never had a problem returning defective tools. I bet those 3 blades cost more than the tool.
Let us know how the other puller works out.
|
|
By RossL - Last Year
|
55blacktie (12/19/2025)
I thought the oscillator looked like something from Harbor Tool. If I were a professional mechanic, I would look elsewhere for tools, but okay for something that's not used often. I've never had a problem returning defective tools. I bet those 3 blades cost more than the tool. Let us know how the other puller works out.
New puller arrived. Besides the swivel end the threaded rod looks like it's about 1/16" thicker. I have to check the threads in the crank before I move forward. I bough a 6" 9/16 18 bolt to test the threads, easier to manage with a longer bolts to thread it straight in. I will use the stock bolt when I install and use the puller
|
|
By 55blacktie - Last Year
|
|
The new puller looks stouter to me as well.
|
|
By MoonShadow - Last Year
|
|
I've used a lot of HF tools in my home garage. As a hobbyist I find the satisfactory. For a day to day operation I would definitely go for brand names. Hope you find a way to get that damper off soon. Are you soaking it with penetrating oil?
|
|
By RossL - Last Year
|
The Casco tool made the difference. I talked to someone that uses the Hill's version, but he welded a small plate to the end of the threaded rod that would contact the crank bolt. I expected once it started moving it would pop off quickly, but coming off was a slow steady process. I used an impact wrench for the entire removal to keep the crank from moving and to save my back from leaning over the fender turning the wrench by hand
I am going to buy the metal sleeve to repair the snout, it's not that bad, but why chance it. The rubber looks OK to me. Any opinions?
Big relief...................... until I realized I am not even half way to completing this job. I bought the installation tool I can't deal with another setback

|
|
By 55blacktie - Last Year
|
|
Just my opinion, but there might be things going on that you can't see. If you send it out to Damper Doctor/Damper Dudes to be rebuilt, it should never have to be done again.
|
|
By RossL - Last Year
|
55blacktie (12/20/2025)
Just my opinion, but there might be things going on that you can't see. If you send it out to Damper Doctor/Damper Dudes to be rebuilt, it should never have to be done again.
I guess I needed to hear that.........Their site says $219 to rebuild, When I talked to them they have a 1 to 2 day turn around, Monday it goes out.
https://www.damperdudes.net/harmonic-balancers/ford/ford-312-1957-thunderbird/
|
|
By 55blacktie - Last Year
|
|
I used Damper Dudes because Ted Eaton recommended them.
|
|
By RossL - Last Year
|
55blacktie (12/20/2025)
I used Damper Doctor because Ted Eaton recommended them.
This post says you used Damper Dude, was there an issue or just mixing up very similar names? I haven't read anything negative about either company
http://forums.y-blocksforever.com/Topic155215.aspx
|
|
By Ted - Last Year
|
|
I recommend Damper Dudes, not Damper Doctor. There is a difference.
|
|
By MoonShadow - Last Year
|
|
The older dampers have been known to slip without showing an obvious damage. This will move the timing marks and make timing the engine difficult or impossible. Either Ted Eatons or Daniel Jessup (the Hot Rod Reverand". Daniels webpage has a lot of videos covering the Y-Block engines. I think its well worth the money to have the damper rebuilt.
|
|
By paul2748 - Last Year
|
The problem with movement of the timing marks only occurs with the sedan dampers (and trucks?) , not the TBird dampers. The timng marks on a Tbird damper are not on the ring.
MoonShadow (12/20/2025)
The older dampers have been known to slip without showing an obvious damage. This will move the timing marks and make timing the engine difficult or impossible. Either Ted Eatons or Daniel Jessup (the Hot Rod Reverand". Daniels webpage has a lot of videos covering the Y-Block engines. I think its well worth the money to have the damper rebuilt.
|
|
By 55blacktie - Last Year
|
|
I was just about to double-check who did the work, but not necessary now that Ted has chimed in. It's easy to get Damper Dr. & Damper Dudes confused. Damper Dr. is in Redding, CA, and Damper Dudes in Anderson, CA. Anyone with the surname "Anderson" shouldn't confuse the two, but Anderson is just 11 miles south of Redding.
|
|
By 55blacktie - Last Year
|
|
Thanks for pointing this out. Damper Dudes is correct.
|
|
By MoonShadow - Last Year
|
|
I've never done a T-Bird so I wasn't aware of that. Thanks!
|
|
By RossL - Last Year
|
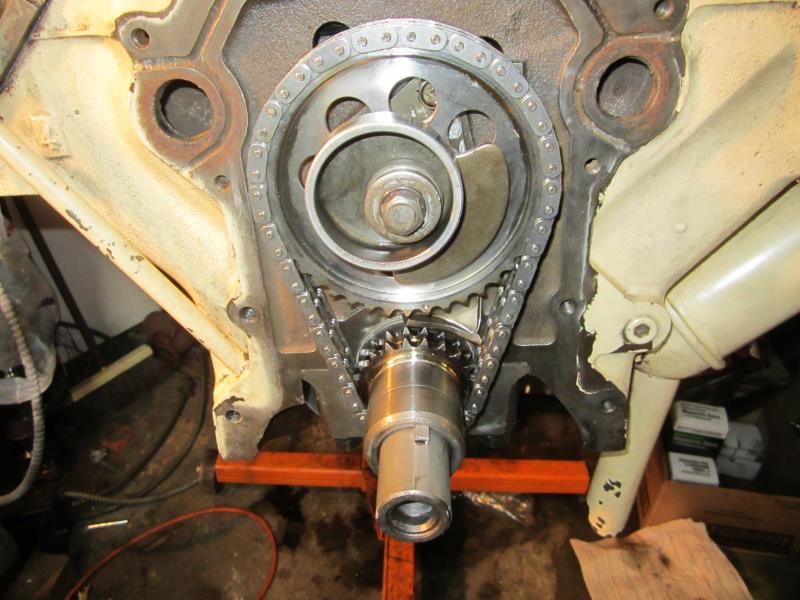
Play is a little less than 1/2". I plan to replace it and get the damper redone. Does this look like it's too much wear/play?
https://www.youtube.com/watch?v=u-A2KwJOnQ0
|
|
By Ted - Last Year
|
Per both the 1955 and 1957 Ford service manuals, the maximum amount of timing chain deflection is ½” at which point it’s recommended to replace the timing chain and gears as a set.
|
|
By RossL - Last Year
|
|
I was watching the Mummert video in the rear seal replacement. Is there something I can do to center the timing cover/seal to the crank? I have no access to a lathe to make a tool to center this
|
|
By Ted - Last Year
|
In lieu of having a centering sleeve to assist in installing the timing cover on the Ford Y, it’s typically adequate to simply install the timing cover so that the oil pan gasket flange at the bottom of the cover is parallel or level with the same oil pan flange (rail) on the block.
|
|
By RossL - 6 Months Ago
|
Shout out to Damper Dude fast turn around, great work, fair prices.................. A rare combination in this day and age
|
|
By KULTULZ - 6 Months Ago
|
|
|
|
By RossL - 6 Months Ago
|
Where would you find one of those?
|
|
By paul2748 - 6 Months Ago
|
|
If you have a lather, you could make one out of wood. Same OD as the crankshaft
|
|
By KULTULZ - 6 Months Ago
|
FROM A PREVIOUS THREAD - http://forums.y-blocksforever.com/Topic154208.aspx
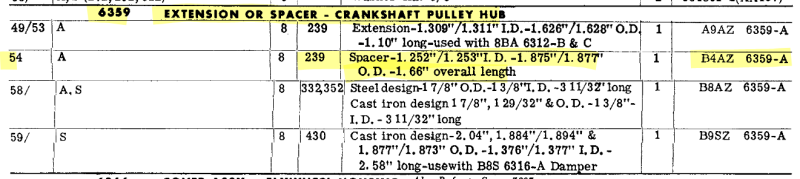
"The alignment tool you want is T52L-6059-AAE but is impossible to find. You can use the crankshaft spacer from the 239 engine as the alignment tool, it would do the same thing. The spacer (B4AZ 6359-A) is easier to find and one is on ebay now for $20.00."
|
|
By 55blacktie - 6 Months Ago
|
|
Interesting. I hadn't seen the pilot tool before or the 239 crankshaft spacer. Not being familiar with the 239, why does it use a crankshaft spacer?
|
|
By Hoosier Hurricane - 6 Months Ago
|
|
What I have almost always done is to start the bolts in the timing cover, install the damper, then tighten the timing cover bolts, allowing the damper to center the seal. I don't have the aligning tool, but I could have made one from a piece of steel or aluminum or plastic.
|
|
By pintoplumber - 6 Months Ago
|
 55blacktie (1/14/2026)
Interesting. I hadn't seen the pilot tool before or the 239 crankshaft spacer. Not being familiar with the 239, why does it use a crankshaft spacer?
The 239 doesn’t have a damper, just a pulley.
|
|
By paul2748 - 6 Months Ago
|
|
make one out of wood.
|
|
By FORD DEARBORN - 6 Months Ago
|
Here's a very simple alignment tool made from a piece of aluminum if you have or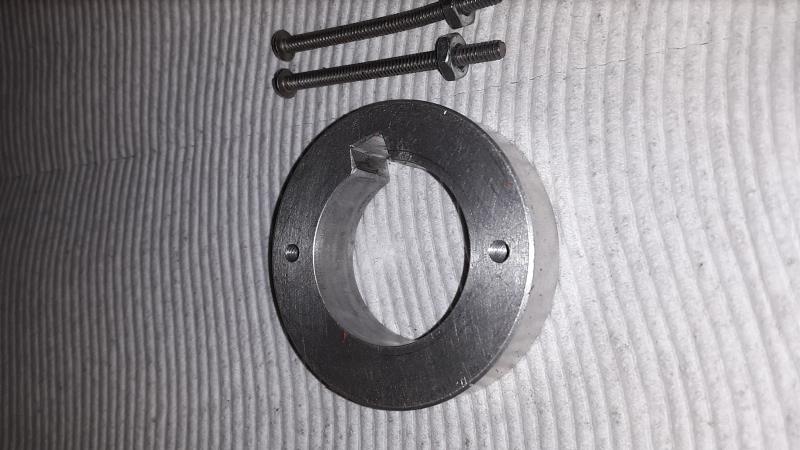 know someone who has a lathe. The screws serve as means to extract the tool. Hardest part was filing the key slot. know someone who has a lathe. The screws serve as means to extract the tool. Hardest part was filing the key slot.
|
|
By KULTULZ - 6 Months Ago
|
I think what is going on is the adapter was used only on the 1954 239 CI PASS CAR ENGINE (EBU) and the ILL shows only on factory PS.
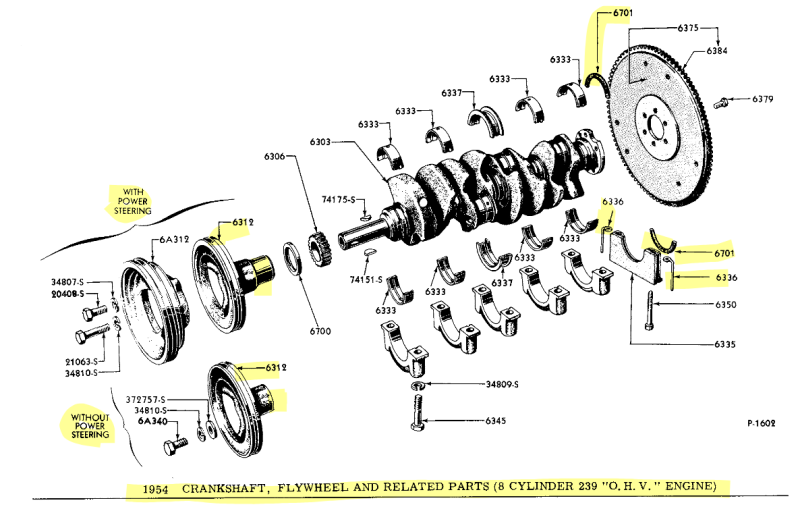 Do you see how much shorter the pulley (6312) w/o PS snout is as compared to the pulley (6312) w/ PS snout?
 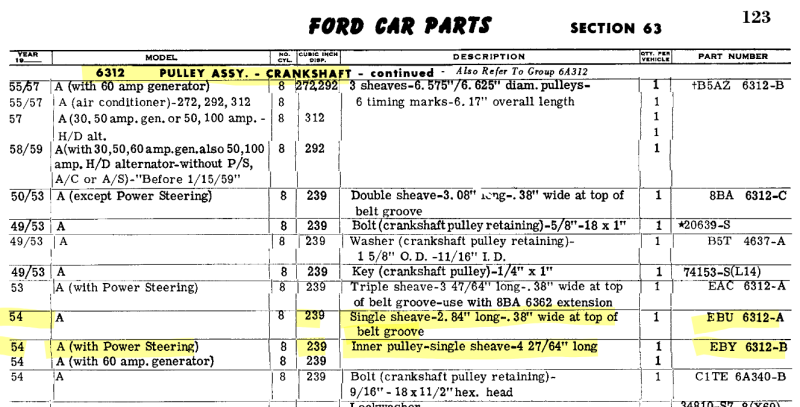 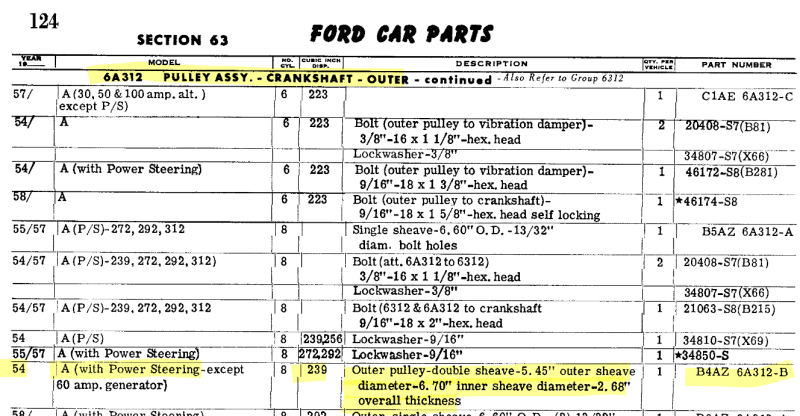 Cataloging is fragmented on earlier applications and one would need a year correct MPC to actually pin it all down.
TED will correct me if I am wrong.. |
|
By KULTULZ - 6 Months Ago
|
|
You are showing a 1954 239CI FORD PASS CAR engine w/o PS?
|
|
By pintoplumber - 6 Months Ago
|
This is a 239 car engine that was in my truck when I bought it in 1978. I have another 239 car engine in the garage. Both have the short pulley, however one is stamped steel and the other one is cast steel or iron.
|
|
By KULTULZ - 6 Months Ago
|
THANX!!! for the reply.
Both are pass car engines (1954 EBU), short pulleys but are different material?
That is interesting.
|
|
By paul2748 - 6 Months Ago
|
|
Going out on a limb here, but it seems to me that unless the engine is pointing up no spacer is going to do the job right because the cover will push down the rubber seal at the top. If the bottom of the cover is even with the pan rail of the block then you are covered.
|
|
By RossL - 6 Months Ago
|
paul2748 (1/16/2026)
Going out on a limb here, but it seems to me that unless the engine is pointing up no spacer is going to do the job right because the cover will push down the rubber seal at the top. If the bottom of the cover is even with the pan rail of the block then you are covered.
This is what I am going with "If the bottom of the cover is even with the pan rail of the block then you are covered"................................................
|
|
By 1946international - 6 Months Ago
|
Remember to align the front cover so it is centered with the crankshaft at the seal area. A while ago I assembled a 292 motor and did not do this and the seal leaked. I think there is a tool that goes around the crank snout so the cover will be centered while you tighten the cover bolts. Like 55blacktie said, people don't like buying tools that will not get much use, and that sounds like me so I made the tool. You may be able to just eyeball the alignment.
Sorry, I did not see that someone already said something about this....
|