|
By dennis22 - 8 Years Ago
|
Hi guys,
I have just got my engine running after a rebuild and I have got my 2nd hurdle. I was about 15minutes in to the break in procedure and i noticed water all of a sudden coming from below each water hole on the timing cover.
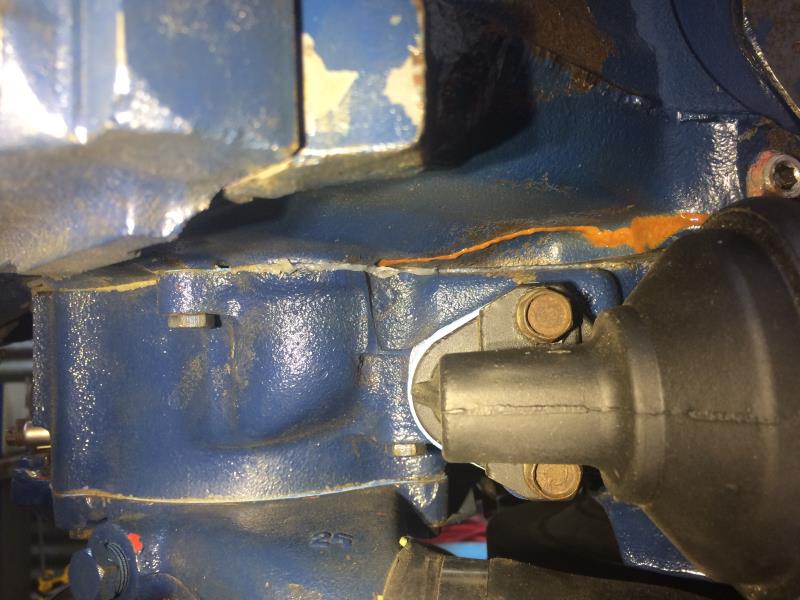
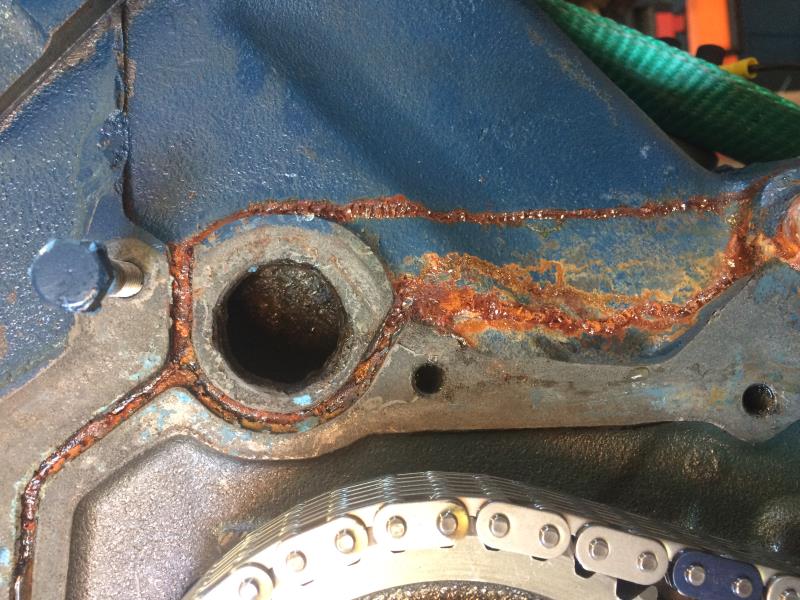
(See the rusty water dribble)
I can only assume these grooves around the water holes are to channel any minor leaks away from entering the sump. And by the looks of it this is what is happening. (This photo is from the tear down before the rebuild)
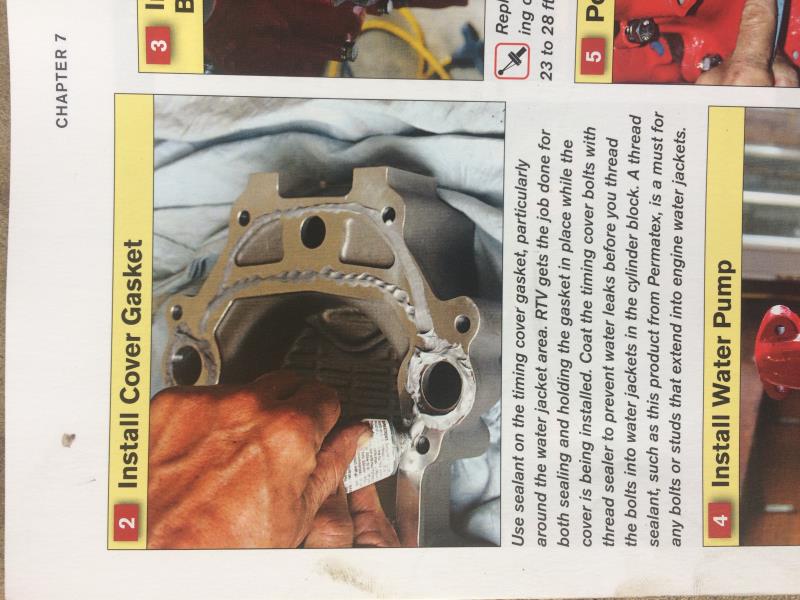
When I assembled the engine I followed instructions from this book, and used some gasket sealer around the jacket area
The water just started when I was varying the revs up (ok I got a bit excited and gave it some throttle) do you think that may have contributed, like excess water pressure from the pump? Funny thing is that it happened on both sides, or is that just because the groove runs from left to right across to both jackets?
Any insight would be appreciated? Hopefully I'm not taking too much of a toll on the patient Y Blockers on here, especially after my other engine starting post😅
|
|
By charliemccraney - 8 Years Ago
|
I haven't looked into that area of a Y so I don't know the cause and effect of a particular way of sealing, but it looks like the book tells you to put sealer on the timing cover in an area where it will pretty well fill that groove, and potentially leave portions of the block unsealed.
I'm pretty sure I can see the discoloration on the engine from the coolant and it looks like that is exactly what happened. Since the timing cover is completely flat, I'd apply sealer to the block to ensure that all gasket surfaces are covered and then attach the cover. Or use a gasket with a skim coat of sealer, on each side, around coolant passages
Another thing, some of the timing cover / water pump bolts need thread sealer. Without that, coolant and oil can seep out but I don't think that is what is happening here.
|
|
By paul2748 - 8 Years Ago
|
Rather than put sealer on the front cover and block, I always coat both sides of the gasket with a thin coat of RTV. Never had a leak from the front cover area.
|
|
By NoShortcuts - 8 Years Ago
|
Dennis. I like Paul's suggestion in applying the gasket cement to the gasket. However, I think Charlie has identified the problem in the end of his entry above.
In the Technical section of John Mummert's web site in the section titled, 'Y-Block Assembly Errors'. Below you can click the link to this page...
http://ford-y-block.com/assemblyerrors.htm
Hope this helps... John makes the following statement:
Timing cover installation. Check the length on the 5/16" diameter bolts for the timing cover. If bolts that are too long are installed they can contact the front cylinders damaging the block. Apply sealer to bolts that enter the water jacket. These are the 2 bolts on above and below the water passages. 4 total.
Let us know how you make out. 
|
|
By dennis22 - 8 Years Ago
|
I think I'll order a new gasket, clean up both faces and apply a skim coating of sealer around the jackets and I'll check the bolt lengths and apply sealer to the threads (had applied sealer to threads previously)
The thing that I'm dreading is pulling the dampener and re installing it, it was a bastard to install! I will have to polish the crank extra smooth this time around.
Sadly this won't be until next weekend or the one after. So hang tight if you're interested in finding out the problem!
|
|
By DryLakesRacer - 8 Years Ago
|
On water sealing I'm an old guy and use Permatex II ( non-hardening) on both sides of the new gasket. I clean the surfaces with a razor blade when working like you are now. It will be set up before all your other work was done.
If I had the bare block I would surface stone it or use a flat body file during cleaning and block prep. Same for the water pump surface. Good luck.
|
|
By slumlord444 - 8 Years Ago
|
|
I also like to clean the mating surfaces with lacquer thinner to make sure there is no grease or oil on it. Can't hurt.
|
|
By dennis22 - 8 Years Ago
|
Ok, apologies to anyone hanging out for a solution on this problem... I have been so busy with work and haven't had a chance. So, I finally have had the chance to attack this water leak.
I think the problem was that I applied the sealant too liberally the first time round. So this time round I haven't put any sealant on at all. The two surfaces look like they are mating together tighter with no sealant.
I disassembled and cleaned both surfaces to perfection, not taking any chances here!
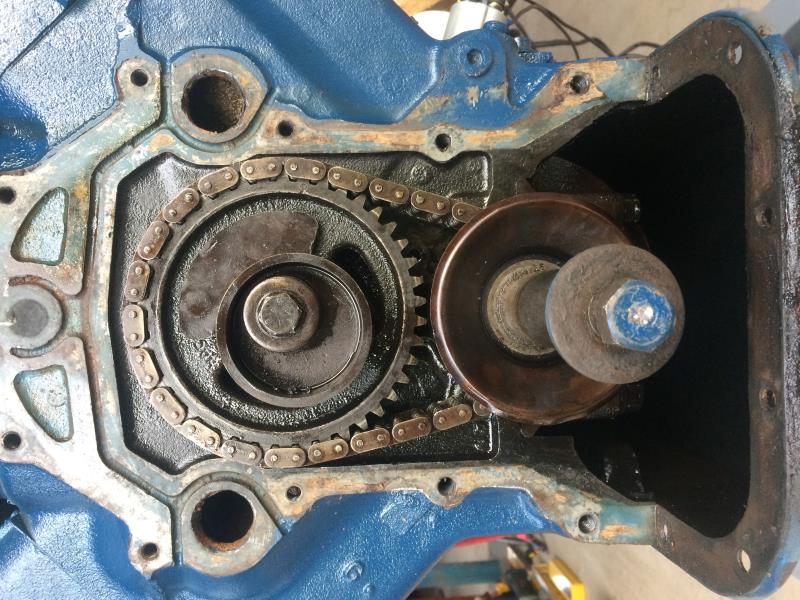
When I pulled off the timing cover- you can see the rust where the water was running

Closer shot of the side which I think was the problem side.
I have the timing cover back on and it's ready to fire up in the morning. Fingers crossed I will have some good news tomorrow!
|
|
By Ted - 8 Years Ago
|
|
As suggested above by both Charlie and James, be sure to put some sealer on the threads of the two bolts that go into the block holes located just below the two main coolant passages in the block. Those two threaded holes are open to the interior of the block and are not ‘blind’ holes. As such, coolant can leak past the threads to the outside of the block. Also insure that the bolts are not too long as they can contact the cylinder wall and in doing so will create other problems.
|
|
By 57RancheroJim - 8 Years Ago
|
Looking at your picture it almost looks like the leak is coming from above the water passage unless the pressure is forcing it upward into the top groove? There is nothing to leak up there unless it is on the timing cover in the water pump area?
I'm dealing with the same problem but not so severe and just one side. Mine doesn't leak when hot and running, it starts after the engine cools and sits over night then I lose about a teaspoon. It's just aggravating as hell after doing my rebuild and being very careful to do everything right. I've rebuilt a few Y's over the years and this is the first one with the problem.
Good luck I hope you solve it.
|
|
By dennis22 - 8 Years Ago
|
Good news and bad news... Still leaks, but just a couple of drops when cold and once it warmed up nothing. I was hoping the gasket absorbed the water and swelled up to seal. Anyway more importantly I was able to finish the run-in period, and change the oil and filter, so I'm partly happy.
Although it sounds similar to rancherojim's problem, annoying as hell but at this stage I can live with that.
I'm taking a break now so I'll let the engine cool down and check again for leaks.
Ted- thanks for the feedback. I was sure to seal up the threads and check bolt length. Although In hindsight, I should have applied a skim of RTV around the water passages.
|
|
By 2721955meteor - 8 Years Ago
|
|
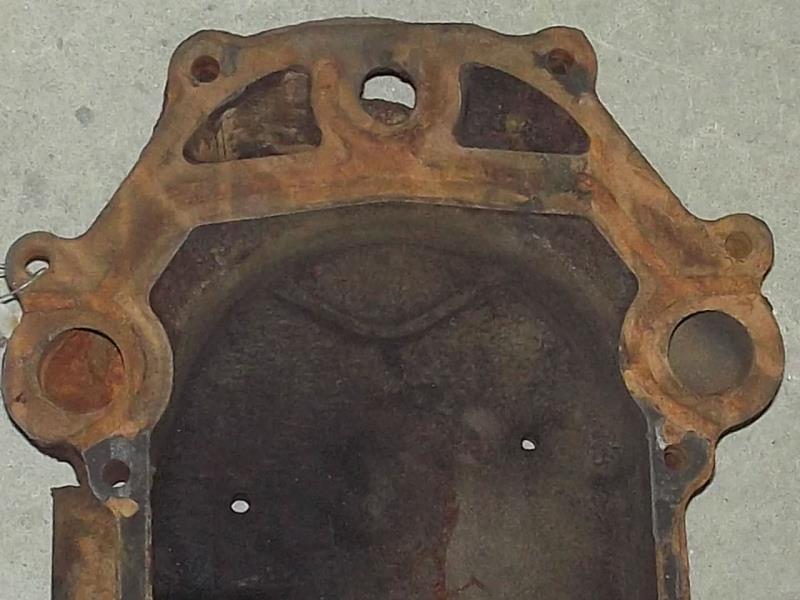
by filling the drain trough with sealer,now the leak will go into the eng oil.the picture shows a badly eroded water port, problem not using any freeze.. not a lot of seal aria left on the block.. i would get the front cover surfaced,then glue the gasket to the cover. sealer around the port,leave the trough with (no) sealer on the portion that sealed the oil.then make sure the right length bolted.use new grade 8 bolts and over tighten ,should do the trick. also run anyfreeze to stop the erosion. dont see the erosion her as the climate ,makes antyfreeze a must ,which eliminates erosion.
|
|
By Cliff - 8 Years Ago
|
|
Hi, I never use RTV with a gasket (maybe in the corners), Use RTV in place of a gasket, gasket sealer is to be used with a gasket, RTV will create worms that will end up in the oil pump pickup, Skim the timing cover and block with JB Weld let dry and stone flat (oil stone), then glue the gasket to the cover with sealer, and white grease on the block side, do not over torque.
|
|
By 2721955meteor - 8 Years Ago
|
Cliff (5/26/2017)
Hi, I never use RTV with a gasket (maybe in the corners), Use RTV in place of a gasket, gasket sealer is to be used with a gasket, RTV will create worms that will end up in the oil pump pickup, Skim the timing cover and block with JB Weld let dry and stone flat (oil stone), then glue the gasket to the cover with sealer, and white grease on the block side, do not over torque. do it your way, i will doit my way,i have no leakes in this aria,tho i only did 3 yblocks last year.re useing grade 5 or worce hardware and expecting no leaks is like the lottery.as well grease hopeing to stop a leak in a eroded block makes no sense
|
|
By dennis22 - 7 Years Ago
|
Ok, round 3 for all you playing at home, haha, it’s been a while but these things can’t be rushed😅.
So I have finally had the time (and mustered up the motivation) to pull the damper and timing cover off and address this water leak for the final time (hopefully)🤞.
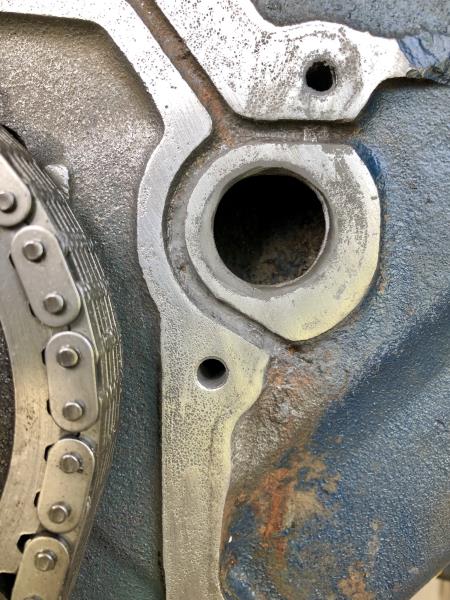
I preped the surface again and applied some JB weld to create more surface area on the Water jacket openings where it had been badly eroded.
I sanded and filed the surface down flush and did the same to the timing cover. Just waiting for the timing cover and oil pan gasket to arrive to reassemble.
Although it’s not perfect, I think now there is a whole lot more surface area for the gasket to mate against.

|
|
By jecklhyde - 7 Years Ago
|
|
No old time y-blocker here...but...I retorqued my timing cover bolts a couple of times after allowing the sealant to set up some . Each time the bolts turned slightly more to torque. Mine may leak too, we'll see.
|
|
By 57RancheroJim - 7 Years Ago
|
Dennis, mine looked similar to yours but not quite as bad. It looks like your water is coming from the area above the timing chain, mine was too. I had used permatex sealant, this time I used Copperkote, sprayed the gasket a few times and let it tack up and so far after 1,000 miles I have no leaks..
|
|
By dennis22 - 7 Years Ago
|
Hi RancheroJim,
I’m fairly certain that the leak was caused by the badly eroded Water jacket passage. There should not be any area for the water to leak above the timing chain as the bolts there go straight into the block valley. The rusted area is just from where the channel directed the water up. However I did have a stripped out bolt just below the left hand water passage, but that had enough sealant to stop the leak. I have tapped it out and have a larger diameter bolt to install. With that fixed, I now should have more clamping force when tightening the timing cover, which will help.
|
|
By 56_Fairlane - 7 Years Ago
|
I still think it's because you painted it blue. 
|
|
By dennis22 - 7 Years Ago
|
56 Fairlane-
Hahah good on ya😅. I did do some reading on colour before I painted that engine, but I just got confused with all colors. Well, I’ll be painting an engine from a 59 truck soon, what colour is period correct?
|
|
By dennis22 - 7 Years Ago
|
|
Anyway, the gasket kit never showed up on Friday, so I’ll have to wait until Monday now to see if the leak is fixed.🤞
|
|
By 57RancheroJim - 7 Years Ago
|
I've painted a Y block blue just because I liked it. I painted the 223 in my 60 F100 blue also, not correct of course, Ford didn't paint blue engines until 1966. The Y truck blocks were black with red valve covers, just the opposite of the cars the best I remember.
Good luck when you get the gaskets, I hope it works
|
|
By 1960fordf350 - 7 Years Ago
|
There's been several discussions about engine color over at the FTE site. The Y blocks in trucks were originally yellow! Don't know what year it changed. So, who cares. As long as your happy with it.
Ever see a white Caterpillar engine? Up till recently, if you bought a Peterbilt truck with a cat, it was painted white.
|
|
By Florida_Phil - 7 Years Ago
|
This might be a little silly to suggest, but I chased a similar leak in my Y Block for some time. It turned out to be a defective repro heater control valve. The thing wouldn't leak until the pressure built up in the block, then the leak was so subtle I didn't notice where it was coming from. It ran down the block just like in your photo. I plugged the hole in the manifold and it went away. Damn those Chinese....
|
|
By 56_Fairlane - 7 Years Ago
|
dennis22 (1/6/2018)
56 Fairlane- Hahah good on ya😅. I did do some reading on colour before I painted that engine, but I just got confused with all colors. Well, I’ll be painting an engine from a 59 truck soon, what colour is period correct?
From what I've seen and read the colors for the US 59 truck 292's were yellow with black rocker covers. I wonder if that was the same for Oz?
I just looked at some brochures from Oz for 57 & 58 and the block was a light green with red rocker covers.
http://oldcarbrochures.org/index.php/Australia-2/Ford/Ford-Trucks
|
|
By Lord Gaga - 7 Years Ago
|
Check the tube for the bypass hose that's pressed into the goose neck....I had a leak there that drove me nutz for a while!
|
|
By 2721955meteor - 7 Years Ago
|
|
put sealer on the 4bolts and make sure they are correct length,also hardened washers in sure clamping stays. if the leak prevails get the front cover machined so it is true. like others the front cover bolt length is a trap. good luck
|
|
By MontyRay56 - 7 Years Ago
|
The last two Y-blocks I did, both leaked just like yours does. I found that either welding this hole up on the timing cover or threading it and screwing in a brass plug and then surfacing the timing cover on a head surfacing machine and then cleaning the front of the block with 400 grit sandpaper and a sanding block and reassembly with sealer and the leaks on both engines were repaired. I had never encountered this before, but we found that these timing covers both were warped and it took two tries on the cylinder head surfacer to make the timing cover flat. I do not have any idea what that hole in the timing cover is for, but it seems like it's only purpose is to leak water.
|