Maybe this will help you out...
There are quite a few ways to do this, but I will ditto the brass plugs and the need for sealer on installation. The following photos and article/text are from something I gave to Bruce Young, the editor of the Y block magazine, sometime ago. As stated previously, do be careful about sucking oil instead of fumes...not good for combustion, definitely. There are several ways to pull this off, what I offer here is certainly just one way. Maybe you can do a PCV search on the forum here to weigh your options.


Crankcase Ventilation Upgrade
All of us love Y blocks – for most of us, that’s the reason we bought the truck or car that we own. Maybe it’s the sound of that Y block firing order through dual exhaust, the look of the engine under the hood, or even the horsepower and torque that our favorite V8 offers. Whatever the reasons why you love your Y block, if you are anything like me, you want that motor to operate and run well. This goes for those of us who own cars and trucks that have “stock” engines and for those who trick their engines for the best in performance.
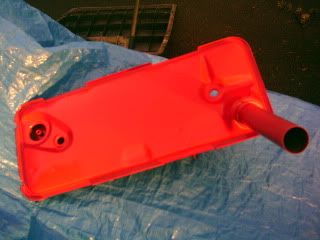
Let’s consider an upgrade that is available for even us rookie wrenches – positive crankcase ventilation. The crankcase ventilation that came from the factory on the early Y blocks was primitive in functionality and typical of the automotive era (the 239, 256, and 272 engines especially). In the beginning, the Y came from the factory equipped with an open crankcase ventilation system. This means that air from the outside of the engine was moved through the crankcase so that pressure and fumes (what we commonly call “blow-by”) could be scavenged from the block by means of a downdraft tube mounted on the side (that included a filter). Other Y blocks were delivered with a valley pan that had provision for ventilation by means of a port that contained a threaded hole, and a long downdraft tube that wrapped around the bellhousing, down to the rear passenger side of the engine. The fumes exiting the block were also baffled by extra sheet metal attached to the bottom of the valley pan. Theoretically, when the vehicle was traveling at speed, the air that was moving past the opening of the downdraft tube would siphon off the gases present in the crankcase. This system was marginal at best, and today many restorers and other Y block owners have given testimony to having trouble with leaks at the downdraft tube, not to mention rear main seal leaks and seepage due to crankcase pressure.
Some of the later 292 and 312 Y’s had a better system of crankcase ventilation whereby some type of PCV valve was used, whether screwed into a port at the carb, valley pan, or in-line “off manifold” vacuum. I believe you would call this type of system “semi-open” because air was being taken in from outside the block (at the oil fill tube location – remember the screened oil filler cap) circulated through the crankcase, dumped into engine vacuum, then finally burned in the cylinders. Finding these types of systems can be a little difficult, for most Y blocks that I have encountered have the sheet metal downdraft tube just aft of the fuel pump or located at the rear of the engine on the starter side. Take heart – Y blocks that have the components for this upgrade still exist in junkyards and swap meets, and the parts you need can be found.
Veteran readers of our magazine will be quick to note that one of the easiest means of upgrading a positive crankcase ventilation system would be to drill a hole in the rear of your non-vented valley pan, use a baffled grommet, insert a PCV valve, attach a rubber tube to the valve and then to engine vacuum, and you are ready to go. While that may be the fastest option, drilling a large hole at the rear of the valley pan may frighten away a rookie.
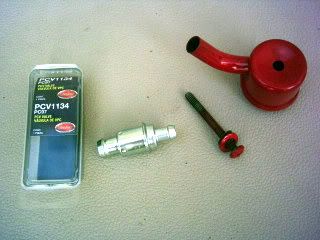
As I thought about what to do, I ran across a photo of a PCV fitting from an early 60’s truck (see picture of teapot/spout looking part). This item screws down to the threaded hole on the rear of the vented valley pan described above (see photo of vented valley pan). This small adapter with an upturned spout was actually a FoMoCo item. Typically, I have only found them on C2AE blocks (and oddly enough) only in trucks, but that doesn’t mean that you could not find them on other original applications. Sometimes these small pieces turn up on Ebay or at swap meets. You could also check F-100 restoration suppliers that keep an inventory of used parts. If you do find a junkyard PCV teapot adapter, look for a metal tube that wraps around the coil bracket on its way to the front of the carburetor or carburetor spacer. This is a perfect way to route your line to the front. It is also ½” in diameter, just like the upturned spout on the adapter. As you can tell in the photo, this adapter is very similar to the top of the downdraft tube that attaches to the vented style valley pan. (Some fabricators have used this part to make their own adapter that resembles the teapot/spout item.)
For a PCV valve, I used one that had a ½” intake and a 3/8” outlet (made it into an inline valve - see photo) #1134. This part number is for a 302 small block – and my 292 has been bored .060 over, giving me 301 cubic inches, so I consider the application to be very similar. My Edelbrock carburetor - that was also being installed with a “B” intake at the same time - offered a PCV port on the front, so that’s where I attached my line. I have seen other setups where the line has been attached to manifold vacuum or to a carburetor spacer.
One piece of advice that will save you grief (a lot of rookies make this one) – make sure that you are installing the PCV valve in the right direction! If you don’t, your engine vacuum will be stopped dead cold in its tracks by immediate blockage, and the Y block will leak oil out the weakest seal (usually the rear main) because there is no place for the pressure to vent. You can test the PCV valve by sucking hard on one end, or even by using a vacuum gun. When the engine is running, vacuum will move from the adapter to the carburetor or manifold vacuum, so make sure that the air can pass through the PCV valve in the direction you have it facing.
If you replaced a flat valley pan with a vented style, you no doubt have the beehive-looking downdraft tube still attached to the side of the block. Remove this unit in its entirety, and block it off with one of two items: 1. An original factory plate that covers this hole (I have seen about a half dozen block-off plates on 292’s and 312’s that had a vented pan with the downdraft tube at the rear of the block going down on the passenger side) or 2. Purchase a VW fuel pump block off plate – believe it or not, all three holes match up, and it all seals off with a new gasket – I didn’t use sealer on mine.
At this point in the process, if you had a vented pan installed before you began the work, you are pretty much done. Fire it up and test it out. A full installation will take some time because you have to remove the intake manifold to get at the valley pan (if you replaced a non-vented pan), but I believe the time spent will be worth it. On my 55 Club Sedan, with a stock 292, any oil seepage at certain points around the block has just about disappeared. Since the downspout has been removed, there are no more oil drips, and certainly the fumes are all gone.
“Hey, Al Gore, do I get any green credits?”
All kidding aside, this upgrade is very straightforward if completed with original parts. Even if you do not use FoMoCo parts, and have to get into mild fabrication, it can still be done with a little thought and “Y”ngenuity.
Keep those Y’s on the road…
Daniel Jessup
Fellow Y blocker
Daniel JessupLancaster, California
aka "The Hot Rod Reverend" 
check out the 1955 Ford Fairlane build at www.hotrodreverend.com