|
By deadhead - 19 Years Ago
|
|
I have encountered a slight problem with a Cardon dizzy. Inside it is built just like the Duraspark except for the width of the advance slots and springs. AZ28's conversion delt with the old original Y dizzy parts. Has anyone encountered this and have it figured out yet? Thanks, Tom
|
|
By GREENBIRD56 - 19 Years Ago
|
|
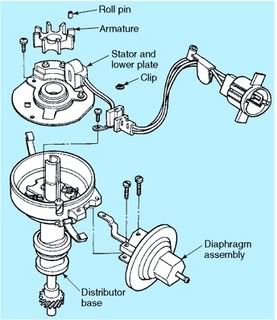
Which kind of advance system? Like the 70's upper rotor shaft on the bottom row of the photo? - The "reluctor" pulls up off of the shaft to allow disassembly. I don't think any of the Duraspark II distributors will fit directly into a Y - you have to add the parts to a Y points distributor, even the newer version. 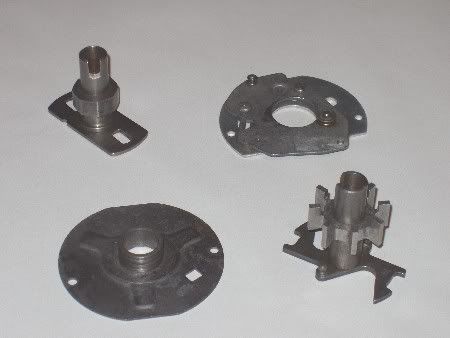
They are stamped with a number near each slot which references the total mechanical advance allowed in distributor degrees (2 per shaft). The upper clip can be removed and the rotor turned 180° to engage one or the other advance limit. There are also several different upper rotors with different total advance slots in them. With a little thinkum, you can take one that is stamped "10" and open it up just enough to be a "13" with a rat tail file - or simply sort thorough a pile of 70's junkers till you find the right number you want. Get a set of springs from Mr.Gasket if you want to speed up the curve at the same time.
|
|
By GREENBIRD56 - 19 Years Ago
|
|
It sometimes takes me a while - Deadhead, are you wanting to put a modified curve in your new distributor? And its a Cardone with points? And it has slots on the bottom of the upper rotor shaft like the one in the photo, except it uses a point cam? The one on the bottom row of the photo is still lying on my work bench - it is stamped "13L" at one slot and "18L" at the other. These are distributor degrees - and are doubled in the engine. The 13L will net 26° at full travel and the 18L will result in 36°. The springs determine when the flyweights will push the rotor to full travel. The factory springs are usually pretty stiff and take lots of rev's to get up to full advance. This is a chart from a late 70's Ford ignition training manual - it shows a typical passenger car advance system. 
The mechanical advance data shows that the full advance won't be in there until the engine is turning fast enough to get the distributor up to 2000 or more rpm - this is well over 4000 rpm at the crank. On a stocker, the initial advance (that you set with a timing light) will be like 3°-5°. Combined - you would get a max advance of about 30°-31° with her wound right out. To get good performance you want this total number to be 36°-38° and you want it at 2800 to 3000 rpm. You also want some additional initial timing in the engine right away to build low end torque. So you work backwards from the maximum. Put in 10°or 12° intial, and select a slot good for 26° divided by 2 = 13°. Together they will net 36°-38°. For reference, the 13° slot in my sample is .480 inches (15/32). If you leave the factory (stiff) springs in there they will take forever to get up to full advance. You want this to come in more quickly so lighter springs are required. Mr. Gasket has a Ford spring set #925D that has something close to what you want. Hopefully you got more information this time around! Good Luck!
|
|
By deadhead - 19 Years Ago
|
|
AZ28, if you look at the shaft in the lower right of your picture and in your mind imagine it with the points cam instead of the reluctor wheel and thats what my Cardone Y replacement looks like. But, the slots in the end of the plate are slightly shorter and the movable weights are marked differently between the two dizzys. I need to go back to the shop and take some pics and write some of the numbers down, will be back later. Thanks, Tom
|
|
By MoonShadow - 19 Years Ago
|
|
Have you checked out the articles under Tech? I don't know if this one will help but it has a lot of information on the Duraspark. Chuck http://www.y-blocksforever.com/tech/html/loadomatic.html
|
|
By deadhead - 19 Years Ago
|
|
I hope this picture loads ok. If it does you can see what I mean about the new replacement dizzy having the same style advance as a Duraspark dizzy. The Duraspark slots are numbered 10L and 15L and the weights are G3 andG4. The Cardone replacement dizzy has slots numbered 13L and 18L and the weights are G2 and G3. I'm guessing the springs also are different between the two dizzys. I'm just trying to figure out what the combo should be. Tom
|
|
By deadhead - 19 Years Ago
|
|
AZ28, I just took apart my donar duraspark, the slots were marked the same as the first one (the one on the left in the above pic) but the weights are G2 and G4. Will the weights make that much difference? Check out the Cardone replacement Y shaft in this pic. The cam would have to be removed with a lathe. Tom
|
|
By deadhead - 19 Years Ago
|
|
Moonshadow, I was under the impression that a Load-o-matic was vacume advance only. The shaft is all one piece. Tom
|
|
By GREENBIRD56 - 19 Years Ago
|
|
Just in case you didn't stumble on to the wiring schematic I used - Holun has put it on a site where you can look it up. Works on my bird and worked on his sedan too. Requires the "blue grommet" style of Ford controller with 4 pin and 2 pin plugs. http://pages.sbcglobal.net/mshum/HoLun/WIRINGSCHEMATICT-BIRD1.jpg Just looking at your pictures - I'd say the upper rotor shaft of the Duraspark distributor will clean up and drop right down into your "new" rebuilt points style unit. Don't even change the fly weights, try it as-is. A lttle homemade prying tool would allow lifting the plastic keepers and moving the weights to the other distributor if you want to keep them together. The '77 Duraspark on my work bench has the 13L and 18L advance slots - but the weights are both marked "S1B" - don't know where the springs went, they were way too stiff anyway. Don't worry about machining anything on one of these style of units - just install the Duraspark upper shaft in your rebuilt distributor. If you want to increase one of the advance slots to match the other part - I would suggest transfering the dimensions and carefully grinding the necessary clearance into the donor part. 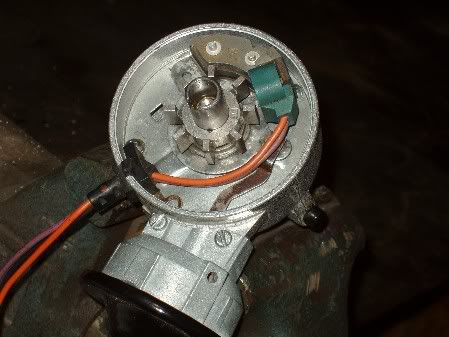
You will have to enlarge the exit slot for the wiring pigtail - 1/4" rat tail file - and be certain you have a good ground for the black wire. It is attached to the two screw loops on the plastic wire entrance strain relief. Grounding problems are an old service issue with these Duraspark systems - that black wire is coming all the way back from the control module and Ford was "hoping" that the dizzy had a good ground to the block. Don't just hope - make sure you get a good ground down to the engine block.
|
|
By deadhead - 19 Years Ago
|
|
Steve, thanks a bunch for helping an old point and condenser guy figure out what he's got to work with. But, food for thought, I will get the spring kit, I'm thinking of using the 15L slot and about 8/10 degrees of initial advance, that should put me in the ball park to play with it. what do you think? Oh yeah, whitch vacume advance diaphram should be used ? Thanks, again, Tom
|
|
By GREENBIRD56 - 19 Years Ago
|
|
Use the vacuum pot that came with the Duraspark - I believe it has the required dogleg to best fit the "point plate" that the stator rides on. Some of the pots are adjustable - try sticking a 1/8 hex key down the port and see what you find inside. While you have it apart - set the two upper rotor shafts on a sheet of paper and draw around the advance slots in the base. Do one on top of the other and you will see the differences in the slot lengths. Just an opinion - I think you will find the 15° slot is too big in the long run. These Y-engines like a good bit of early advance like 10° - 12° is pretty common for the "tuned" cars. If you use the 15° slot and some lighter springs, you'll suddenly find yourself with 40° total and if that's a bit much and she knocks - you'll have to fix it by backing down the initial and that will immediately hurt performance. If you can transfer the length of the 13° slot onto the Duraspark upper shaft (a little file work will do the trick) then you will have a quick choice. The white wire in the schematic is a "detector" that will cause the system to automatically retard when the solenoid is actuated. So the high initial advance gets out of your way when you want the engine to crank right over.
|
|
By deadhead - 19 Years Ago
|
|
Steve, I got the spring kit and went ahead and widened the slot out to about 13 degrees. The dang thing practicly put itself together, even the slot for the pigtail was correct for the Duraspark. You would almost think that Cardone is expecting rodders to make this conversion!!! This is the eaziest and most economical way to get a reliable electronic ignition system with parts available anywhere. Thanks one more time for your sage advice and help with this. Tom
|
|
By GREENBIRD56 - 19 Years Ago
|
|
Deadhead - Got a coil for your hotrod yet? This picture is of a 90's Ford "E-core" (shape of the steel armature the wire is wrapped on) coil - commonly called a "TFI" coil. TFI is technical jargon for the chip that runs the 90's ignition - has nothing to do with the coil. It doesn't use oil as a coolant and has about 1.2 OHMS primary resistance. This one came off a salvage Lincoln at the "pick-a-part". I run mine with a ballast resistor - but I've heard that there are systems that have survived without it. 
You can find these at the yunk-yard for cheap - with a snap-on connector, bracket, rain hat, and the condensor. The connector on this unit had a red #12 positive lead wire and two green #14 negative wires. One of the green wires is for the condensor - the other goes back to the electronic ignition box (where a transistor is used to ground it - just the same as the points in your old set-up). Best one to find is the one from a Ford Probe - it has a nice, easily adaptable bracket.
|
|
By 1964fordf100292 - 14 Years Ago
|
|
got any specifics on the 77 duraspark distributor? like what kinda motor and car?
|
|
By GREENBIRD56 - 14 Years Ago
|
|
You want a Motorcraft distributor for a V-8 of that '77+ era - I've used 302W , 351W, and big block versions too. What you are after is the "point plate" (stator coil, magnet, and swivel plate), upper rotor shaft that carries the 8 blade timing armature (reluctor), vacuum advance pot. most likely used on cars, light trucks and vans up to 1984. I don't have a good way to predict which timing slots will be found in the upper rotor shaft. 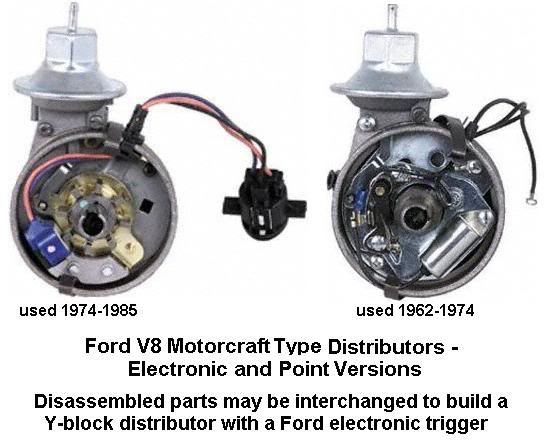
The Reluctor pries off your donor with a couple of screwdriver blades and steady pressure. 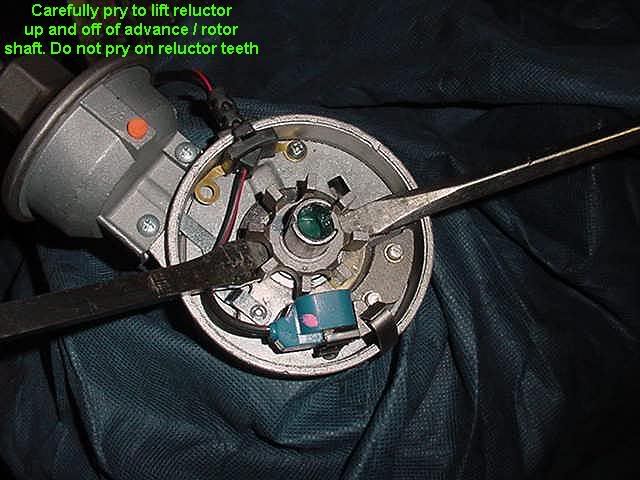
There is a little clip down in here that has to be opened to release - hold your mouth right while trying this.. 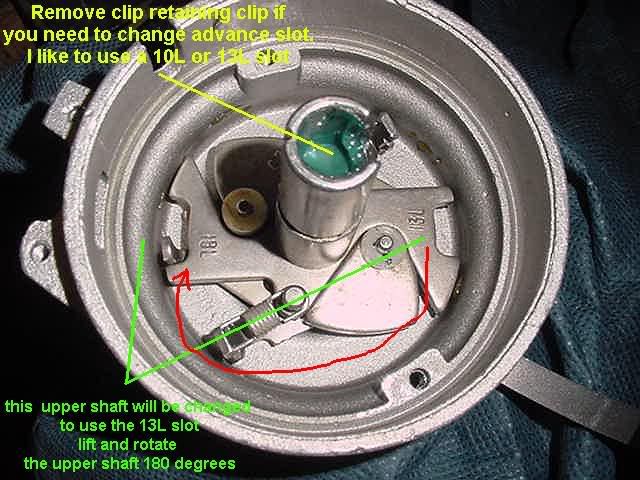
The length of the 13L slot is what is critical to getting the 13° of travel - if you get a 10 or something else, you could modify a shorter one. 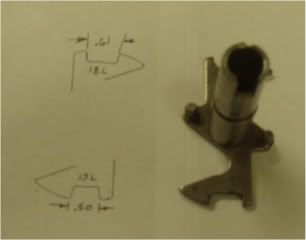
|
|
By GREENBIRD56 - 14 Years Ago
|
|
I've spent a little time fooling with my "homebuilt" ignitions over the years since this thread was started. I don't think you can beat the Ford trigger assembly (8 blade reluctor) for longevity and being trouble free. But you can put out some serious sparks with some yunk-yard parts once you have the trigger.....and not spend much money. 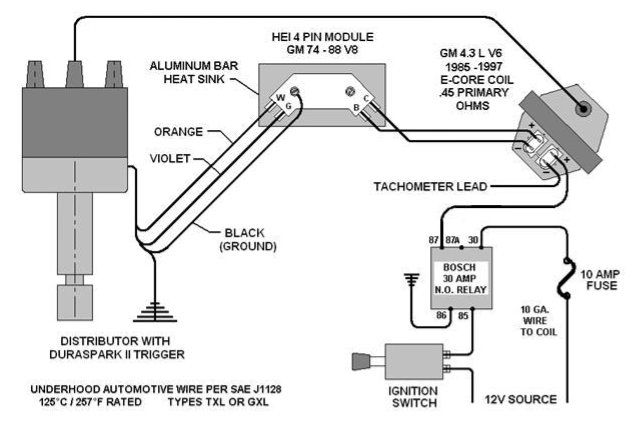
This diagram uses the Ford distibutor/trigger - a GM HEI type four pin controller - and a low OHM primary coil from a V6 GM of later vintage still. 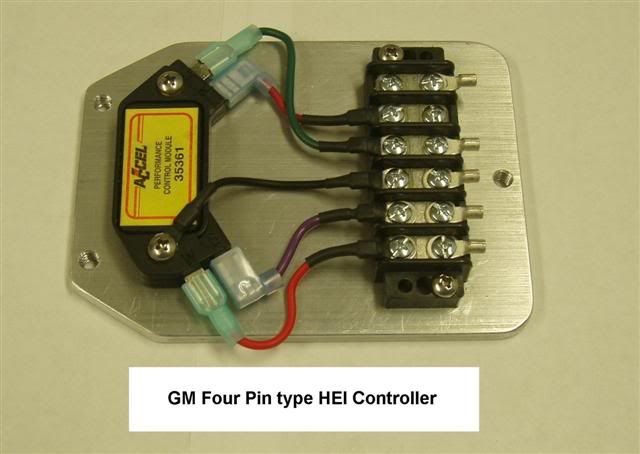
The four pin module just screws down on an aluminum plate with some heat transfer paste under it......hide it where you wish, out of the water - and where it can cool a bit. 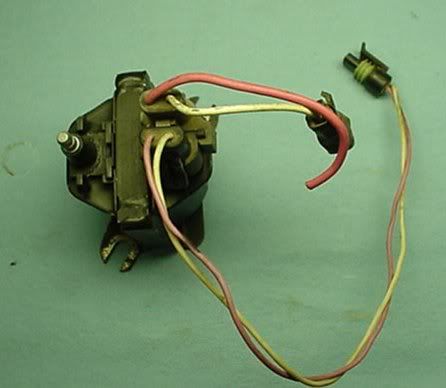
And the coil is out of an S-10 pick-up (V6) or something of that type. Bring the two connectors home with it. Make sure you have a way to feed the coil lots of AMPs - the diagram shows using a lighting relay to switch the power. 
The HEI module will turn on the coil and run all of the AMPs the switching transistor can handle without cooking. The trace above shows just how long the coil might be saturated.
|
|
By JoeBob - 14 Years Ago
|
GREENBIRD56 (7/2/2007)
I have a distributor with the advance mechanism similar to the upper left in this photo. Does this piece just pull off or is there a clip? I have a Pertronix but I wanted to change the advance springs to the Mr. Gasket ones.
Thanks,
|
|
By NoShortcuts - 14 Years Ago
|
JoeBob (6/11/2012)
GREENBIRD56 (7/2/2007)
I have a distributor with the advance mechanism similar to the upper left in this photo. Does this piece just pull off or is there a clip? I have a Pertronix but I wanted to change the advance springs to the Mr. Gasket ones. Thanks,
The distributor cam is secured in place on the distributor shaft by a small diameter, horseshoe shaped, spring steel, wire clip with 'ears' (ends) that come up toward the end of the distributor shaft/top of the distributor cam. There should be a felt pad covering this clip in the top of the distributor cam opening. The felt pad in the top of the distributor cam should be damp with lubricating oil for lubricating the distributor shaft.
Hope this helps!
|
|
By oldcarmark - 14 Years Ago
|
|
Just watch that spring clip as you remove it or install.Travels a LONG way if it gets away from you.
|
|
By JoeBob - 14 Years Ago
|
NoShortcuts and Oldcarmarc, Thanks for the info, I'll check it out this evening. The top is packed with a light weight grease. I'll clean that out so i can see what I'm doing.
|
|
By JoeBob - 14 Years Ago
|
Wow!! Glad I took this distributor apart to change the springs. The part that holds the weights and springs was bent, causing the weights to rub and not return all the way, sometimes sticking in different locations. Also it has two different length and strength springs.
No wonder the car seem to be lacking in power with the advance so inconsistent.
This was a remanufactured distributor from NAPA that I bought but never used. Very disappointed. Ended up taking the whole distributor apart so I could straighten it out. Seems to move freely now but if it doesn’t work properly after this it may end up being a core for another one. But NOT from NAPA.
Sorry Deadhead for hijacking your thread.
|
|
By Talkwrench - 14 Years Ago
|
|
It may well have two different springs, that is common one may be a bit longer and "come in" about halfway. It is not unusal to "bend the posts" a little to slow down or speed up the rate on the springs, tuning it to your liking.
|
|
By JoeBob - 14 Years Ago
|
|
Talkwrench (6/12/2012)
It may well have two different springs, that is common one may be a bit longer and "come in" about halfway. It is not unusal to "bend the posts" a little to slow down or speed up the rate on the springs, tuning it to your liking.
Thanks Talkwrench. Didn't know about the bending the posts but I would imagine you wouldn't want to bend them so much that they hung up on the base and don't move smoothly.
|
|
By pegleg - 14 Years Ago
|
|
Joe, Many of us use the 10 degree cam or fill the 13 with braze and start with 14 degrees initial. depends on your actual combination, and what you run for gas. They do like a lot of initial advance.
|
|
By GREENBIRD56 - 14 Years Ago
|
|
This photo shows an upper rotor shaft that has been modified to provide a reduced travel length for the slot. Originally the slot allowed for a total mechanical advance of 20° in the distributor - 40° at the crank. This would correspond to an old factory motor tune that called for static timing of 0° at idle with one of the two springs being very heavy. 
This one is reduced to 13° (26° at the crank) so that an intial static timing of 10°/12° will sum up to 36°/38° at the crank. 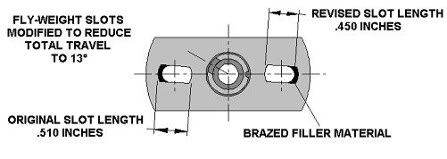
The cam was removed to fit a Ford Druaspark II reluctor onto the Autolite distributor.
|
|
By unibody madness - 11 Years Ago
|
nothing like bringing up an old post!
I am going to try this upgrade.greenbird56 I sent you a PM
|