|
By Deyomatic - 2 Years Ago
|
I got a good deal on an ECZ-9425B manifold and I'm in the process of getting it prepped for paint to put it on after smoothing out the venturi holes a little...
Is there something I can soak it in that will get rid of the rust in the thermostat area, as well as any other surface rust as well as the heat riser ports?
Thanks.
|
|
By alanfreeman - 2 Years Ago
|
|
I know that I will probably get some negative comments in response to this post but soaking the manifold in muriatic acid (ordinary pool acid) for a few hours will get rid of all of the rust inside and out and will not harm the cast iron. Just neutralize the acid residue on the manifold with fresh water, dry it off and paint it quickly as it will start to rust almost immediately. I have used this process a couple of times with no problems. Home Depot or Lowes sells the acid and you can pour it back in the container when finished and save it to reuse it again.
|
|
By 55blacktie - 2 Years Ago
|
|
Depending upon the amount of rust, you might consider having it media blasted; just make sure that there is no residue remaining before you install it. For paint I used Seymour primer and Ford/Chrysler Red Engine Paint for my 55 Tbird; it's the best rattle-can paint I've used, but make absolutely certain there's no residue on the intake before painting. I used Goof Off and 91% isopropyl alcohol.
|
|
By Daniel Jessup - 2 Years Ago
|
Another good idea would be to use electrolysis. For something as small as an intake manifold this will be easy to do.
I explain the process in the article below.
https://www.hotrodreverend.com/post/rust-restoration-preparing-a-cast-iron-exhaust-manifold
|
|
By Deyomatic - 2 Years Ago
|
Thank you...three great ideas.
Daniel- do you think the electrolysis was worth doing, since you ended up blasting it anyway? It looks like a cool process.
|
|
By Daniel Jessup - 2 Years Ago
|
|
The electrolysis works well if you are willing to be patient with it. I was in a hurry to finish that up and post the article/video on my website. One of the issues as well was trying to save the heat riser on that setup. Since the gaskets and corrosion were keeping the electricity from flowing from the manifold to the spacer it took more time to be in the tub. I would assume that an intake manifold will not be near as bad as an exhaust manifold that came uncoated/unpainted from the factory.
|
|
By Deyomatic - 2 Years Ago
|
|
I may just try to have it blasted somewhere. It's not as crusty as I thought...it's just dirty...I soaked it in Simple Green overnight, wire brushed it and used the drill attachment...soaked it again. Today I was looking closer and there's still dirt build up all over it. The Simple Green worked wonders, but I'm getting frustrated. I'm thinking getting it blasted will clean it all up and then I'll be able to paint it.
|
|
By Joe-JDC - 2 Years Ago
|
|
I have sandblasted both cast iron intakes and aluminum intakes before porting them for the last 37 years without any issues. You definitely have to pressure wash out the ports backwards and forwards afterwards, but media/sand/black beauty does a much better job of cleaning the rust and scale. Do NOT glass bead the interior of either intakes for the glass beads will break upon contact if there is too much air pressure, and the glass will eventually break free with fuel/air and heat cycles of the engine running. Glass beading the exterior and pressure washing is acceptable if you tape over the ports and water passage, and carb plenum and use low pressure air. In the exhaust passages, use sand only or high pressure water. Joe-JDC
|
|
By Deyomatic - 2 Years Ago
|
Thanks Joe,
Should I get 80 grit or 120 aluminum oxide…or something else?
Thanks
|
|
By Joe-JDC - 2 Years Ago
|
|
Which ever one you have, adjust the pressure to get a rough texture on the ports after the rust and grease is removed. I personally would use the 80 for cleaning up, and then move to the 120 to give a uniform texture to everything. It all depends on how show worthy you want the finished product to look. Wash thoroughly, blow dry or sun dry, and prime asap. Two or three light coats of paint are better than a thick coat. Thick chips. BTDT. Joe-JDC
|
|
By Deyomatic - 2 Years Ago
|
I will try the 120 then. Thanks again.
The only paint “quality” I strive for is “doesn’t flake off.” 😂
|
|
By 55blacktie - 2 Years Ago
|
|
You'll need to remove oil/grease, etc. before it's media blasted; otherwise, the media will stick to whatever is on the manifold. Paint & rust aren't a problem. If you take it to a machine shop to be media blasted, they'll probably put it in a parts washer or bake it before blasting it, but they might charge more than if you bring it to them clean.
|
|
By Joe-JDC - 2 Years Ago
|
|
If media blasting is done properly, it will remove all greases, carbon, paint, rust and actually anneal the surface of the metal a bit. That is why I do not recommend using glass beads for they imbed many particles instead of removing them. Many machine shops use steel shot to clean parts and pressure wash them afterwards. I don't like either steel shot or glass beads due to their getting caught in the tiniest of grooves or cracks in the part. Steel shot will get into screw threads and ruin them. Joe-JDC
|
|
By Deyomatic - 2 Years Ago
|
|
HMMMM... Could I hit the suspect areas with brake cleaner or even a MAP gas torch (not necessarily in that order)? I would think that would get rid of all the grease/oil. Thoughts?
|
|
By 55blacktie - 2 Years Ago
|
|
When my heads came back from the machine shop, I thought they were clean enough to paint; unfortunately, the paint didn't stick. I was able to remove the paint with Goof Off with very little effort. I then went over the heads multiple times with 91% isopropyl alcohol (cheap). Once my white rag was clean enough to suit me, I resprayed the heads, priming them first. Success!
|
|
By Deyomatic - 2 Years Ago
|
|
Thanks for the tip...I had planned on using acetone but I do have a bunch of rubbing alcohol. The blasting media is supposed to show up tomorrow, let's hope my old sandblaster gun still works. It's been a long time.
|
|
By 55blacktie - 2 Years Ago
|
I used a cheap brass-wire brush for scrubbing, cheap paint brushes for applying the alcohol, and old, white T-shirts for wiping it off. I might have used 000 steel wool as well for the last step before painting. As long as you follow the directions on the can(s), you can spray the top of the manifold and then flip it over to spray the bottom (it's too heavy to hang). Seymour PBE primer dries very quickly; it's the best rattle-can primer I've used. The Seymour Ford/Chrysler Red top coat takes considerably longer to dry.
I masked off all of the gasket surfaces before painting, but not everyone does.
|
|
By Skyliner57 - 2 Years Ago
|
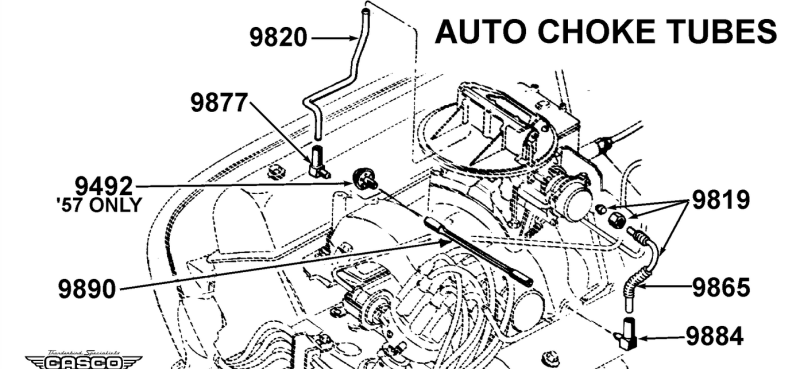
I plan to do the same with a manifold that I just picked up. I can have it sandblaster by a local company down the street. Bit, how about the heat tube that runs through the manifold. I have heard they rust out. any experience on replacing this?
|
|
By 55blacktie - 2 Years Ago
|
|
Are you retaining the original heat-riser choke?
|
|
By cokefirst - 2 Years Ago
|
|
The heat riser tube replacement is a 10 minute job with the manifold off. I used a small punch and carefully knock the old tube out and then use a small hammer to insert the new tube. Once it is replaced, it should last another 30 years.
|
|
By Skyliner57 - 2 Years Ago
|
I had not planned go remove, the car starts extremely well. I see there is a bolt in the tube on the driver's side so thought zi would prepare the spare to be correct. I am only assuming the tube is rusted out so hopefully it will come out--masybe have to drill?
|
|
By KULTULZ - 2 Years Ago
|
You have a 56 FORD and you are putting a 1957 ECZ-B intake on it? Each year intake choke system is unique.
What carb are you planning on using? Are using with the 1955/56 BIRD ACL ASSY?
Parts to restore the crossover tube are readily available - https://www.classictbird.com/Carburetor/products/55/1/0
|