|
By slumlord444 - 3 Years Ago
|
Am I missing something or does the road draft pipe have to go? I don’t see any way to make it work with the headers. I’m thinking the easiest is to convert to aPCV. A rubber grommet in the hole in valley pan, PCV valve in the grommet, a hose to a vacuum outlet on my 750;Holly and I’m done. Am I missing anything? Cheaper than the $90 kits I see.
|
|
By miker - 3 Years Ago
|
Just make sure the rubber grommet is the type that has some kind of baffle. They’re a fair number of recent post here that address that.
The latest one. http://forums.y-blocksforever.com/Topic162448-2.aspx
|
|
By KULTULZ - 3 Years Ago
|
Did the manufacturer (please name) mention as to whether the tubes will interfere with the BIRD SPECIFIC road draft tube?
I know there is a beautiful set available but it says BIRD SPECIFIC on the left set due to the STEERING BOX.
Ideally, you want (IMO) a PCV SETUP to ventilate the crankcase properly. ROAD DRAFT leaves a lot to be desired (IMO).
EDIT -
...hmm ...
You did mention the manufacturer. Maybe call them and ask what the problem is. If they interfere with something, they should include a notation and/or include such notation in their application list - http://www.fordpowertrain.com/Tbirdheader.htm
|
|
By slumlord444 - 3 Years Ago
|
|
Headers are FPA T Bird specific. Will call them Monday. Was thinking someone here who has them might know.
|
|
By miker - 3 Years Ago
|
|
I’ve got them, but I had the PCV in place when I installed them. Just looking at mine I can see it’s pretty tight down there so I’m not surprised you’re having a problem.
|
|
By ogasman - 3 Years Ago
|
I have the FPA headers for my 55 Bird. I think they are the same as the 57. They are not in the car, the engine is on the run stand. I did away with the road draft tube for a cleaner install. Block off plate for the draft tube site. Ran a gromet and PCV valve in the valley cover, and plan on running it to the base plate of the Holley carb. I got the part number information from Ted. Just local junk from the NAPA, nothing special. Hopefully he will chime in, I did not save the part numbers or applications.
Paul
|
|
By Florida_Phil - 3 Years Ago
|
Replacing the road draft tube with a PCV is worth the trouble. Casco Thunderbird makes a kit that comes with everything you need. I used their kit to replace the road draft tube in my '55 TBird some time ago. It idles better, my mysterious oil leaks quit and my garage doesn't stink. This makes my wife happy, which is well worth the cost.
|
|
By DryLakesRacer - 3 Years Ago
|
|
If the Thunderbirds road draft tube has the “box” under it in the valley cover like the 62-64 292’s in cars and trucks your grommet will not need a a baffle but will need a short cap screw installed in the hole so it will not suck thru the hole. You can look in the hole after the road draft tube is removed. Ted has shown a photo of this installation many times. I agree with Phil that my garage no longer smells when I park after I added the system.
|
|
By slumlord444 - 3 Years Ago
|
The T Bird has the box. Figured an easy way to hook up the PCV. Dug up a spare road draft tube. Cut it off about an inch psst the 90 degree turn out of the valley cover. Simple to adapt the PCV to the road draft pipe and a hose to the vacuum outlet on the carb. Bolted up the passenger side header. Gasket that came with the headers wasn’t going to seal so I used a gasket for the factory manifold. I will callFPA tomorrow about the gasket. Header fit fine without the road draft tube. I used the studs I had with the old headers. Had to grind some more off my already modified wrench to tighten the rear bolt but it worked. Didn’t use the heat shields. Should be easier to change plugs. So far, so good. On to the drivers side and then getting from the header to the muffler. Going to a muffler shop to make 2 1/2” tailpipes.
|
|
By bird55 - 3 Years Ago
|
The copper gaskets supplied with my FPA's worked great. I also use studs (actually they are referred to set screws) with allen drives. These make installing and removing much, much easier.
I converted to pcv before this install.
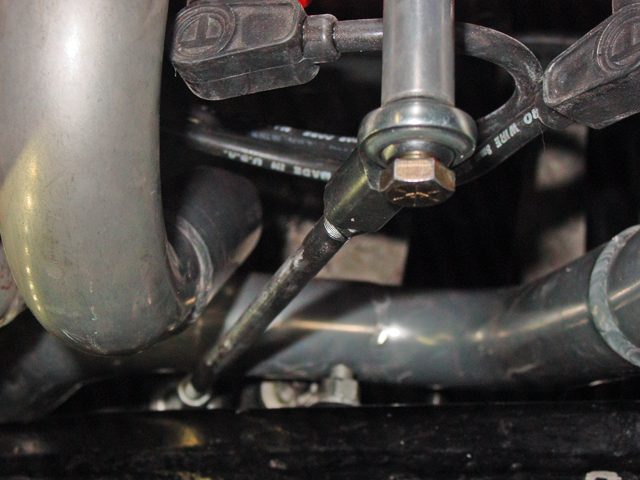
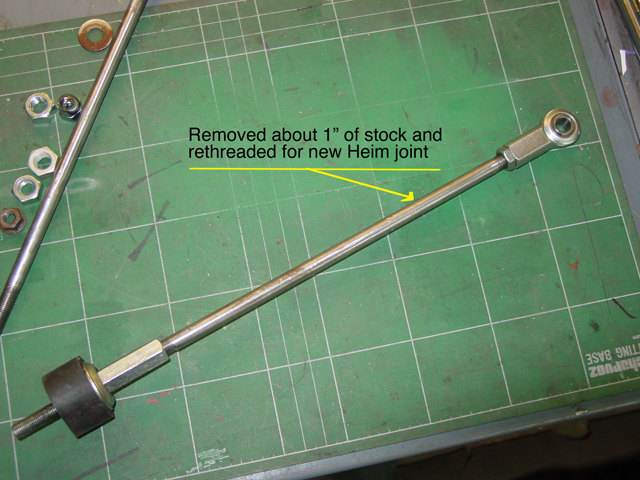
FYI, one thing I did change is reverse the heim joint style. I felt like it is a more efficient engineering solution. BUT, I'm no engineer! Still have had it for years and have no issues.
Also this allowed me to shorten the threaded receiver that is welded to the header flange.
Here's the before.
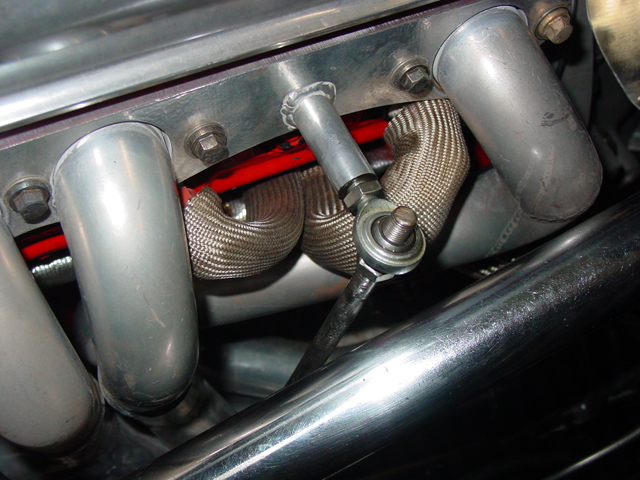
And here's after.
|
|
By slumlord444 - 3 Years Ago
|
|
The gaskets that came with mine were composition, not copper. After talking with FPA, I slotted the bolt holes in the gasket to make it line up better. Your re engineering of the stabilizers is interesting. I am now working on the passenger side and will have to think about that. Header is sure close to the steering column. Apparently, you got it in there. Temperature is single didgets and below here in Southern Illinois at the moment and staying that way for a couple of days. I have heat in my garage but am going to wait till it warms up a bit after Christmas to get back to work on it.
|
|
By ogasman - 3 Years Ago
|
I sent a PM through the site with my contact information about the exhaust manifold flanges. Just want to make sure it sent. No rush, it is -3 here right now, with a wind chill of about -25.
Thanks
Paul
|
|
By slumlord444 - 3 Years Ago
|
|
Got it. Sent you pm.
|
|
By Brent - 3 Years Ago
|
I fired my engine up for the first time with FPA headers, they are ceramic coated, got so hot the plug wires were smoking and got soft and began to sag. I have ordered heat shields like bird55 posted a picture of earlier in this post. The headers sound great and I am anxious to feel them perform.
Thank you to bird55 for posting the mount upgrade, I had an issue with the steady rest mount touching the header, the mount was tweaked a bit in an incident long ago. I ground the mount, but I like the mount mod better.
|
|
By slumlord444 - 3 Years Ago
|
|
I have a question for TBird55. What all did you have to remove to install the driver’s side header? I’m in the process of installing the driver’s side header and from what I can see I’ll have to remove the valve cover, spark plugs, power brake booster, and possibly the clutch linkage and it’s still going to be a tight fit. I will also have to relocate my fuel pressure regulator because it’s now in the way. Any tips will be appreciated.
|
|
By bird55 - 3 Years Ago
|
Well, it's been too many years ago to remember! But, I do recall it was trial and error. It is helpful to be sure to remove both original factory side steady rests from the engine so it can rock side to side, also the oil filter. I have an AOD so no clutch linkage. Also, I no longer use my power brake unit so that has been removed, so you may need to temporarily move it.
Again I recommend the short set screw type studs to make it easier to position the gaskets on the install. The shortening of the rod and attachment collar will help some to lean over the rod towards the engine. I also didn't use the rubber steady rest bushings when fitting things up this will give you more room to experiment with your application.
Also, I just remembered that the battery and tray is in the way, so you may want to remove them as well. My battery is trunk mounted so I have much more room.
Hope that helps a bit. The headers WILL go in but your results may vary. I can shoot more pics if you need or try to answer more specifics if you want just let me know. Let us know how it's going.
|
|
By bird55 - 3 Years Ago
|
Additionally,with the battery tray left in, you might try installing the header from below the car.
|
|
By slumlord444 - 3 Years Ago
|
Just finished supper after working on it this afternoon and saw your last post. I had removed the oil filter, plugs, studs for the headers, and the sending unit for the. Stewart Warner oil pressure gauge and was leaning over the fender surveying the situation and thought there looks like more room from the bottom than the top. Crawled under and with a little jiggling around it slipped through with no problem with the battery and brake booster in place. Only had to slightly replumb the fuel pressure regulator. Thanks for your input. You were dead on with coming up from under the car. Need to bolt i
it up tomorrow and start fabricating pipe from the headers to the mufflers. Will clean and paint the floor above the mufflers and install some self stick insulation on the floor. Slow but sure process.
|
|
By bird55 - 3 Years Ago
|
Glad to hear you got it solved.
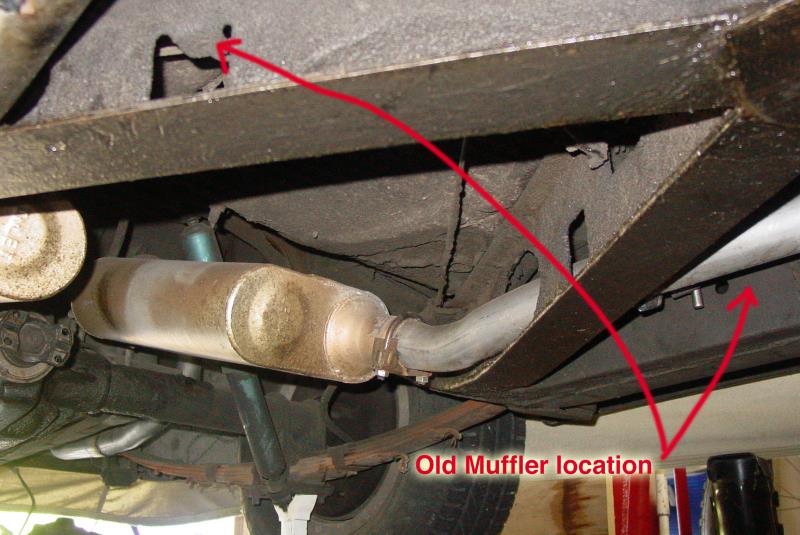
Now that you are at this point, I would recommend skipping the mufflers in their original location and moving them back (different size) to behind the x-frame. It's a much cooler option inmho for your feet. You might check with Phil in Florida, I think he's also running this way. Changing muffler styles from stock also opens up your options for larger exhaust tubing sizes.
|