|
By ac289ace - 4 Years Ago
|
My new engine is installed but I am having some trouble getting it to run right. For the first step I rechecked the timing and with the vac advance still hooked up, I estimate the timing was ~35 degrees advanced. I originally set the timing at 6 degrees with the vac advance disconnected and was surprised how advanced it was under vacuum. Is going from 6 to ~35 after reconnecting vac advance normal and should the vac advance be disconnected when doing the timing? I believe my distributor is the stock one for a '57 312.
The running problem I am trying to find is the car dying when I try to accelerate as well as backfiring before dieing. If the timing change is normal, then I will need to head down some different paths. My initial thought was carburetion, but I completely disassembled my Holley (stock for a '57 Tbird), blew out all passages, and reassembled so I am looking at timing now.
|
|
By miker - 4 Years Ago
|
The timing is set with the vacuum advance disconnected and plugged on the vacuum side. I don’t know the particulars on your distributor, but 35 connected wouldn’t surprise me. As an aside, a lot of engines like 8-10* more than 6* for the initial.
Disassembled and blown clean is not the same as a rebuild. How was it running before you did the carb? Checked for vacuum leaks? Your symptoms are often (not always) a lean condition due to a leak.
|
|
By Tedster - 4 Years Ago
|
It helps a lot to begin this process at what I call "battlesight zero", what I mean by that, is when the timing pointer is on the TDC or "0" tick mark of the crank balancer, that we have checked (using a piston stop tool) that the #1 piston is indeed truly and exactly at TDC, the idea here being we want to be sure the timing pointer is telling the truth about the timing degrees we are seeing with the timing light. This is long to read but if you understand it better, you'll only have to do it once and you'll thank yourself every time you drive it.
Put another way for emphasis when the #1 piston is exactly at TDC on the compression stroke (using a piston stop) the engine timing pointer should coincide exactly with the "0" mark on the balancer. Everything ignition related including timing and valve closing events is based on this null point.
There are a few reasons why the pointer may not be accurately indicating true TDC, but this defect has caused mucho headscratching and wasted hours over the years in many, many different engine families. Be sure to verify TDC before proceeding, just as a "belt and suspenders" approach.
With that out of the way, you kind of have to get it into your head that under the overall ignition timing umbrella there are two main systems at work, the centrifugal/mechanical timing, and the vacuum advance timing. They are two completely independent and separate systems for advancing and retarding the ignition timing as engine conditions require. The mechanical advance uses weights and springs and is solely based on engine RPM. The vacuum advance is based solely on engine load. While they are separate or independent of each other they work together, ordinarily when one is advancing the timing, the other is taking some out, and vice versa. The exception is at steady speeds at light loading where it tends to be additive.
What the engineers found very early on, there is no way to achieve the very high necessary ignition timing advance numbers under lightly loaded lean fuel condition using weights and springs alone.
The two systems in turn are also measured and adjusted separately, in isolation. The mechanical advance is always set first. Disconnect and plug the vacuum advance port. I always tell people to forget it even exists, for a while anyway, when sorting out the distributor.
A dependable source of confusion is when you hear terms like "total timing". This logically sounds like it would include both the mechanical & vacuum advance degrees, but this is not the case! When you hear something like "36 degrees total timing all in by 3000" what that means is 36 degrees without vacuum advance.
"Total" timing numbers do not count vacuum advance. A surprising number of people who should know better are not aware of this. Total Timing is an old drag racer term that stuck in the wider automotive community, but performance engines never use vacuum advance. Yet another aspect of ignition timing that can be a bit bewildering, when drilling down deeper into the shop manual (nod your head "yes"...) the published numbers in the specifications section for both mechanical and vacuum advance are listed in distributor degrees, not crankshaft degrees.
The distributor was intended to be setup and adjusted on a distributor machine by Ford, and the distributor turns at half speed relative to the crankshaft. Therefore any given timing advance specs in the shop manual for a particular RPM or vacuum level will be exactly double at the crankshaft.
SO, what you want to do as a practical matter is give your particular engine what it wants for your particular location and fuel quality, elevation, compression. 34° to 36° mechanical advance timing would be a good place to start. Most every OHV engine ever made will be happy somewhere in there on pump gas. Sometimes a bit more. Extending the timing marks out to 50° BTDC using timing taps will help you when using a timing light. So will the flourescent colored numbers. The rate of timing advance, how fast, or "when" the advance is coming in at a given RPM also very important to check. A short test drive or three with the vacuum advance disconnected will be very helpful sorting this out. This can get tedious, but there is no other way short of a distributor machine.
What you want to measure is the mechanical advance at higher RPM. Most people like to set the initial timing to somewhere a bit north of 10 degrees. Different internal reluctor slots and spring stiffness combinations were offered for different engine applications. What the DIYer has to be careful of is checking the mechanical advance at 2000, 3000 RPM and beyond. One reason is because the factory distributor or internals intended or included may have been replaced after these many years and may not be suitable for vehicle weight and other factors. It's also very important to check that it is operating smoothly without sticking up and down the RPM range and returns to the same base timing. The initial timing (in one sense) doesn't really matter too much, so long as there is no starter kickback. It is more important that the advance on the far end, at high RPM and cruise is suitable.
The factory stock distributor in my Truck wasn't done advancing till north of 4000 RPM, they used VERY stiff springs and a "lazy" advance curve. Your T-Bird advance curve will be much different than a truck. This is one issue with remanufactured distributors - the rebuilders may have included the wrong advance curve mechanicals.
These adjustments have a huge effect on how the engine performs. Once you get the mechanical distributor timing curve sorted out to your liking, then the vacuum advance should be re-connected and the canister itself adjusted for the correct timing advance particularly under very lightly loaded steady cruise conditions.
This is difficult or at least confusing for the DIYer to measure. Because there is no load at all on an engine in neutral, there are consequently very high ignition timing numbers observed on the balancer with the vacuum advance connected.
Even the actual advance on paper might seem to be "too much". The engineers didn't seem to think so, typically at steady highway cruise on flat ground about 50° BTDC is right in there, maybe more! The ignition advance at idle makes little to no difference anywhere else in the "curve".
If you understand how the two systems work together you will understand why this is so. Optimum timing here actually allows the engine to run much cooler esp. in stop and go driving. As it turns out a sharp engine tune contributes to elevated levels of NOX emissions, something that the engineers had to address when federal pollution emission standards were mandated. This adds even yet another layer of confusion to a widely misunderstood topic!
|
|
By Ted - 4 Years Ago
|
|
Points or breakerless ignition? If breakerless, what brand conversion kit? Ported vacuum (carb) to the distributor or direct vacuum (manifold or carb base)?
|
|
By ac289ace - 4 Years Ago
|
Thanks all and I'll need to digest Tedsters info. It covers a lot.
More info-
My car was running well 6 months ago when I pulled the 312. I pulled it because there were leaks everywhere and then decided to freshen up the engine. During the freshening up, I found cracks in the main bearing webs and started down the path that led to a new, rebuilt engine. The carb had been rebuilt previously (~ 9 months ago) but while I drained the tank, I still ended up with fine particles in the carb after the rebuild. I then replaced the tank, cleaned the carb, and added 2 in line filters. Yesterday when I disassembled the carb, I did not find any of the fine particles/residue in it and the filters look clean also.
The distributor is the stock one that was on the 312 and is using points. The vacuum is coming off the stock holley in the original position, but I am not sure if that is ported or not. The position is from the front metering plate on the passenger side.
On my initial start up, I could not get the engine to idle at anything below 2000rpm and found the new PCV valve kit I installed was leaking and so have capped that off at the carb base plate for now. The engine now idles perfectly, but coughs, sputters, and backfires when depressing the gas pedal. If I feather the pedal (rapid pumping) I can get it to stay running, but there is very poor acceleration. The squirters look like they are providing a good squirt when I depress the pedal and I checked all 4 jets when the carb was apart and they are clear. I did take it around the block, but it died a couple of times and was tough to keep it going.
In case it helps, the temp is at the high end of the gauge where it was previously just below the midway point.
Edit- I just checked the manual and it looks like the vacuum going to the distributor is ported.
|
|
By Ted - 4 Years Ago
|
I’ll suggest rechecking the valve lash. While the engine is freshly rebuilt, assume nothing. If the valve lash checks out good, then do a cranking compression test.
|
|
By ac289ace - 4 Years Ago
|
Ted (10/31/2021)
I’ll suggest rechecking the valve lash. While the engine is freshly rebuilt, assume nothing. If the valve lash checks out good, then do a cranking compression test.
Thanks for this Ted.
I rechecked the valve lash and all needed adjustment. Because of the running issues I was having, I chose to adjust the valves cold and set them to .020". Each one needed ~1/8 of turn looser to get to the .020". Initially I didn't think 1/8 turn was much, but if the thread pitch is 20TPI (not sure if that is right), my quick calcs say I was ~.006" tighter than my targeted .20". After making the adjustments, the car runs much better but still has a slight stumble off idle. Tomorrow I'll adjust the lash warm and recheck timing/idle etc and see if everything smooths out.
Its getting closer to being a driver!
|
|
By oldcarmark - 4 Years Ago
|
|
Is the Centrifugal Advance working? As the RPM increases is the Timing on the Crank Pulley advancing. You can check this with your Timing Light as you increase RPM. Because your Vacuum Advance works at idle you have direct non-ported Vacuum supply. Ported type would not advance at Idle due to lack of Vacuum supply.
|
|
By Ted - 4 Years Ago
|
In the grand scheme of things, the ignition timing at idle should be the same with the vacuum advance line going to the distributor either hooked up or unhooked. If you have ported vacuum present at idle thus causing the timing to advance when the line is hooked up, then there is too much primary throttle opening at idle. You don’t mention what camshaft you are using but having more duration and/or a decreased lobe centerline can contribute to the carburetor requiring more throttle opening at idle. A slipped damper giving an erroneous timing value is also a probability. It’s not unusual for engines that have a ‘bigger’ camshaft to need a small hole drilled in each primary throttle blade to get that blade positioning correct in regards to the intermediate fuel transfer slot in the carburetor. A short cut to that would be to open up the secondary blades slightly to allow more air in the engine thus allowing the primary blades to be closed up accordingly.
I mentioned this in another post and I’ll mention it here. If you are running ethanol laden fuel, you may need to increase the primary jet sizes in the carburetor. For premium fuel, two numbers richer should suffice. If 87-89 octane fuel, then it may need more than that.
|
|
By ac289ace - 4 Years Ago
|
I didn't get a chance to work on this today, but will be back at it tomm.
Ted, I suspect you are right about the main throttle plates being slightly open. I saw a difference in the timing between the vac line being hooked up and not, and your explanation makes perfect sense. I had never heard about opening the secondary plates slightly and will try that if needed.
My cam is a Schneider and below is a pic of the cam card. It is supposed to be very close to the Isky cam people recommended (E4), but in theory has better idle characteristics to support power brake vacuum. I did talk to the engine builder today and he confirmed he set the cold valve lash at .014" which is what Schneider recommends on the cam card. Based on the sputtering/backfiring when set cold at .014", something doesn't seem right, but I will freely admit I do not speak cam very well.

|
|
By charliemccraney - 4 Years Ago
|
There is a small set screw below the vacuum diaphragm. You can turn that to open the secondaries slightly. Take a look down the scondaries with a mirror while the engine is idling to ensure that fuel is not coming from the boosters. If fuel is coming from the boosters then the secondaries are open too far and need to be closed a bit more.
That set screw is circled in red on a modern Street Avenger:
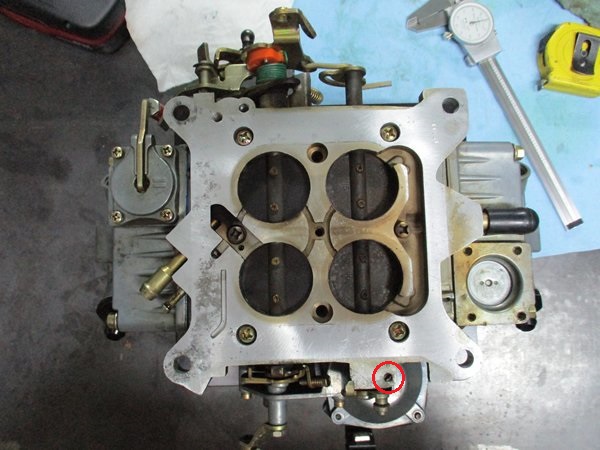
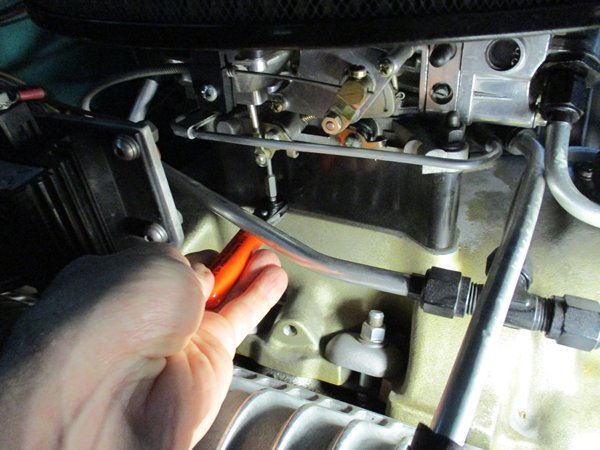
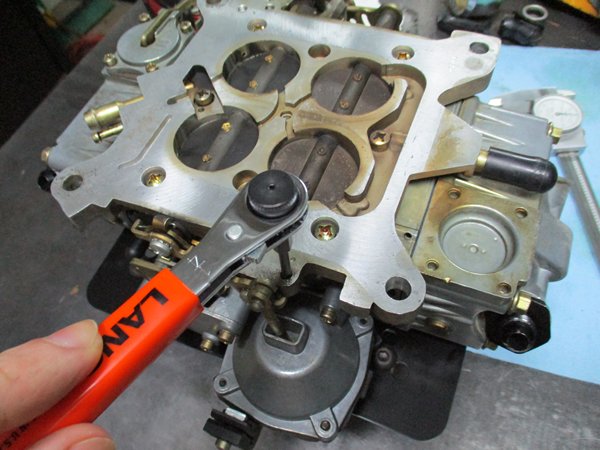
I've found a ratcheting bit wrench and bit that allows me to perform this adjustment on the engine but I also have a 2" spacer which does make that easier. Otherwise, you have to remove the carb, make the adjustment, reinstall and see how it does and repeat until it's where you want it. The bit wrench set, Lang 5278, in this case, comes with a straight, bent forward and bent backward wrench which could allow for more versatility in other situations. The bit is about 2" long, which is necessary because the wrench head is too large and touches the spacer, preventing perfect alignment with the set screw. The long bit allows it to be off center but straight enough to work, if that make sense. Cutting clearance into the spacer, if possible, would help alleviate that and might allow these tools to be used where less space is available.

|
|
By ac289ace - 4 Years Ago
|
|
Thanks Charlie, Great info.
|
|
By Sandbird - 4 Years Ago
|
|
According to Ford specs the vacuum advance with15 inches of mercury is maxed out at 22 to 26 degrees measured at the crank. Either your vacuum advance is getting fed with manifold vacuum or there is a problem within vacuum advance diaphragm, like maybe a bad or missing spring. With initial advance at 10 deg. or so plus 26 deg vacuum your rotor will be getting closer to the next distributor cap terminal when the mechanical advance starts moving at 1000 engine rpm.causing misfire. This can really happen.
|
|
By Florida_Phil - 4 Years Ago
|
Tedster (10/31/2021)
It helps a lot to begin this process at what I call "battlesight zero", what I mean by that, is when the timing pointer is on the TDC or "0" tick mark of the crank balancer, that we have checked (using a piston stop tool) that the #1 piston is indeed truly and exactly at TDC, the idea here being we want to be sure the timing pointer is telling the truth about the timing degrees we are seeing with the timing light. This is long to read but if you understand it better, you'll only have to do it once and you'll thank yourself every time you drive it. Put another way for emphasis when the #1 piston is exactly at TDC on the compression stroke (using a piston stop) the engine timing pointer should coincide exactly with the "0" mark on the balancer. Everything ignition related including timing and valve closing events is based on this null point. There are a few reasons why the pointer may not be accurately indicating true TDC, but this defect has caused mucho headscratching and wasted hours over the years in many, many different engine families. Be sure to verify TDC before proceeding, just as a "belt and suspenders" approach. With that out of the way, you kind of have to get it into your head that under the overall ignition timing umbrella there are two main systems at work, the centrifugal/mechanical timing, and the vacuum advance timing. They are two completely independent and separate systems for advancing and retarding the ignition timing as engine conditions require. The mechanical advance uses weights and springs and is solely based on engine RPM. The vacuum advance is based solely on engine load. While they are separate or independent of each other they work together, ordinarily when one is advancing the timing, the other is taking some out, and vice versa. The exception is at steady speeds at light loading where it tends to be additive. What the engineers found very early on, there is no way to achieve the very high necessary ignition timing advance numbers under lightly loaded lean fuel condition using weights and springs alone. The two systems in turn are also measured and adjusted separately, in isolation. The mechanical advance is always set first. Disconnect and plug the vacuum advance port. I always tell people to forget it even exists, for a while anyway, when sorting out the distributor. A dependable source of confusion is when you hear terms like "total timing". This logically sounds like it would include both the mechanical & vacuum advance degrees, but this is not the case! When you hear something like "36 degrees total timing all in by 3000" what that means is 36 degrees without vacuum advance. "Total" timing numbers do not count vacuum advance. A surprising number of people who should know better are not aware of this. Total Timing is an old drag racer term that stuck in the wider automotive community, but performance engines never use vacuum advance. Yet another aspect of ignition timing that can be a bit bewildering, when drilling down deeper into the shop manual (nod your head "yes"...) the published numbers in the specifications section for both mechanical and vacuum advance are listed in distributor degrees, not crankshaft degrees. The distributor was intended to be setup and adjusted on a distributor machine by Ford, and the distributor turns at half speed relative to the crankshaft. Therefore any given timing advance specs in the shop manual for a particular RPM or vacuum level will be exactly double at the crankshaft. SO, what you want to do as a practical matter is give your particular engine what it wants for your particular location and fuel quality, elevation, compression. 34° to 36° mechanical advance timing would be a good place to start. Most every OHV engine ever made will be happy somewhere in there on pump gas. Sometimes a bit more. Extending the timing marks out to 50° BTDC using timing taps will help you when using a timing light. So will the flourescent colored numbers. The rate of timing advance, how fast, or "when" the advance is coming in at a given RPM also very important to check. A short test drive or three with the vacuum advance disconnected will be very helpful sorting this out. This can get tedious, but there is no other way short of a distributor machine. What you want to measure is the mechanical advance at higher RPM. Most people like to set the initial timing to somewhere a bit north of 10 degrees. Different internal reluctor slots and spring stiffness combinations were offered for different engine applications. What the DIYer has to be careful of is checking the mechanical advance at 2000, 3000 RPM and beyond. One reason is because the factory distributor or internals intended or included may have been replaced after these many years and may not be suitable for vehicle weight and other factors. It's also very important to check that it is operating smoothly without sticking up and down the RPM range and returns to the same base timing. The initial timing (in one sense) doesn't really matter too much, so long as there is no starter kickback. It is more important that the advance on the far end, at high RPM and cruise is suitable. The factory stock distributor in my Truck wasn't done advancing till north of 4000 RPM, they used VERY stiff springs and a "lazy" advance curve. Your T-Bird advance curve will be much different than a truck. This is one issue with remanufactured distributors - the rebuilders may have included the wrong advance curve mechanicals. These adjustments have a huge effect on how the engine performs. Once you get the mechanical distributor timing curve sorted out to your liking, then the vacuum advance should be re-connected and the canister itself adjusted for the correct timing advance particularly under very lightly loaded steady cruise conditions. This is difficult or at least confusing for the DIYer to measure. Because there is no load at all on an engine in neutral, there are consequently very high ignition timing numbers observed on the balancer with the vacuum advance connected. Even the actual advance on paper might seem to be "too much". The engineers didn't seem to think so, typically at steady highway cruise on flat ground about 50° BTDC is right in there, maybe more! The ignition advance at idle makes little to no difference anywhere else in the "curve". If you understand how the two systems work together you will understand why this is so. Optimum timing here actually allows the engine to run much cooler esp. in stop and go driving. As it turns out a sharp engine tune contributes to elevated levels of NOX emissions, something that the engineers had to address when federal pollution emission standards were mandated. This adds even yet another layer of confusion to a widely misunderstood topic!
Ted, I have to say your explanation of distributor timing is the best I have ever heard or read. After all my years of working with old cars, I never truly understood the function of vacumn advance. I'm sure I am not alone in this. Thanks for this great info!!
|
|
By Tedster - 4 Years Ago
|
Thanks for the kind words! When I got my truck pretty much everything was roached, distributor included. For starters it was stabbed 180° out, the crank balancer ring slipped about 25° off axis. This made checking the ignition timing confusing. The distributor was so worn out mechanically the dwell would never measure even close twice in a row. This, and many other defects, forced me to learn how to do all that stuff that I thought I had already paid somebody else to do. An expensive lesson. The spark plugs were dripping black, as if freshly coated Krylon.
It's only taken 20 years - I'm startin' to sneak up on a pretty good tune up! ha ha
|
|
By Sandbird - 4 Years Ago
|
|
You stated in a post you had a stock holley for a 57 tbird. If your engine is a Tbird it needs to be mentioned that if the balance ring on the crank shaft pulley has slipped the timing marks are on the pulley, which is riveted to the keyed hub of the balancer, are still accurate. Also the timing pointer is different on a bird than a that of a car. They both will bolt on but the one meant for a car will give wrong reading. Unfortunately the tbird setup only has a few marks .
|
|
By ac289ace - 4 Years Ago
|
Thanks all and it is now running great. Full disclosure, I had to call in help as I was going in circles.
The primary problem ended up being the carb and I caused other problems trying to compensate for that. Even though the carb worked fine on my old, tired 312, there were leaks around the throttle shaft that caused me to raise the idle to get the new engine to run and that caused the mechanical advance to kick in so the timing was way off. We were able to get it barely running with the Holley 1273 ( original 390cfm Tbird carb), but it still didn't run very well so I threw a spare Holley 8007 (also 390 cfm) on it and it runs great now. I had put the 8007 on earlier while trying to get it to run, but it ran very poorly so initially didn't think it was a carb problem.
I am going to send the carb off for a complete rebuild/refurb and I am considering the Holley Custom Speed Shop or Daytona Carburetors. Does anyone have any experience on these 2, or can recommend someone else that can do a good job on the 1273? I am not looking for a restoration, just a good, solid rebuild.
|
|