|
By Florida_Phil - 7 Years Ago
|
I recently installed a new gas tank in my 1955 TBird. The tank went in without a hassle. I ordered a new fuel gauge sending unit from Macs and they sent me a universal sender from Dennis Carpenter. I followed the instructions and can't get the fuel gauge to read correctly. The arm with the float on it hangs up. I took it out and the pressure required to move the float up and down is substantial. I am under the impression that the float arm should fall with gravity alone? My car is a 55 that has been converted to 12 volts. This unit is suppose to work with either 6 or 12 volt systems. Anyone else have this problem?
|
|
By Dobie - 7 Years Ago
|
|
The arm is supposed to drop freely with gravity. Can you see where it's hanging up?
|
|
By oldcarmark - 7 Years Ago
|
Florida_Phil (1/4/2019)
I recently installed a new gas tank in my 1955 TBird. The tank went in without a hassle. I ordered a new fuel gauge sending unit from Macs and they sent me a universal sender from Dennis Carpenter. I followed the instructions and can't get the fuel gauge to read correctly. The arm with the float on it hangs up. I took it out and the pressure required to move the float up and down is substantial. I am under the impression that the float arm should fall with gravity alone? My car is a 55 that has been converted to 12 volts. This unit is suppose to work with either 6 or 12 volt systems. Anyone else have this problem?
What was wrong with the Original? You are always better to use the Ford Sender. I don't hear much good about the replacements. There's a Company that can repair the Original if its not working properly. The Carpenter Ones and most others are made U know where.
|
|
By Gene Purser - 7 Years Ago
|
|
It won't read correctly if it doesn't hang up. The reproduction units work on resistance, where the originals work on bi-metallic strips and points. I have a reproduction on my '55 Victoria. From my experience you can only get them read accurately on one part of the scale. I chose for it to tell me when the tank is about empty.
|
|
By Florida_Phil - 7 Years Ago
|
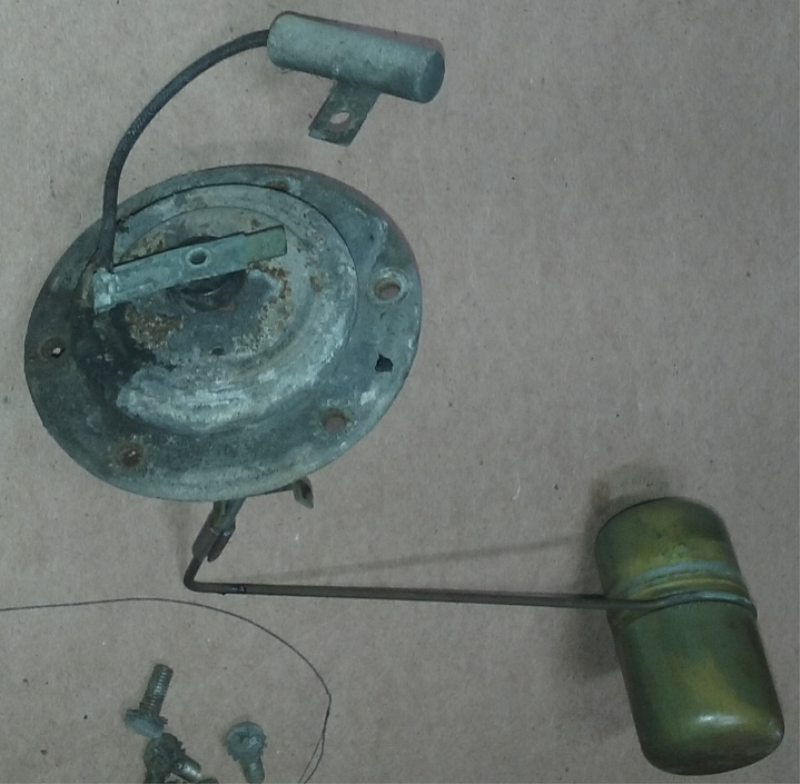
I spent some time looking at the replacement sender and it looks like it has an open rheostat with a little board and a pointer that wipes across it. The friction of the pointer on the board is such that it won't fall under the weight of the float. The original sender works completely different, but it's broken. I'm going to mark this part up as junk and try to find an original unit. Don't buy one of these.
|
|
By oldcarmark - 7 Years Ago
|
|
Some of the Aftermarket Ones don't even have the right Resistance Values. Nothing beats OEM. I assume You have a resistor or step down device to run your Gauges on 12 Volts?
|
|
By KULTULZ - 7 Years Ago
|
|
I followed the instructions and can't get the fuel gauge to read correctly.
The first thing to be done (IMO) is to call them and describe the problem. If they will foot the bill for return, send it back.
They will continue to sell crap until all let them know it's crap. If you just simply can it, they will keep pushing it.
|
|
By Rusty_S85 - 7 Years Ago
|
If you want to try and source a OEM one, all cars and thunderbirds included used the same sending unit, the 12V one for 1956 is #B6A-927-A. For 1955 with a 6V sender if you are using a 6V sender still its #B5A-9275-A.
I checked ebay for both numbers it only shows the new ones not NOS units.
|
|
By oldcarmark - 7 Years Ago
|
|
B5A-9275-B which is for Wagon can also be used by switching float Arm from Original Unit. Even harder to find than the proper "A" Unit though.
|
|
By Rusty_S85 - 7 Years Ago
|
oldcarmark (1/4/2019)
B5A-9275-B which is for Wagon can also be used by switching float Arm from Original Unit. Even harder to find than the proper "A" Unit though.
Yep. That's why I don't know what he did, I know he has a 55 but if hes not running a voltage reducer to his gauge cluster after converting to 12 volts then he might be running a 56 gauge set which means he can run the 56 12 volt sender. If hes running the voltage reducer on his cluster then he really should get the 55 6 volt sender.
|
|
By Tedster - 7 Years Ago
|
|
Pshaw!! If a graduated stick was good enough for Henry, why, it oughtta be good enough for you.
|
|
By Rusty_S85 - 7 Years Ago
|
|
lol nothing says fun times like running out of gas in the middle of no where cause you forgot to check your fuel stick.
|
|
By Florida_Phil - 7 Years Ago
|
My car was converted to 12 volts before I bought it, so I'm not sure that gauge I have. It's most likely the 6 volt unit. The former owner was running 12 volts with a positive ground. I switched the battery cables and all has worked for a year so far. The gas tank repro sender is erratic. It sticks on full. After a while it shows correctly. For now, I'll keep the tank full. The car runs so much better with a new gas tank. Rust dust was getting by the filter and into the carb.
|
|
By oldcarmark - 7 Years Ago
|
|
To run 6 Volt Gauges- Fuel + Temp there should be a small voltage Device on backside of Dash. Steps down voltage from 12 to 6. The only Year that Ford used 12 Volts on Gauges was 1956. All other 12 Volt Systems use reduced 6 Volts for Gauges..
|
|
By Florida_Phil - 7 Years Ago
|
I filled my TBird this morning and the gas gauge went beyond full. I believe the new sender has a different oms range than the original. I noticed my original sender had a resistor in line with the ground. I am going to check the range of my old sender and compare it with the replacement. I may need to install a resistor to make it work right.
|
|
By oldcarmark - 7 Years Ago
|
|
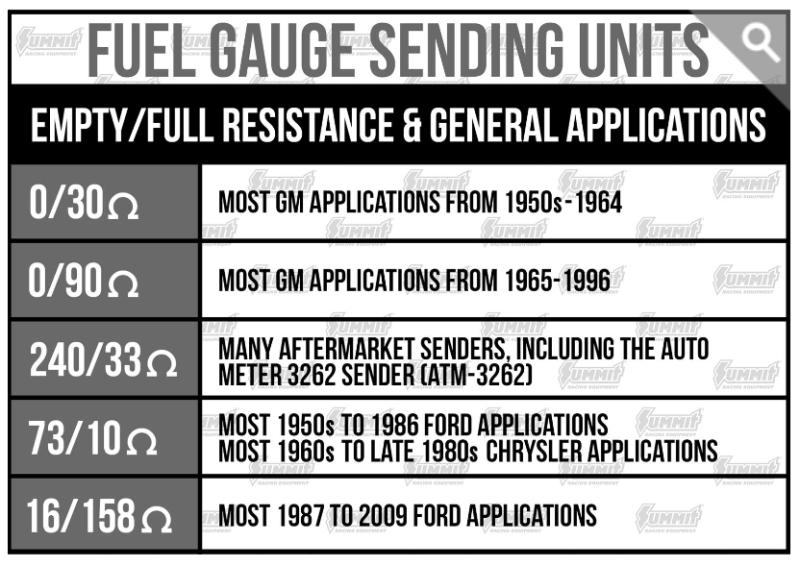
The biggest Problem with these replacement Senders is the Ohm Range is wrong. The Ford Senders are 73-10 Ohm Range. Using a Multi Meter set to Ohms connect the Red Lead to center Post of Sender and Black lead to the outer body where it screws to Tank ( ground). Moving the Float Arm from lowest Point to highest Point should read between 75-10 Ohms. Full to empty. You can do this out of the Car. Bench Test. If the Ohm reading is not close to Specs it won't work no matter what You do. The "Resistor" you mentioned is actually likely a Condensor. I forget why they were installed but I have heard of these before but not shown on Illustration in Parts Book. Kultulz will probably know about these Condensors. If You do a Google Search relating to Ford Sending Units there's lots of Information out there. Too bad U can't repair Your Original or find even a good used Original. On my 56 the Gas Gauge was erratic. I opened up the little Cover in Trunk which should have given Me access to Sender. Wasn't there! Someone put a 55 Tank in which Places Sender further forward under the Trunk Floor.If I want to access it I have to drop Tank. if I was at that Point I would replace the Tank with correct One.. I asssume the Sender in mine is a 56 but because its not positioned where it should be on the Tank it doesn't read correctly. There's a lot of complaints on the Internet regarding these Aftermarket Senders not working as Advertised. By the way the 55 T-Bird Sender is the same as the 55 Ford Passenger Car Sender. Might help U find a new proper Replacement or a good used One. Maybe Carl has a good used One.
|
|
By Dobie - 7 Years Ago
|
Bob's Speedometer Service says they can repair King Seely senders and guages.
https://www.bobsspeedometer.com/1/120/services.asp
|
|
By oldcarmark - 7 Years Ago
|
|
I just checked Hill's Thunderbird Shop. They do top Quality Restorations and sell Parts also. They have a new replacement Sender for 55 $57.95. 56 $57.95. They also have a replacement Set with Dash Gauge and Sender $149,95.They have those in 6 or 12 Volt. The 55 or 56 Sender should also work in 55 and 56 Passenger Cars. I would trust these Guys a lot more than any of the other Aftermarket Parts Sellers. They use in the Shop what they sell Online.
|
|
By DryLakesRacer - 7 Years Ago
|
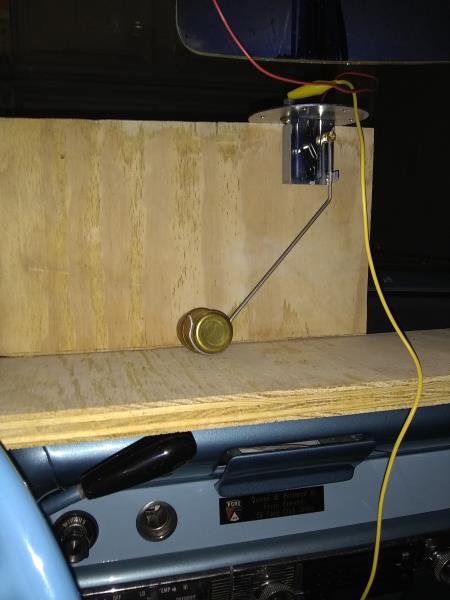
I had trouble with my 56 Victoria. After playing with it a while I came up with mounting the sender on a 2 x 4 in the trunk sitting on it edge. I turned on my accessory key and started watching the gauge as I moved the float arm in an arc. Be patient as it reacts very slowly. Before I started I measured the tank depth and set the float low enough where It would be sitting on the bottom which to me would mean buy some gas. It was about 1/2 tank as I remember.
I found to get the gauge to read empty in needed to shorten the arm so I started bending in "Z's" until it did, I then slowly moved it up to where I thought the float would be floating on about 1/2 tank than also where to float would be pushed up against the top of the tank hoping for a full reading. After a lot of bending the arm and multiple tests I got it "close enough"
I doesn't move off full for 50-75 miles or so, 1/2 is 1/2 and takes about 8 gallons. Right between 1/4 and empty it takes 13 gallons so that's where I left it. I had the sender out at least 4 times.. Mine gets about 10 mph with all in town driving and I'm OK with it. I have gone 150 miles but normally not.
|
|
By KULTULZ - 7 Years Ago
|
Regarding BOB' SPEEDO, read this page- https://www.bobsspeedometer.com/1/120/news.asp?artID=43858
|
|
By Dobie - 7 Years Ago
|
And this:
https://www.bobsspeedometer.com/1/120/retrofit.asp
|
|
By Florida_Phil - 7 Years Ago
|
After working with the repro sender, I have determined it will not work with the gauge I have in my dash. My car was converted to 12 volts before I got it and I have no idea what has been done to it. The right thing to do is to replace both the dash gauge and the sender as a unit. I would advise anyone who is thinking about buying a repro sender to do the same. It looks like Casco has the right parts. For now, I'm keeping my tank full.
|
|
By kevink1955 - 7 Years Ago
|
Yea, it looks like Casco has a new Gauge and Sending Unit designed to work together for the T Bird in fact they warn not to mix original parts with the new as they are not compatible.
Wish they had a solution for my 56 Fairlane that is a 1 year orphan as far as gauges go. I am going to pull the sender and see if it's reparable
|
|
By Brent - 7 Years Ago
|
I tested the sending unit I just purchased from Hill's, a # 9275-B Fuel Sending Unit with Gasket 12V 56. My meter indicates 182-37 Ohms and jumps around through the cycle. I found this sending unit, it gets great reviews at summit. "Tanks Inc 556FS"

|
|
By oldcarmark - 7 Years Ago
|
Brent (1/11/2019)
I tested the sending unit I just purchased from Hill's, a # 9275-B Fuel Sending Unit with Gasket 12V 56. My meter indicates 182-37 Ohms and jumps around through the cycle. I found this sending unit, it gets great reviews at summit. "Tanks Inc 556FS"
It should 73-10 as shown on chart. That is the correct Ohm Rating for a Sending Unit to work with Original Dash Unit. Maybe the One You got is Defective?
|
|
By BamaBob - 7 Years Ago
|
|
Exactly how do you test the ohm rating of the fuel sender? What do you touch the probes (+ and - ) to on the sender? Thanks for your help and advice.
|
|
By bergmanj - 7 Years Ago
|
The King-Seeley system does not work on "resistance"!!!! The shop manual has a good basic description of its workings.
It works on a system of heating elements and bi-metal-springed points affected either by pressure [in the case of the fuel sender], or heat [in the case of the engine temperature gauge system.
You MAY be able to get a correct range of resistance on an aftermarket sending unit by "fudging" around; however, you can't just measure the sender or gauge resistance and expect to "match" it; it's an entirely different operating principle. To do that, use a variable power resistor of a range from about 20 ohms to about 500 ohms (or some select individual power resistors in that same range), set it at it's maximum resistance range, and insert into circuit IN PLACE OF the sending unit, then carefully and very slowly (over several minutes of time - the gauge is very slow acting) start to reduce the resistance 'till you just notice the gauge coming off of "empty"; then take the resistor out of circuit and measure the resistance: That will be your "high" range end of resistance needed. Re-insert the resistance into the circuit and, again, very slowly start reducing it's resistance until you just "hit" the "full" gauge mark; then re-measure the resistance of the variable resistor: That will be your "low" range end of resistance needed. [You could also try this at "mid" range just to get some idea of your "system's" non-linearity, if you want.] Now you can try to locate an aftermarket "resistance" sender to meet your needs. EDIT: Please note that you need to ind an aftermarket sender that is at it's "high" end of resistance when the float is dropped for empty, and is at it's "low" end of resistance when the float is high for "full"; some senders might be "backwards" from what you need!!!
NEVER apply the full 6 or 12 V to the gauge directly: It will burn out in fairly quick order - this is why you start the resistance check at it's highest resistance!
I've adapted my '55 6V system to a 12 V conversion by using the original sender/gauge SYSTEM, measuring the TOTAL SYSTEM resistance (mine measured about 35 ohms), and adding an equivalent series power resistor in series with the sender/gauge circuit (I "hid" my resistor just under the fuel tank sender access plate in the trunk floor).
In a case like mine [using the original King-Seeley 6V system in a 12 V conversion - NOT the same as the 3rd paragraph above explains in detail for "aftermarket"], the MINIMUM power dissipation rating of the 12-to-6V dropping resistor MUST be figured by calculating the current draw using the circuit voltage-drop (6V -- to drop 12 V to 6 V) divided by the measured resistance (35 ohms in my case) to equal 0.171 Amps [171 mA]; then, taking the voltage drop (6 V) times the calculated current draw (0.171A) which calculates to 1.08 Watts. OR using the voltage drop squared [6*6=36] divided by the circuit resistance [35 ohms] gives essentially the same answer for minimum power dissipation [in watts].
Because of the "intermittent" (continually opening and closing) nature of the sender points in this King-Seeley system, a 1 Watt resistor is probably "adequate", though a two or 5 watt resistor might be more reliable over time for this specific application. You MUST calculate the above for YOUR system; I only used my system for my calculations as an example of how to do it; and, it may NOT fit your system. As usual: It's YOUR responsibility as to whether or not to try and use the above information for YOUR use.
I hope that this information is helpful to others.
Regards, JLB
|
|
By Brent - 7 Years Ago
|
|
Black to flange with bolt holes, red to post where wire connects.
|
|
By bergmanj - 7 Years Ago
|
Yup.
But, when measuring the original King-Seeley sender with a regular portable Digital Multi Meter, the "resistance" will not change with a change in fuel level - it does NOT work that way! See above.
Regards, JLB
|
|
By Brent - 7 Years Ago
|
JLB,
Here's the unit that I removed from my '55: I can find no markings and my meter measures no resistance, there is a capacitor (condenser) connected to the lead. Is this a King-Seeley unit?
|
|
By LordMrFord - 7 Years Ago
|
Hmmm... I have to do something about my sender too because my new tank got a new sender too.
What are 59 passenger car resistance values for stock sender?
The new sender might be 240-33ohms.
|
|
By Brent - 7 Years Ago
|
|
From what I have come to understand: The sender and gauge must be a match. My stock '55 Thunderbird gauge requires ? ohms, I'm still trying to figure out the stock King-Seeley unit. Found Tanks Inc. 5556 FS which says "Floating Ohm range can be used with original 1955-56 gauges," doesn't mention 6v or 12v requirement, it fits the early Ford 6 bolt pattern. Here's info from Hills catalog: Thunderbirds: 55 Fuel Gauge has 11-12 ohms resistance.56 has38-40 ohms resistance & 57 has 13-14 ohm resistance. Measured from Terminalto Terminal. I am considering adding an AutoMeter gauge which requires 240/33 Ω.
If I use this gauge: https://www.autometer.com/3-3-8-quad-gauge-designer-black.html I will use this sender: https://www.autometer.com/universal-fuel-level-sender-240-e-33-f.html with this adapter: https://www.autometer.com/fuel-level-sender-adapter.html
All in all: Thanks to this group no matter which way I go my gauge will work. THANKS!
|
|
By kevink1955 - 7 Years Ago
|
As I understand the King-Seeley, the sender is a contact and heater when the tank is full the contact spends more time closed than open and when the tank is empty the contact spends more time open than closed.
This open/close operation determines how much the heater in the dash gauge heats the Bi-metal spring that is connected to the gauge needle. When bimetal is hot the gauge reads full, when cold it reads empty. Thats why the gauge settles on E when the key is off (cold Bi-metal)
I guess a pure variable resistance sender could work if it allows the proper current flow at the right levels but I have not seen anyone claim they got 1 that actuality works
I am going to have to pull my sender over the winter cause it went from intermittent at times to mostly dead all the time.
It.s a weird setup but it worked well for years and as mine is a 1 year orphan (56 fairlane) I would like to fix it as there no NOS around
|
|
By Brent - 7 Years Ago
|
I'm posting this link because a "'56 Fairlane" owner gives this sender 5 stars. Tanks Inc. lists this for 55-56 Fords and makes mention of specific to these two years.
https://www.summitracing.com/parts/tnk-556fs
http://www.tanksinc.com/index.cfm/page/ptype=product/product_id=266/category_id=181/mode=prod/prd266.htm
|
|
By kevink1955 - 7 Years Ago
|
Brent
Thank you, I looked at the Summit reviews and it looks like 6 people out of 8 installed the sender and say it works so I ordered 1 and will post back ans do Summit feed back when I install it.
They do make a note that it is special and only works with 55 and 56 stock gauges so they seem to understand the difference
|
|
By Brent - 7 Years Ago
|
Please check the ohms if you can, I'm wondering if the sensor that I recently tested matches.
|
|
By kevink1955 - 7 Years Ago
|
Brent
Will ohm it out as soon as it gets here, Looks like a job for the old Simson 260. I will back up the readings with a Fluke digital
Will be a while before I get to install but I will try to wire it in and play for a while
Will report back
|
|
By LordMrFord - 7 Years Ago
|
LordMrFord (1/13/2019)
Hmmm... I have to do something about my sender too because my new tank got a new sender too. What are 59 passenger car resistance values for stock sender? The new sender might be 240-33ohms.
In theory, if I add 105ohm resistor in parallel with aftermarket sender unit, I get 73/25ohm sender and original is 73/10ohms
... in theory.
|
|
By bergmanj - 7 Years Ago
|
Brent,
Reply to your Pix posting: That looks to me as being an original as far as i can tell from the photos.
You should be reading some relatively low resistance between the mounting flange (make sure that it's shiny-clean where you attach the meter probe - oxidized/corroded tin or zinc plating [as original] is a good insulator and will not give good probe contact) and the gauge lead hookup (clean this also as corrosion here has the same insulating effect). This also points-out that a poor connection (loose, corroded, etc.) between the gauge lead and/or flange-to-tank, and/or tank-to-frame ground can cause all kinds of issues with these circuits. Any time that i re-do connections these days, I use an electrically-conductive anti-corrosion grease called "No-Ox" (or equivalent); this helps prevent future circuit issues.
If you still do not get some relatively low resistance reading (~10 -- 100 ohms????) and it reads "open" (infinite resistance), then the sender internals are likely "fried" (heating coil burned "open" and/or contact points corroded/"fried"), and the unit is unusable (you may as well open it up to see what's in there for your own curiosity if interested). I have opened-up the similar temperature sending unit, cleaned points, calibrated, and put back together - works fine; but, it's really "picky" and difficult to do.
Edit: That ? thing connected to the sender is a capacitor (condenser) used to quelch sender points electrical "noise" to help prevent interference with the original AM radio. It's not necessary for gauge operation, though. If you don't use an AM radio, you don't need it.
Good luck - I'd like to hear from your results, if any.
Regards, JLB
|
|
By bergmanj - 7 Years Ago
|
LordMrFord,
Your theory doesn't quite work the way that you think that it may - it's probably too complicated to go into here; but, don't expect your proposal to work correctly.
Regards, JLB
|
|
By LordMrFord - 7 Years Ago
|
bergmanj (1/14/2019)
LordMrFord, Your theory doesn't quite work the way that you think that it may - it's probably too complicated to go into here; but, don't expect your proposal to work correctly. Regards, JLB
I just used basic electrical formula.
Original sender had simple resistance wire and new one works same way.
It costs nothing to test.
I also got diy adjustable voltage converters for gas- and temp gauges so that might help too.
But yes, you might be right, usually my projects go south...
|
|
By BamaBob - 7 Years Ago
|
|
Does this mean that the same sender(556FS) will work equally well with the 1955 6-volt positive ground and the 1956 12-volt negative ground with no modifications of any sort? Just install it on either one right out of the box? I am referring to the post from Brent yesterday.
|
|
By Brent - 7 Years Ago
|
JLB,
I scoured and used electrical cleaner, now my meter is measuring resistance. the readings are jumping around sporadically, similar to the replacement I purchased from Hill's. Is this an example of "floating ohm range?"
|
|
By bergmanj - 7 Years Ago
|
Brent,
Something's still wrong: My best guess (by remote troubleshooting - which is never a great thing) is that you're still getting intermittent connections with your meter (still likely - can probably be corrected by solid screw connections between sender and meter leads); or, some internal connection is corroded/points burned. After all, these are many decades old and in a hostile environment both in and out of the gas tank. Seals and/or diaphragm may have deteriorated to the point of letting moisture/gasoline inside the electrical workings.
Try making solid meter to sender connections (screw/bolt them down tightly); then, try moving the float through its range and see whether the resistance stays relatively steady (which it should, + or - a few ohms); or, if the resistance measurement wanders/spikes around all over the place (a serious indication of corrosion/points burned).
If it still indicates problems, there's no loss in opening it up for curiosity's sake. I've only opened the engine temperature sensor and never have done the fuel sensor: If you can carefully open it up, you may be able to clean the points and see what else may be going on; and, put it back together - as a possibility. If you decide to do so, please take good pix and share them with us as to what you found.
If it tests "good" with solid connections; then, I'd advise going through every electrical connection in that circuit and clean/re-tighten each (and use some [minimal] "no-ox" on all screws/connections). The "no-ox" is good for the sender-to-tank mounting screws also: It will help slow-down/prevent future corrosion. I know that it's messy; but, it'll really help in the long-run; just keep "shop-rags" handy.
Good luck, JLB
|
|
By Florida_Phil - 7 Years Ago
|
I installed the matching fuel gauge and sending unit kit in my 55 Thunderbird today. It works on resistance. It still needs a little adjustment as it reads low. Better than running out of gas. The gauge moves around a bit when the car is moving. I'm pretty sure it did that when the car was new.
|
|
By kevink1955 - 7 Years Ago
|
Brent
I received the Summit fuel sender today https://www.summitracing.com/parts/tnk-556fs
A few quick notes first. I mounted it in a wood test mount so I could get more accurate readings than holding the thing in my hand and holding test probes while moving the float up and down. I also connected the Ohm Meter leads using ring terminals so intermitent connections would not skew the readings.
First test resulted in "0" ohms full and empty, Looking around the sender I found that the connection stud had a lump of solder that was touching the case. I found that loosing the jamb nut and rotating the stud it would clear the case (dont go to far or you will break the wire that the solder is attaching)
Now that I have repaired my brand new sender here are the results Full - 35 Ohms 1/2 - 131 Ohms Empty - 266 Ohms
Using the Digital meter the readings were very jumpy, The analog meter read smoother but did jump in certain spots around 1/2 tank. I am thinking that the resistance element may have some kind of oil on it that installation in a real gas tank would wash off and smooth out the operation.
If I get time over the weekend I am going to take it out to the car, remove the sender wire from the gauge and wire and ground the new sender out of the tank and see how it works on an actual gauge
Will report back
|
|
By Brent - 7 Years Ago
|
|
The specs are real close to the “aftermarket” sensors, 240/33Ω.I’m going to say, ‘when’ your new sensor works it’s going to present a whole new twist. Hmm…Thanks for the info!
|
|
By bergmanj - 7 Years Ago
|
Just really curious; any update?
Regards, JLB
|
|
By kevink1955 - 7 Years Ago
|
No updates yet, it was 11 degrees here most of the weekend, to cold to work in the garage. They are saying warmer at the end of the week, hope to get to it soon.
|
|
By bergmanj - 7 Years Ago
|
Thanks for the update.
Oh, come on - that's not cold - LOL: Your +11 o F temp. is in the tropics - we're going into -24 actual air temp coming Thurs. - Fri. And - years ago now - I actually replaced Y-block rings and main bearings outside in -35 air temp weather: Young family and no choice on the weekend to be ready for Monday's work schedule. Years later in early Feb. of 1996 got called-in to work at my electrical utility power plant for cold-weather problems on my scheduled day off - arrived to find actual recorded air temp. at -65 on our calibrated weather station at 08:30 CST - was "outside" work; now THAT was cold! "Official" recorded temp. for MN that day was -54 - the thermometer actually broke at the NWS measuring site, so could not measure "actual".
Still really looking forward to your information as to success of "new" fuel sender working with original gauge.
Regards, JLB
|
|
By kevink1955 - 7 Years Ago
|
Ok, your cold beats my cold LOL. I will try to get it done and report back. I want to fill the tank for winter storage ASAP but need to resolve the gauge problem first . If I go much longer I may as well let it go and take my chances with the 1/4 tank thats in it now. Will do my best to get it done.
|
|
By Tim Quinn - 7 Years Ago
|
Talk to Stuart at VINTAGE FORD PARTS. He is on ebay and might be able to help. I've found him very knowledgeable and helpful.
Tim in Florida
|
|
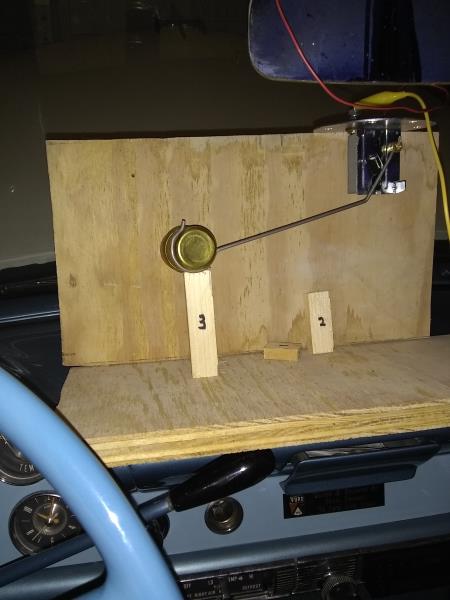
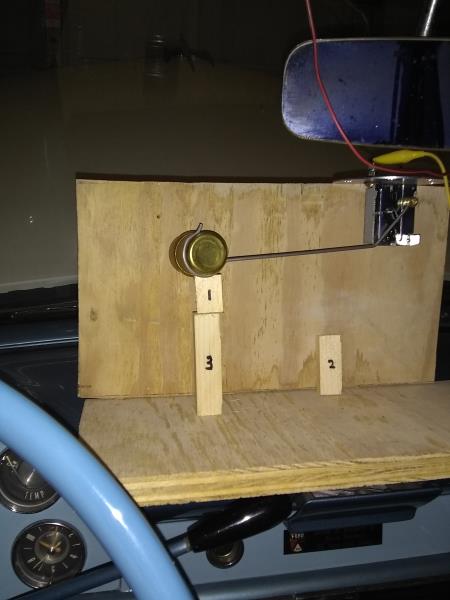
By kevink1955 - 7 Years Ago
|
Brent and anyone else interested in the Summit sender
I tested it in the car (56 Fairlane) out of the tank, I disconnected the factory sender from the harness and connected the sender to be tested via jumper wires. The results are hopeful as this being a good replacement while keeping the stock King Sealy gauge
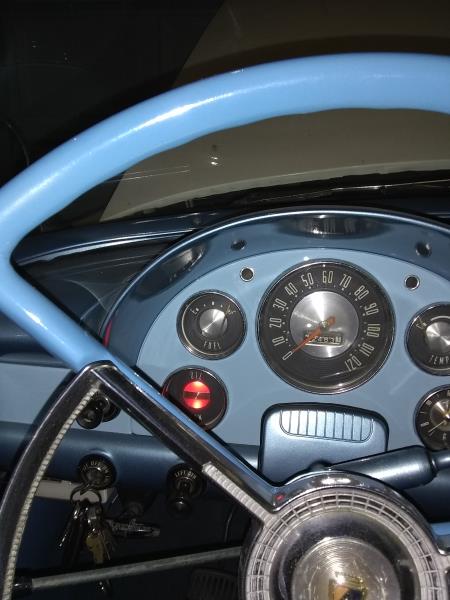
Photos of the Gauge and Sender at bottom stop, note gauge reads 1/8 tank while sender is at bottom stop. if you remove the wire the gauge will go past E so it needs more resistance than the sender provides.
Photos of the Gauge and Sender at 1 inch from bottom
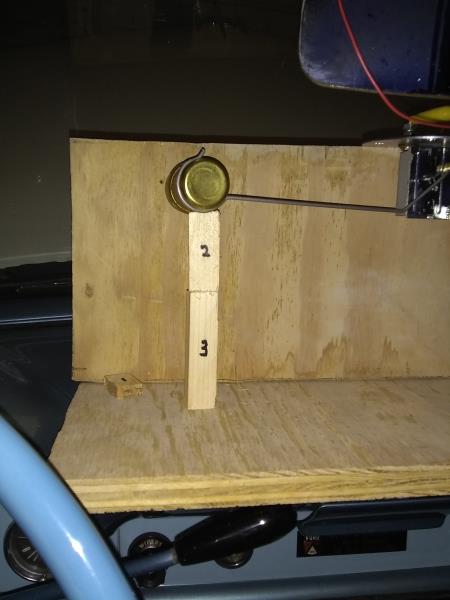
Photos of the Gauge and Sender at 2 inches from bottom stop
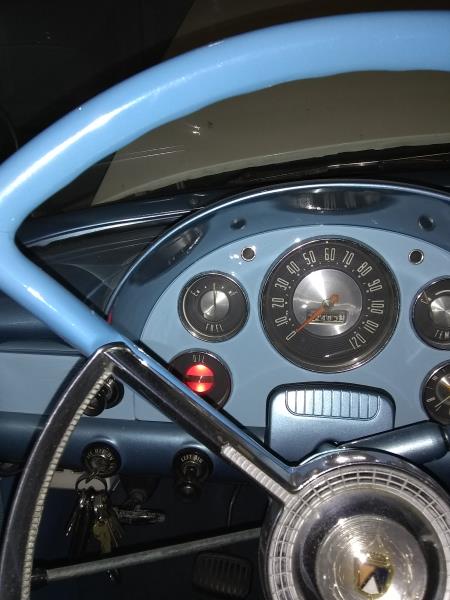 
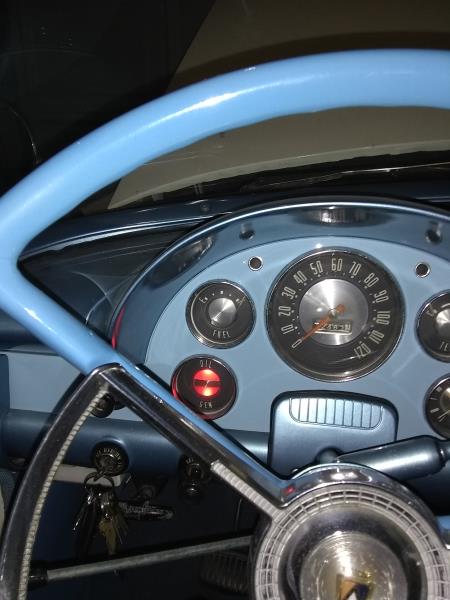
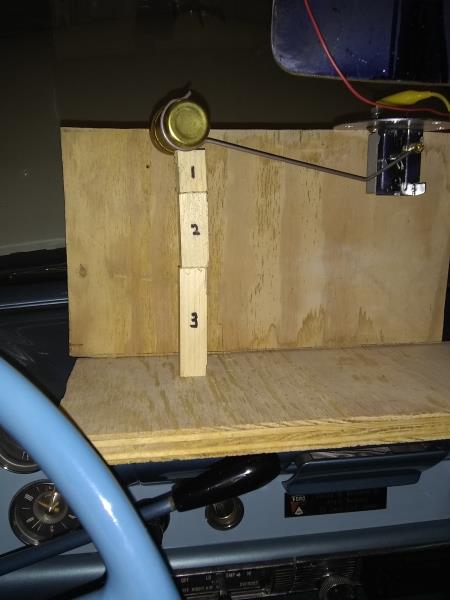
Photos of the Gauge and Sender at 3 inches from bottom stop
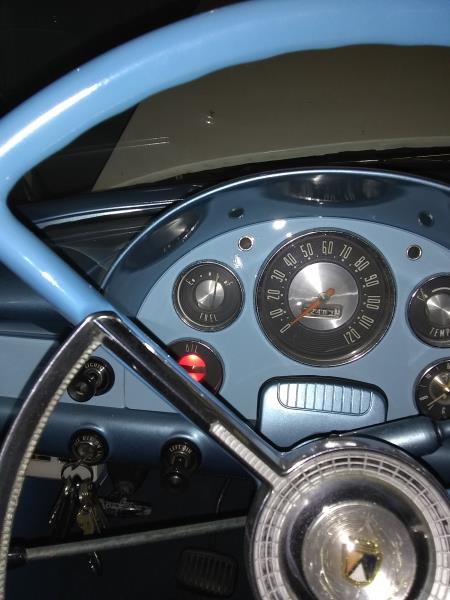 
Photos of the Gauge and Sender 4 inches from bottom stop
Photos of the Gauge and Sender at 5 inches from bottom stop
Photos of the Gauge and Sender at 6 inches, the top stop. I do not think the float can go that high in the tank as it would be above the top flange of the sender
In conclusion,I think this sender could be made to work with a small resistor in series to make the empty resistance more like 280 - to 290 ohms. the car harness and ground thru the chassis may add enough resistance to correct this, I was using short test leads to the back of the gauge.
Only other thing I want to test is what happens at higher battery voltage, I was testing with engine off and 12.10 volts. 13.8 running may raise the readings slightly as 56 has no instrument voltage regulator. Will see if I can run the same test with a battery charger on to raise the battery voltage tomorrow
|
|
By kevink1955 - 7 Years Ago
|
It appears tomorrow is not going to work out, I have been promised elsewhere so Itried a few more tests tonight.
first, with the battery charger on but still under 13 volts the gauge reads about a needle width higher than it did on just battery so it looks like at 13.8 (my regular charging voltage) the gauge is going to be inaccurate reading a little more than 1/8 above E when the sender is at the bottom of travel. I would rather it be inaccurate the other way and say E when you had 1/4 tank
Second, I tried putting 45 ohms in series with the sender wire, this made it read E when the float was at the bottom stop, Perfect right. not exactly. With the series resistor the gauge will only read 3/4 at the top stop. I guess this is because at E you have a 266 ohm sender + 45 ohm resistor = 311 ohms At full you have a 35 ohm sender + 45 ohm resistor = 80 ohms. Not a linear change in restance
I am going to play some more and see if I bent the bottom stop can the sender go past 266 ohms when empty, it would only need the wiper to go a little further on the wire wound resistor but I do not know if that extra length is there. I could then bend the float arm to calibrate further. I guess the worst that could happen is the wiper will go off the end of the resistor, that would be an open circuit and would put the gauge well past E just where it rests with the key off, just do not know if it will do that without damage to the sender Will report back soon
|
|
By bergmanj - 7 Years Ago
|
Hey, GREAT reporting! Should be most useful for sender replacements.
Another thing to consider: In my "playing" with sender/gauge calibrations in the past (fuel and/or temperature) I also had the gauges "out" to try and see what was "adjustable": both [King-Seeley] dash gauges on my 6V '55 had [rather crude] adjustments for "zero" and "span"; they "can" be re-adjusted to do some "correction". However, the "zero", in particular, is VERY sensitive - which might actually be to your benefit in indicating "Empty", if you want to consider that as part of the "system" adjustments for correct readings.
Hope this is also helpful.
Regards, JLB
|
|
By DryLakesRacer - 7 Years Ago
|
|
Kevink I did the same with my 56 but had to shorten the rod by bending a "Z" in it. Thanks for your photos...
|
|
By kevink1955 - 7 Years Ago
|
Bergmanj, The info in the adjustment of the gauge is very helpful as there is no way the sender can be adjusted to raise the 266 ohms at E to something higher.
I opened the sender and found the expected wire wound resistor and wiper that is connected to the float arm,
I also found that when the float is at the bottom stop the wiper is already off the wire wound part of the resistor and the 266 ohms is the resistor only as it is grounded at the end opposite the terminal so there is no way that any amount of rod bending or stop repositioning will change the E reading so adjustment of the gauge may be the only option.
It may take me a while to get around to removing the gauge, the car is in a very small garage and I cannot open the door all they and will never be able to positon myself under the dash so I can see what I am doing with out opening the door. Since I retired I lost the use of the shop and am now confined to working in the driveway.
I may also look at fixing the original King Seely sender as I have read it is fairly simple and most of the time just cleaning the contact points restores operation
If anyone has any other ideas please chime in, we all need support to keep these cars running. I think that collectively, this group knows more about Y Blocks and the vehicles they came in than the Dealership knew in the 50'S
Thanks Kevin
|
|
By bergmanj - 7 Years Ago
|
Thanks!
Yes, it sounds as if the gauge "zero" probably needs adjusting - my gauge "innards" were built pretty "flimsy"; so, if yours is the same, be very careful - it seems very easy to damage!
I've never had a fuel sender apart: Photos are GOOD.
Please keep us posted when you are able to get to it.
Regards, JLB
|
|
By Florida_Phil - 7 Years Ago
|
Great information. For those of you who have a TBird, the Casco gauge and sending unit kit works just fine. All I had to do was bend the wire a little on the sending unit.
|