|
By 62bigwindow - 9 Years Ago
|
|
Anyone running a Oregon 1475 cam? I was wondering what to set the initial timing at with this cam. I am thinking around 10-12°. But wanted to ask here first.
|
|
By Ted - 9 Years Ago
|
|
Do you have the specs handy for this cam?
|
|
By 62bigwindow - 9 Years Ago
|
This is what Tim had on the build sheet.
Lift .475 @ 1.43:1
Dur 280° (236° @ .50")
110° LSA
LC 106° Intake
114° Exhaust
|
|
By Oldmics - 9 Years Ago
|
This should be interesting.
Whats the rest of the parts going into this build? Such as pistons and machine work you plan or have had done?
Stick or automatic trans? You mention Tim - Is that Tim Mcmasters?
Oldmics
|
|
By 62bigwindow - 9 Years Ago
|
Yes Tim McMaster built the engine. I bought it off him 3 years ago for my stalled unibody project. I decided to pull the anemic 6 cyl and put it in my wagon. Been working on it since last September. I also rebuilt the complete front suspension and all new brakes with Versailles spindles and discs. Plus cleaned up the firewall and frame and painted them semi gloss black. Here is a copy of the build list he sent me.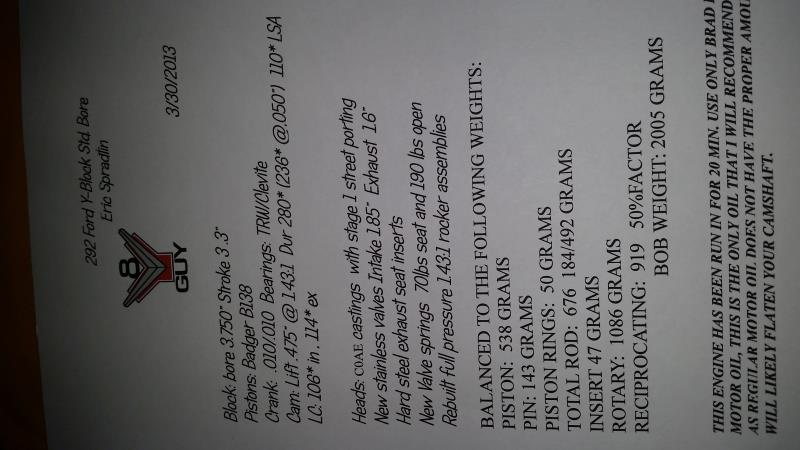
|
|
By RB - 9 Years Ago
|
That is a pretty big cam.. 10 to 12 may not be enough.. Probably take more like 16 to get it to idle well.. Just have your distributor set up so you don not get too much total advance from running a lot of initial advance
|
|
By Ted - 9 Years Ago
|
|
That camshaft is similar to the Crower Monarch camshaft I use in the 312 dyno mule for testing. The Crower camshaft is 238°@0.050” and is ground on 110° lobe centers. The initial timing with that camshaft is reasonably happy at 12° BTDC but I always insure that for most testing the timing is set at 38° for the total with the vacuum advance disconnected. Idle speed if on the high side can throw you a curve on the initial timing which is why I will use the total timing numbers to set the distributor.
|
|
By 62bigwindow - 9 Years Ago
|
|
I know how to set the initial timing. How do you set the total?
|
|
By RB - 9 Years Ago
|
Here are a couple articles that explain the process.. Your distributor could have a 10 13 or 15 degree arm in it.. If you shoot for 38 total advance and you have 16 degrees initial then you want 22 degrees of mechanical.. To achieve this you would want either the 10 degree arm or the 13 degree arm..The distributor arms are in distributor degrees so you double that to get crank degrees.. IE.. 10 arm = 20 crank degrees 13 arm = 26 crank degrees.. So if you were shooting for 38 total timing and you have the 13 arm you would need 12 initial advance. If you have the 10 arm you would need 18 initial.. I usually opt for the 10 degree arm for any engine with a cam bigger than 230@.050.. Cammed up motors idle a lot better with a lot of initial and less mechanical advance. Esp with low to modest compression.
http://www.bob2000.com/dist.htm
https://www.fordmuscle.com/archives/2000/03/timing/
|
|
By Ted - 9 Years Ago
|
Add this as an alternative to what Royce brings up.
First you’ll need the total timing mark (ie. 38°) on the damper. With the engine running and the vacuum advance unplugged, you’ll rev the engine up until the timing light indicates that the mechanical advance is fully engaged and will not advance any further. That will be the total timing. Depending upon how the springs are set up in the distributor, this could be anywhere between 2200 rpms and 4500 rpms. Once the mechanical advance is fully extended and with the engine holding steady at that rpm, simply move the distributor so the 38° mark is aligned with the pointer. Once the engine is brought back to idle, then the initial timing can be checked. If you don’t like where the initial timing is, then the ignition curve can be shortened or lengthened accordingly so that both ends of the ignition curve is happy. The vacuum advance can be hooked back up when you’re through.
One note here is that once the total timing is achieved, you may see the total timing start backing up if continuing to rev the engine beyond the point where the mechanical advance is fully in. This is the elasticity in the timing chain and at this point you are seeing camshaft retard taking place. Nothing to be concerned about but does reinforce the need to only take the engine rpms to the point of maximum mechanical advance and not running it well beyond that.
|
|
By 62bigwindow - 9 Years Ago
|
|
Thanks Royce and Ted. I take it you have timing tape on your balancers? Or does a stock balancer have a 38° mark on it?
|
|
By RB - 9 Years Ago
|
Once you confirm TDC on your damper you can use a tape.. or most dampers have marks from TDC to about 30 degrees. If you know you have 20 degrees of mechanical advance in your distributor, then by setting the initial at 18 using the marks on your damper, you should be at 38.. I have a timing light that will read advance and I use that to double check the results. If you install a timing tape it needs to be for the diameter of your damper. Otherwise the degree marks will be off..
|
|
By charliemccraney - 9 Years Ago
|
You can also paint the additional marks, using the spacing of the original marks as the template. I did that using a sewing needle dipped in paint. This will be a lot easier with the damper removed.
|
|
By 62bigwindow - 9 Years Ago
|
|
I wish I would have thought of that before I put the motor in Charlie. I ordered a set of tape from MSD that goes from 5.25 to 8" so it should cover my dampner. My timing also has a dial to adjust for different degrees. I'll have to pull my cap off to see what arm I have.
|
|
By Ted - 9 Years Ago
|
Before MSD started selling their own timing lights, their list of recommended timing lights to be used with their multi-spark ignition systems was quite short; that list did not include any of the popular “dial back” or adjustable advance timing lights. After trouble shooting several race cars that were repeatedly having engine trouble or simply not running right, those problems ended up being related directly back to ‘dial back’ timing lights. I’ve seen those ‘adjustable’ timing lights off as much as 6° when compared to standard fare timing lights. For whatever reason, when those lights are inaccurate, they are off in the direction of adding additional advance instead of the other way around. For many years I used the Penske timing lights but within the last few years, I am becoming more of a fan of those battery powered lights that simply have two ‘D’ cells. These particular timing lights work even on magneto systems or those systems that do not have easy access to 12 volts under the hood.
This is food for thought but if you’re looking for accuracy in the timing, then the timing light must be accurate. With many of the race engines being sensitive to ½° changes in ignition timing, then you can see where this is going.
As far as putting a new timing mark on the damper that does not read enough degrees, a little math will help you out there. Take the diameter of the location where the mark goes (damper ring in the case of most Y’s), multiply by pie (3.1416), divide by 360, and then multiply by the number of degrees you desire. A new mark would then be transcribed to the damper from the TDC mark based on that measurement. For a 6” damper ring, 38° would be a mark 1.990” from the original TDC mark.
|
|
By 62bigwindow - 9 Years Ago
|
|
Thanks Ted. I did a quick search on Ebay and there is a ton of the Penske lights on there cheap. I'll pick one of them up and compare to what I have. I don't want to keep chasing my tail on this.
|
|
By 62bigwindow - 8 Years Ago
|
|
Bringing this back from the dead. I'm going to change the factory MSD advance cure to more suit my driving style. Right now it has the heavy silver springs and the blue 21° bushing. I'm running 18° initial for a total of 39° at 4000 rpm. The motor starts and runs good with no pinging but I'd like to have everything all in around 3000 rpm. What combination of springs and bushing would you guys recommend? I'm thinking of either a red or silver bushing with 1 light silver and 1 blue spring.
|
|
By charliemccraney - 8 Years Ago
|
Here is a link to instructions for the MSD 8383
http://documents.msdperformance.com/8383.pdf
|
|
By 62bigwindow - 8 Years Ago
|
|
I have them. I was hoping to hear first hand experience. Thanks though.
|
|
By Joe-JDC - 8 Years Ago
|
|
I would only add that when unplugging the vacuum advance, to plug the vacuum source while doing your checks so the engine will not rev higher from the vacuum leak and confuse you. Joe-JDC
|